Have you intended to learn how to use a secure DNS on your Chromebook? Many users have been concerned over their Chromebook’s browsing security by not utilizing a neat ChromeOS feature that encrypts user search data. However, this guide is here to change precisely that.
We’ve pondered the question of Chromebooks being truly secure long and hard, and the answer ends with a blatant yes. These devices have never been hit with ransomware, which speaks volumes regarding their security. ChromeOS comprises various techniques that help it achieve its firm stature.
However, despite the efficiency of the Verified Boot or the sandboxed security system of the operating system, there’s still a way you can get spied on online. To ensure this does not turn out to be the case, you must use an alternate DNS connection far more secure than your existing one.
Let’s learn how to get that done without wasting another microsecond.
- Chrome Ready essential: How to check and clear your browsing history on Google Chrome.
What is secure DNS?
DNS is an acronym whose full form stretches to Domain Name System. The phenomenon is often referred to as the internet’s phonebook, mainly because it contains many IP addresses. Every website, including Chrome Ready, has a dedicated IP address.
Without DNS, we’d have to memorize the IP address of every website we’d like to visit, making things pretty inconvenient. Thanks to this technology, though, we have to use plain text and add a “.com” at the end to get the ball rolling.
However, as valuable and advantageous DNS truly is, it doesn’t come without its fair share of security concerns. Regular DNS settings aren’t precisely boasting military-grade protection, which a casual user would probably use. Ill-willed cybercriminals can tap into your browsing and figure out the patterns of your data searches.
Somewhere along those lines, it would become rather feasible for hackers to intercept your networking and potentially hack into your system. However, this is exactly where a secure DNS comes in—a relatively recent ChromeOS functionality enciphers your browsing data and adds a robust layer of security to your searches.
Therefore, users with secure DNS enabled will find it much more comfortable when navigating across the various stretches of the wide interweb. The best part is that you don’t need a master’s degree in Computer Science to toggle on the feature at hand and get started with secure browsing on the go.
The following section will illustrate how easy using a secure DNS on your Chromebook is.
- Do check out: Can Chromebooks get viruses? Are they secure?
Tweaking ChromeOS to use secure DNS
The ability to flip the switch and toggle a secure DNS on your Chromebook arrived with ChromeOS 83. At the time of writing, the latest stable release for the operating system is 103.0.5060.132, so you’re pretty much set if you have your device entirely up to date.
In case, you can look at our curated guide on updating a Chromebook for step-by-step instructions and subsequent results.
That said, let’s probe the matter further and talk about using secure DNS on ChromeOS. The following guidelines are going to take it from here.
1. Fire Google Chrome and open the browser’s “Settings.” You’ll do that through the “Customize and control Google Chrome” button, as shown in the screenshot below.

Customizing Google Chrome
2. Once done, a swath of options will appear on your end as a drop-down list. Here, look for the “Settings” button and click on it.
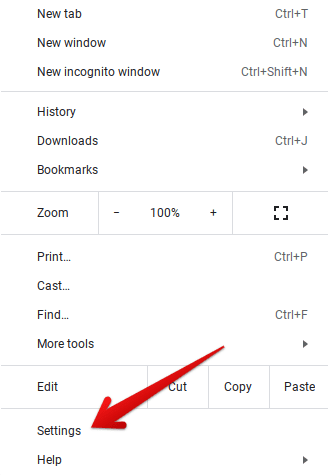
Clicking on Google Chrome’s “Settings”
3. Your browser’s main settings panel should open in a new tab. To continue, focus your attention on the panel on the left and click on “Privacy and security.”
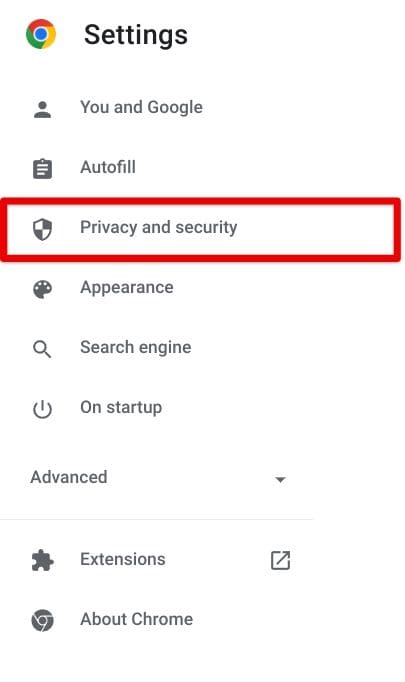
Clicking on “Privacy and security”
4. Clicking on “Privacy and security” will change your screen’s contents. You’ll have to scroll down from the center and look for an option called “Manage secure DNS in ChromeOS settings” under the “Advanced” tab.
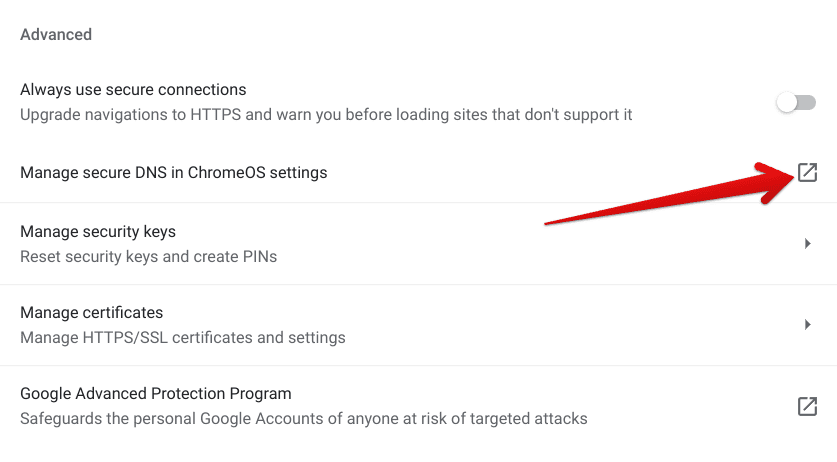
Managing secure DNS in ChromeOS settings
5. Completing the last step will open the native “Settings” system utility of your Chromebook. Here, you’ll be automatically redirected to the point of our interest. Under the “Use secure DNS” section, click on “With” followed by inputting “Cloudflare,” which is a high-quality, reliable Domain Name System.
Ensure that the prerequisite to this step, the “Use secure DNS” option, is enabled before you enter the instructions above.

Using Cloudflare as a secure DNS
That’s about it for knowing how to use a secure DNS on your Chromebook. Your new settings are bound to be saved on their own, so there is no need to take any extra measures.
However, you’re not entirely done yet. We have switched up the type of DNS used on the Chrome browser, which constitutes a substantial portion of your Chromebook’s functionality, but there’s more to that. Say you’re using a program outside the Chrome browser that needs to connect to the internet for its functioning.
That is when your Chromebook’s connected network will come in, presenting more of a general networking concern for the whole device than just Chrome. That is why it’s helpful to tweak the DNS setting of an individual network connected to the device. Let’s look at how you can accomplish this in a couple of easy steps.
Altering the DNS of an individual network on ChromeOS
Since we already got Cloudflare DNS to consolidate our ventures with the Chrome browser, let’s get the same database type for your Wi-Fi, metered network, or Ethernet connection. Continue reading from the following steps to continue.
1. Get started by opening the “Settings” system app.
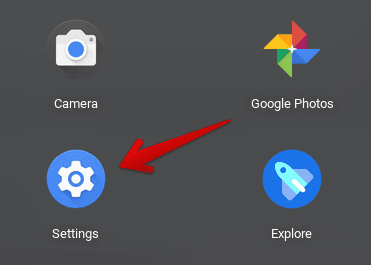
Opening “Settings”
2. Continue by clicking on “Network” on the side panel and following up by choosing your connection. In our case, we’ve hooked up our Chromebook with Wi-Fi, so we’ll act accordingly.
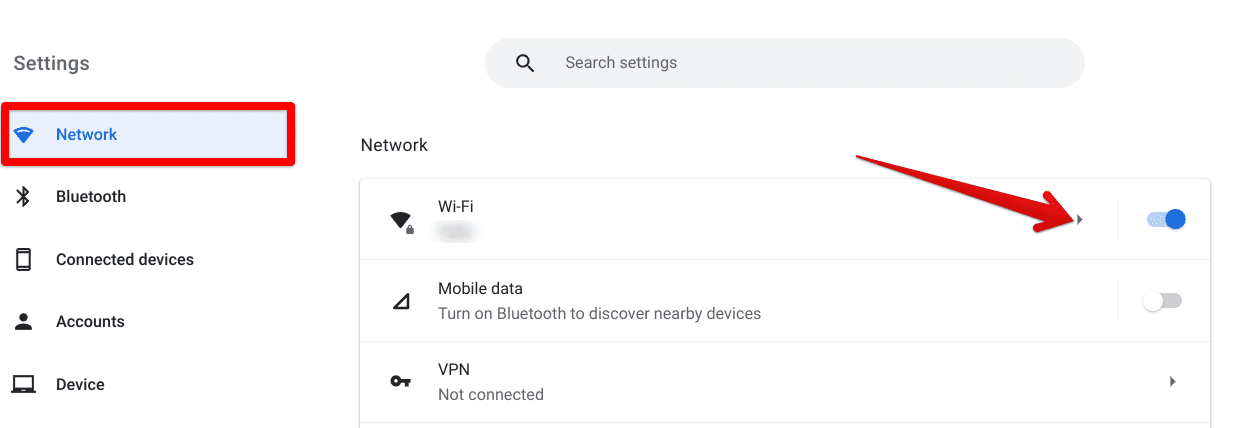
Selecting the connected network
3. After completing the last step, you’ll be shown a list of Wi-Fi connections the device is currently detecting. Move forward by clicking on your connected Wi-Fi network again, similar to how we’ve done it in the screenshot below.
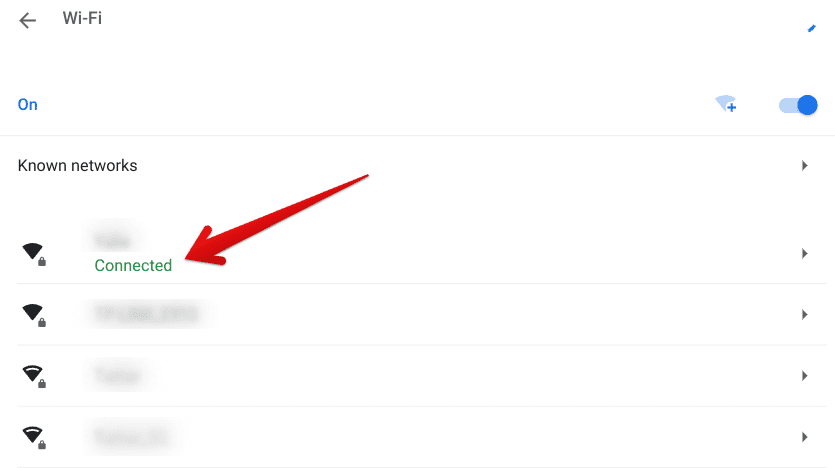
Opening the connected network’s settings
4. Here comes the final part. After completing the last step, click on the “Network” tab. Once done, scroll down and select “Custom name servers” under the “Name servers” section. Finally, put “1.0.0.1” and “1.1.1.1” in the first and second blanks, respectively. Leave the final two entries as they are.
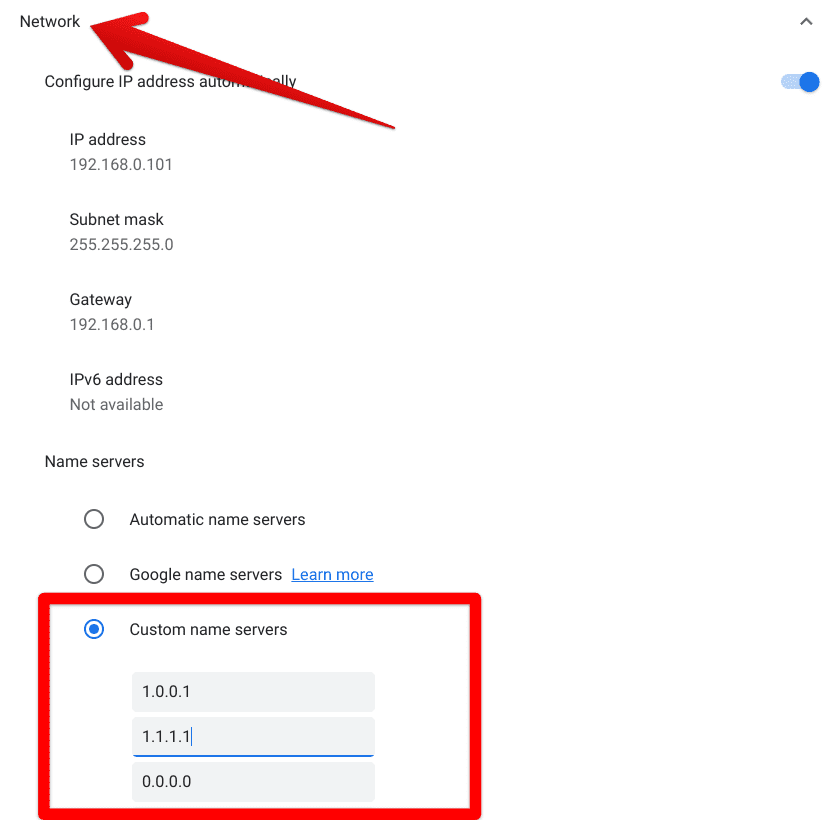
Changing the DNS of the connected network
You’ve successfully changed your connected network’s DNS servers for more secure functionality. We used the “1.0.0.1” and “1.1.1.1” servers because these belong to Cloudflare, and having such a secure DNS set up in tandem bodes exceptionally well for ChromeOS.
- Related read: How to maintain your Chromebook and extend its life.
Conclusion
While Chromebooks may not come across as fully decked-out and dripping from top to bottom with hard-and-fast tech specs, they are some of the most secure laptops on the planet. ChromeOS remains unhinged in the case of a virulent infection, mainly due to the swath of features it comes with.
For instance, the aforementioned Verified Boot functionality wipes the system clear of any danger, malicious content, and viruses whenever it starts up. All the magic happens during the device’s boot-up time, which is less than 10 seconds, so you can genuinely assess the efficiency level in this case.
That said, it’s still very much possible for other people to spy on you, especially when you’ve connected your Chromebook to an unprotected Wi-Fi network in your local coffee shop. In that case, making the best of the secure DNS feature in ChromeOS is nothing but an excellent choice.
- Before you go: How to monitor your Chromebook activity.
