To enjoy ChromeOS like never before, you must tap into its full potential. This guide will walk you through the top 25 tips and hacks to make the most of your Chromebook daily so you never have to look at another tutorial again. Keep reading until the end to discover how ChromeOS can be tuned to yield the most productive results.
The operating system at hand has evolved significantly from its initial release. The Chromebooks that come out today differ from how things used to go down a decade earlier. Google has made many strides in improving how its operating system plays out for millions of users across the board, and if you assess the condition of ChromeOS in 2022, it’s easy to see why.
With that said, let’s dive right into this guide with no further ado. You’ll leave here knowledgeable and well-equipped after absorbing all the 25 tips we’ve outlined.
25 of the best tips and tricks for your Chromebook
The following is our cherry-picked collection of tips and tricks to make your Chromebook stand out and be better than ever.
1. Keep your Chromebook up-to-date
Keeping your Chromebook up-to-date is one of the wisest tips in this master article. If you wish to keep your device working in full flight most of the time, don’t make short work of that prompt when the Chromebook tells you to pay attention to the update.
Updating the device occasionally sets you up to receive the latest software improvements, bug fixes, security patches, and other vital tweaks, without which survival can be difficult.
One of the significant benefits of using this operating system is that all updates occur in the background. You don’t have to update it, as ChromeOS automates the procedure. All you need to do on your end is a quick restart, and you will be ready. The latter is effortless, so you shouldn’t be too troubled by it.
The fault will be on you if there’s still a delay in completing ChromeOS updates, which is no less than the cornerstone of what makes your Chromebook run fast.
- If you’d like to learn how to get your device on the latest software version, check out our curated guide on updating your Chromebook.
2. Free up some RAM
The device’s internal storage is crucial for keeping the performance stable and swift. If there’s a lack of sufficient RAM on the device, it’s inevitable for the device to get dragged down. That way, you are bound to experience difficulty completing the most unchallenging of processes on ChromeOS.
In many cases, some applications or programs may even cease to launch because of internal storage insufficiency. Therefore, ensure you know how to find the RAM size on ChromeOS and acknowledge the clean-up process of unwanted files accordingly.
That is why we would like to refer you to our specialized guide on freeing up Chromebook RAM. We’ve discussed different ways you can always approach to keep your device working perfectly in the guide, so do give it a shot.
Using RAM-smart extensions like OneTab and The Great Suspender on top of clearing the Chrome browser’s cache from time to time is sure to keep your device running like new.
If you’re after a more detailed tutorial on how to do all that, don’t forget to check out the interlinked article. In the meantime, pay heed to the forthcoming subtitle. It is closely related to the point that we’ve made here.
3. Set up your Chromebook with cloud storage
Constituting one of the best unconventional ways of saving up storage space on ChromeOS, cloud-focused solutions have amassed their fair share of popularity in the age we live in today. A hefty portion of the networking world depends on cloud computing technology to get things done, and rightfully so.
The goal is to keep local data off your Chromebook so it never slows down or houses too much of a challenge for optimal functioning. Thankfully, there are plenty of high-quality options in this regard. If you’re curious to check out the best cloud storage options in the business, look at pCloud.
pCloud is very well established because it starts users by offering them 10 GB for free. From there on out, users can upgrade to higher subscription plans and enjoy the benefits afterward. If pCloud puts you off for some reason, feel free to check out some of the other top cloud-based storage offerings lined up for you.
Free your Chromebook from the shackles of your private data and send everything to secure, flexible platforms online. Doing so will ensure you get the most out of your Chromebook and not bog down the system due to heavy local downloads.
4. Clear the Chrome browser’s cache and data
Spending hours and hours on the internet will likely lead you to accumulate a lot of browsing history and cache over time. The latter, in particular, is flat-out temporary and loads web pages faster than your previous visits.
As time progresses, however, the cached data can get outdated and thereby cause inconsistencies with new information that gets updated on the website.
That is why you should occasionally erase the Google Chrome history and cache to keep your browsing working in full flight. The matter at hand can get pretty detailed, so we urge you to check out our complete guide on clearing the browsing history on Google Chrome for a step-by-step tutorial.
5. Give your Chromebook a new look
One of the first things you should try to make the most of your Chromebook is changing the wallpaper. Bid farewell to the age-old image that comprises your ChromeOS desktop and slap on something different for a change. Doing so will help keep things fresh.
Fortunately, Chromebooks do very well in providing users with a comprehensive variety of system-installed wallpapers. The affair is then made wholly effortless for one to apply new wallpaper to the Chromebook desktop. However, this is just about the main home screen of the device.
If you want to switch up the operating system’s style, use Google Chrome for the best results. The good news is that it’s pretty painless to modify the Chrome browser on ChromeOS. Pop open a new tab on the famed web crawler and tap on the “Customize this page” button in the lower-right corner of the screen.
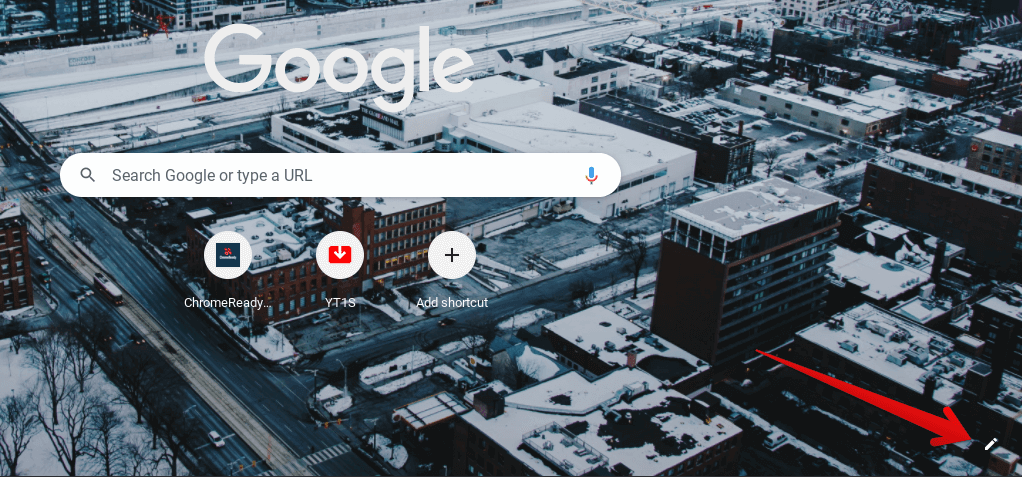
Customizing the Google Chrome browser
Once done, a small-scale window will appear on the screen, allowing you to personalize the home page and the overall theme of Google Chrome. Please check out our personalized article on giving ChromeOS a new look using these tweaks if you want to dumb things down.
6. Enable Linux and try the best Linux apps around
Chromebooks come with their very own Linux container. Simply put, this is fantastic news for ChromeOS. The feature at hand revamps the operating system’s functionality by leaps and bounds, making the device more robust than its previous stature.
It’s pretty easy to get Linux up and running on the device since a separate section is available for it right within the “Settings” portion. Continue to the “Developers” section of the “Settings” app to eventually find the option to enable Linux on your Chromebook. It’s as easy as that if we’re being frank.
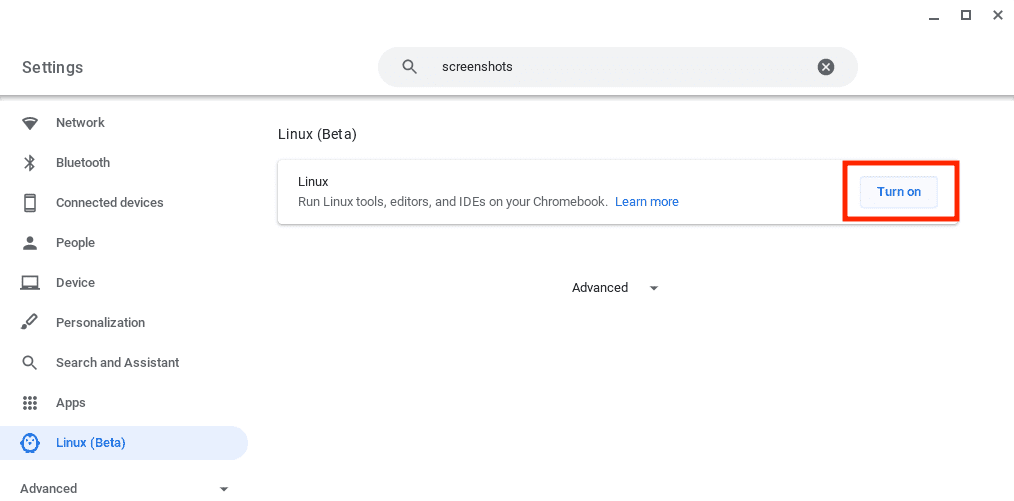
Enabling Linux on ChromeOS
As soon as you’re done, the next step is to enjoy the top 20 Linux apps available to install on ChromeOS. The most robust Linux software does no less than offer a great user experience. For instance, OpenShot Video Editor is a terrific video editing software that can compensate for the lack of Adobe Photoshop on Chromebooks. However, that, too, is officially making headway for the lightweight operating system.
7. Get an anti-malware program for ChromeOS
We’ve already gone long and hard over Chromebooks needing antivirus software, and the conclusion is pretty straightforward. Thanks to its brilliant security functioning, ChromeOS doesn’t require such a program.
To protect its framework, the operating system features tip-top functionality, such as Verified Boot. You can even take it from here that ChromeOS has never been hit with ransomware. Installing an antivirus program for the tiny percentage that dictates the chances of Chromebooks getting hit with some virus is still advisable.
We’re sure that the top 5 antivirus software for Chromebooks will help you make a robust decision for this purpose. After personal use and thorough research, Avast Antivirus on ChromeOS is an excellent choice. It has several extra features, including junk clear-up and cache removal, that are integral to your device’s functioning.
8. Download and play some fun Android games
Thanks to their integration with the Google Play Store, Chromebooks can be fun entertainment devices. Feel free to explore the famous Android marketplace for some high-quality games and apps. If you’re packing a specced-out machine like the Acer Chromebook Spin 713, you’ll have a blast experiencing the top 10 fun games to play on ChromeOS.
Some unique options include Genshin Impact and PUBG Mobile, which are high-ranking in their respective categories and deliver an excellent gaming experience on ChromeOS. Harness the power of your device’s hardware and relish a smooth gaming experience to make the most out of the Chromebook.
9. Try Nearby Share
Nearby Share was added to the arsenal of ChromeOS features in the 91st stable release of the operating system. It’s a feature that makes sharability fast, easy, and simple between friends, family, and co-workers.
The best way to get to Nearby Share on your Chromebook is through the Status Tray—the utilitarian menu can be found in the lower-right corner of the ChromeOS interface. You can also see the time, Wi-Fi icon, battery life, and other essential system components.
Clicking on it will reveal many options for you, and one of them will be Nearby Share. Click on it to proceed.
Clicking on the Nearby Share icon in the Status Tray
As soon as you click the relative button, you’ll be taken straight to the main menu of Nearby Share within the device’s “Settings” app. Upon arriving there, you’ll be notified that your Chromebook appears visible to other nearby devices. Therefore, Nearby Share on your device has been enabled now.
This is only half part of the whole process. We suggest checking out our guide on how to share files with devices using Nearby Share in ChromeOS for further instructions. For now, let’s check out the top tip in the guide.
10. Enable the Overview Button
You can enable a dedicated “Overview” button in the far right corner of your Chromebook’s shelf area. This will allow you to utilize the multitasking capability of Chrome OS, especially when you’re using several virtual desks at once.
However, the feature is a Chrome flag you must enable yourself. It doesn’t come pre-loaded at the moment for stability reasons. Type the following into the omnibox of the Chrome browser and press the “Enter” key.
chrome://flags#ash-overview-button

Enabling the “Overview” button for the status bar
After being taken straight to that specific flag, please enable it and restart the device to apply the changes. You’ll observe the “Overview” button perfectly positioned on your Chromebook shelf as soon as you’re done.

The “Overview” button alongside the Chrome OS status bar
11. Try out Calendar View
Calendar View isn’t enabled on Chrome OS by default. It’s still experimental, so you must tend to the accessibility-oriented feature. Fret not, though. Toggling it on is straightforward and painless and warrants a similar procedure as enabling the “Overview” button.
It adds an extra “date” section in the Status Tray area of the Chromebook’s shelf, making it painless to check out today’s date at a glance. Type the following into the address bar of your Chrome browser and enable the Calendar View functionality on the go.
chrome://flags#calendar-view

Enabling the Monthly Calendar View in ChromeOS
After enabling the experimental feature, you’ll restart the Chromebook to finalize the changes. As soon as the device boots back on, you’ll observe Calendar View in the bottom-right corner of the ChromeOS interface.
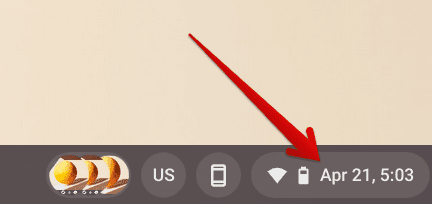
Calendar View in action
12. Get the best camera apps on ChromeOS
ChromeOS is better with the best camera apps in the business, so you can always capture stunning photos of yourself and everything around you whenever needed. Thankfully, specific picks like Adobe Lightroom, Cymera, and Line Camera can help you get started with spectacular photo-taking without breaking a sweat.
Find out all that you need to know about this matter in our top 10 camera apps for your Chromebook guide.
13. Adjust your cursor’s size
Notice the ChromeOS cursor? Its size can be changed at will. Different individuals have different preferences, so it’s worth checking out what cursor size suits you the best.
To switch up this setting, go into your Chromebook’s “Settings” app and head to the “Accessibility” section. Once you’re within the “Manage accessibility features” area, scroll down until you find the “Show large mouse cursor” area.
Click on the toggle beside it and adjust the size until you’ve found your preference. Check out the following screenshot for more information on the matter at hand.
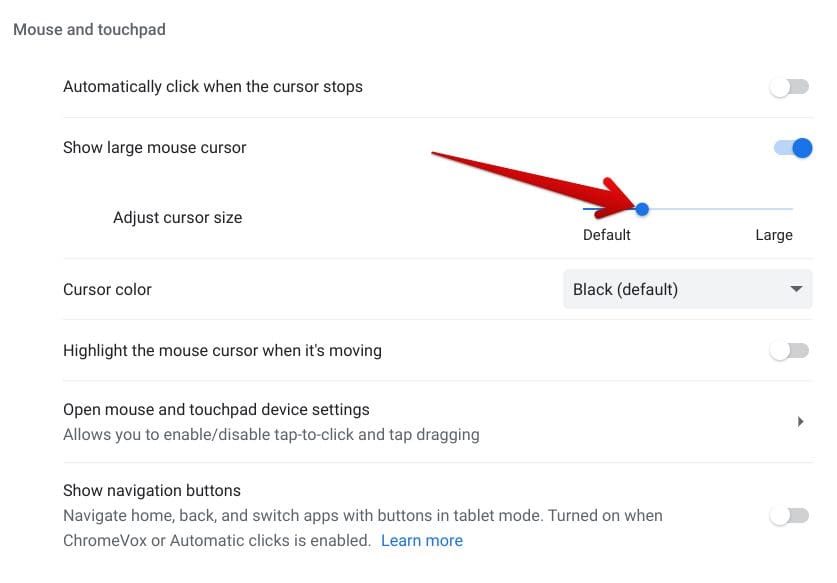
Adjusting the cursor size
14. Organize your virtual workspace
ChromeOS features virtual desks, not just any, but updated ones with high productivity levels. Swipe three fingers on your Chromebook’s trackpad, and the desktop will allow you to enter into the “Overview” mode. From there, check out the section on the top for a plus sign alongside “New desk.”
Click on it to add another desktop to your Chromebook. We advise you to make better use of all your desktops by renaming them. Click ” Desk ” below the small-scale screen to give your desktop another name. The rectangular icon in the screenshot below depicts where to click.

Adding another desktop
Check out our detailed guide on updated ChromeOS virtual desks for more helpful information.
15. Clear the Chrome browser’s cache
Clearing up the cache of the Chrome browser is essential to keep it running great. Over time, a ton of junk can accumulate in the Chrome browser and lead to drops in the overall performance, not to mention consistent crashing. It’s pretty simple to clear up the cache, browsing history, and other data on Google Chrome. Follow our specialized instructions on clearing cache and cookies on Google Chrome for the best results.
16. Try out the ChromeOS screenshot tool
The native screenshot tool provided to Chromebook users is a favorite over at Chrome Ready. It just makes life so much easier and negates the use of third-party screenshot tools, although you will need them for annotation purposes. Press the “Ctrl” and “Show Windows” keys together, and you’ll instantly snap a screenshot.
If you want more control, add another key to the mix—Shift—to enjoy more flexibility. We’ve dished out a complete guide on how to take a screenshot on a Chromebook, so do check that out if you want step-by-step instructions.
17. Switch up the shelf’s location
You no longer have to settle for the Chromebook shelf to one side of the desktop interface. Double-tap the ChromeOS home screen and hover over “Change self position.” Once done, select the direction where you want the shelf to be placed, and that will do it promptly.
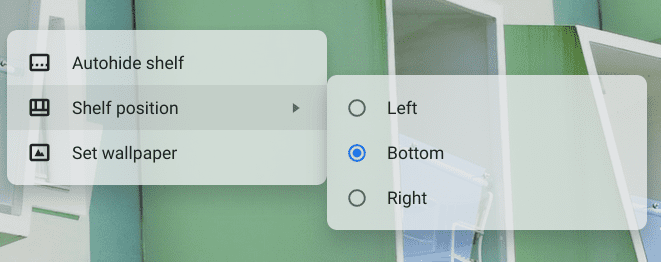
Changing the shelf position
18. Utilize your Chromebook’s Launcher
The Chromebook Launcher isn’t what it used to be anymore. Its functionality has expanded by leaps and bounds, and it can now answer simple questions for you. For example, the ChromeOS Launcher solves mathematical equations and tells you the weather.
Next time, don’t fire up the Chrome browser for other small-scale operations. Tap the “Search” button and type in your query for the Chromebook Launcher. You’re bound to receive favorable results that way.
19. Review the device’s specifications easily
There’s a neat trick that you can employ to discover your Chromebook’s specifications effortlessly. Please type the following into the address bar to pull up essential system diagnostic data; it is worth the effort for some of the most tech-savvy Chromebook users.
chrome://system
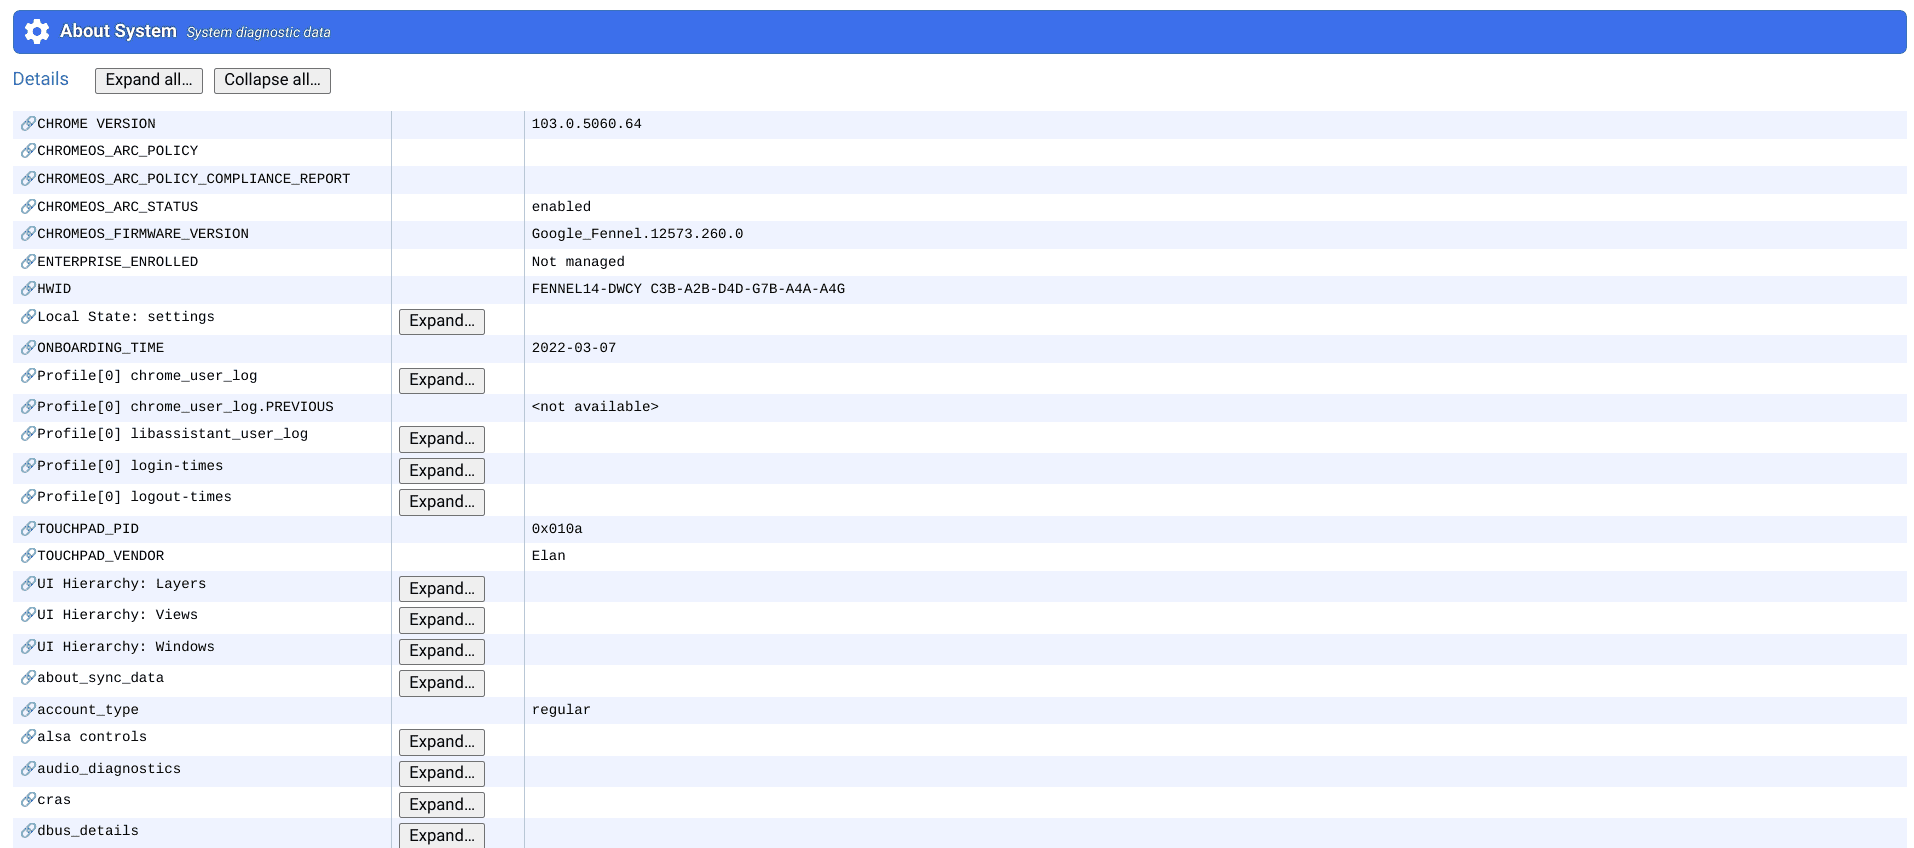
System diagnostic data
20. Instantly open a new tab with a trackpad gesture
One massive productivity boost that lets you get things done quicker is learning to open new tabs when hovering over links quickly. Spot an appropriate opening, but instead of double-tapping to select “Open link in a new tab,” tap on the link concurrently using three fingers, preferably using your index, middle, and ring finger.
That is bound to instantly open that link in a new tab, increasing your productivity.
21. Learn cursive writing

Cursive app on ChromeOS
The ChromeOS cursive application is becoming common in 2-in-1 Chromebooks with USI stylus compatibility. This innovative application makes it possible to write, draw, or jot down ideas creatively and, better yet, learn cursive writing.
We highly encourage letting your little one get into this domain for fruitful learning and exploring the realm of graphic designing and sketching. Check out how to do cursive writing on your Chromebook for more details.
22. Use keyboard shortcuts
Chromebook users can do well within the boundaries of their work or personal life online if they learn how to use their devices more efficiently. As it happens, this is all that keyboard shortcuts are about on ChromeOS, providing users with the speed and skill they require to conquer their work sessions daily.
Check out our detailed write-up on how to see keyboard shortcuts on a Chromebook for more information. A separate window appears on the desktop interface where all usable shortcuts are grouped in different categories. Check them out, and you’ll see how much of a boost you receive in your overall productivity.
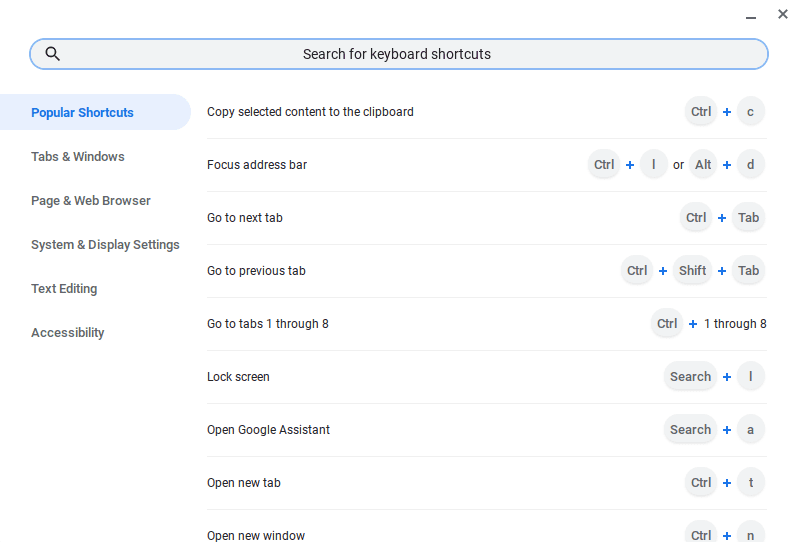
ChromeOS keyboard shortcuts
23. Try out the ChromeOS developer mode
We advise against employing the vast stretches of the ChromeOS developer mode, but if you’re genuinely trying to push your Chromebook to its limits, you must try it out at least once.
The developer mode offers distinct changes to the operating system as a whole, but strictly in the sense that you can install other operating systems on your Chromebook.
This includes Windows 10, 11, Ubuntu, GalliumOS, and CloudReady, which have seamlessly transitioned into ChromeOS Flex. If this piques your interest, try this experimental-grade feature out and let us know how it goes down in the comments section.
24. Turn on the Night Light for better readability
It’s worth turning on the Night Light feature if you use your Chromebook late at night for reading purposes or anything of the like. Click on the Status Tray area and tap “Night Light” to complete it.
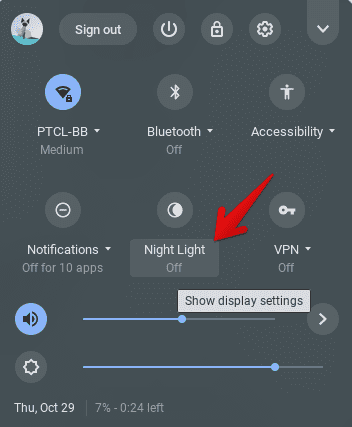
Turning on Night Light on ChromeOS
25. Know how to Powerwash the Chromebook
If your Chromebook starts giving you a ton of trouble, including error codes, bugs, and glitches, or you’re simply looking to clean up the device before selling it to someone, you must learn how to Powerwash your Chromebook. This essential trick of hard resetting the device is integral when it boils down to multiple scenarios, as you understand by now.
We’ve curated a complete guide on how to Powerwash your Chromebook to achieve the purpose. Please take a look at it for more information and step-by-step instructions. As for the gist of it, you have to venture into the “Settings” app of your Chromebook and make way to the “Reset settings” area, which falls under the “Advanced” portion itself.
When you’re there, click the “Powerwash” button, and the process will begin—no need to delve into anything other than following the on-screen instructions.

Performing a Powerwash
Conclusion
Chromebooks may seem simple, but these reasonably minimalistic devices can get pretty involved, provided you’re willing to go all in regarding exploration. There is an exhaustive array of ways to take ChromeOS from one level to the next, as we’ve shown you first-hand in this comprehensive guide. Implement all the outlined tips and hacks for the best results.
Our favorite trick is otherwise simple yet exceptionally effective. If you keep your Chromebook up to date, you’ll ensure that the device stays in its best possible version. Doing so forms the basis of all other hacks to come, so we cannot ignore this crucial step in any way whatsoever. Please let us know in the comments section what tip has become your go-to after reading the article.
As always, Chrome Ready wishes you good luck!
- Recommended read: How to maintain your Chromebook and extend its life.

1 comment
Great read! Thanks for sharing. I am interested in hearing the authors experience using the ChromeOS Developers mode.