Google Chrome is the world’s fastest browser that comes with its own set of features, functions, and various other user-oriented facets. Not only is it trendy, boasting about 5 billion downloads across all platforms, but it’s very much deserving of all the fame it has received over the years. Google likes to keep its front-running browser highly updated, so all the best features in the works come directly to the well-established internet surfer.
With that being said, however, not every piece of functionality that Google Chrome boasts is certain to be productive and valuable. In some cases, the browser comes across as more annoying than helpful, so we have to keep in check what functionality is beneficial for us and which one has to be toggled off promptly. For instance, some websites will often start sending you notifications that don’t matter to you.
In such scenarios, you should know how to turn off Google Chrome notifications for the better and resume your browsing swiftly. That is why we’ve decided to put together this guide to show aspiring users the exact method they can use to make browsing on Google Chrome and their respective devices much more seamless. So let’s jump right in without wasting any further time.
What are notifications in Google Chrome?
Notifications in Google Chrome have dedicated pop-ups that appear on the desktop of your device’s operating system. They are usually small in size, arising out of the specialized notification area or the status bar of the interface. Now, notifications are sent out by various websites that you visit when you’re using Google Chrome. This attempts to draw traffic toward the website by sending these notifications out.
In addition, notifications are meant to provide the latest updates on a site, so all its followers can stay up to speed with everything trendy across the niche that the website targets. While this Chrome feature certainly has its advantages, there’s no doubt that these pop-ups can often get annoying as well, especially when you didn’t sign up for them in the first place.
That is why one must know how to control these intrusive features. Your privacy can be risky if you allow too many websites to send notifications. Let’s talk about how you can avoid these occurrences and manage them at will, similar to Google Chrome extensions permissions.
The best ways to disable notifications in Google Chrome
It turns out that there are two different methods you can use to disable notifications in Google Chrome. Both of them are easy to follow through and result in successful results. Let’s take a close look at these methods so you can quickly learn how to turn off these pop-ups in Chrome on the fly.
Method 1. Disable browser-wide notifications
A quick and easy way to get rid of notifications in Google Chrome is to disable them browser-wide. No website can send you any notification after enabling a specific toggle in the Chrome browser. It will also apply to those sites whose notifications were personally enabled by you. The following steps will take it from here and guide you on how to do this painlessly.
1. The first step is to open the Chrome browser and access its “Settings” from the “Customize and control Google Chrome” button. This should be pretty easy to do. Check out the following screenshot to complete the step in question.
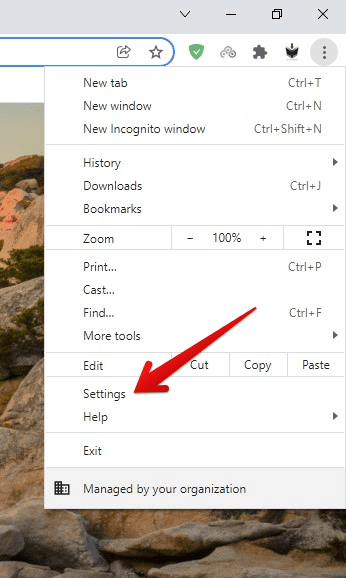
Google Chrome settings
2. After that, you will be taken to a new tab on the browser. Here, focus your attention on the panel on the left and click on “Privacy and security.”The following screenshot should clear things up for you.
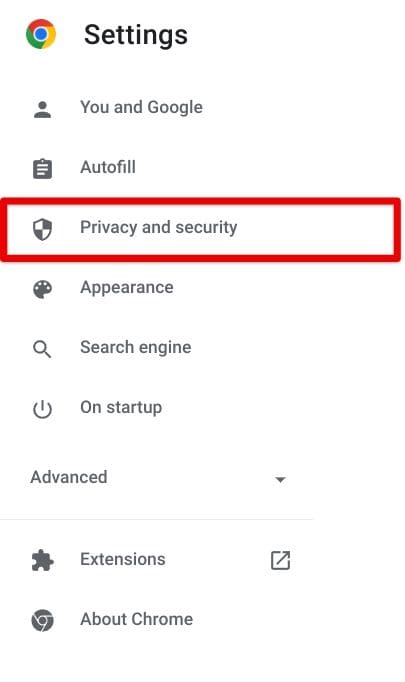
Clicking on “Privacy and security”
3. The next step is to click on “Site Settings” right after taking to a new section within your browser’s settings. This will help you proceed further.
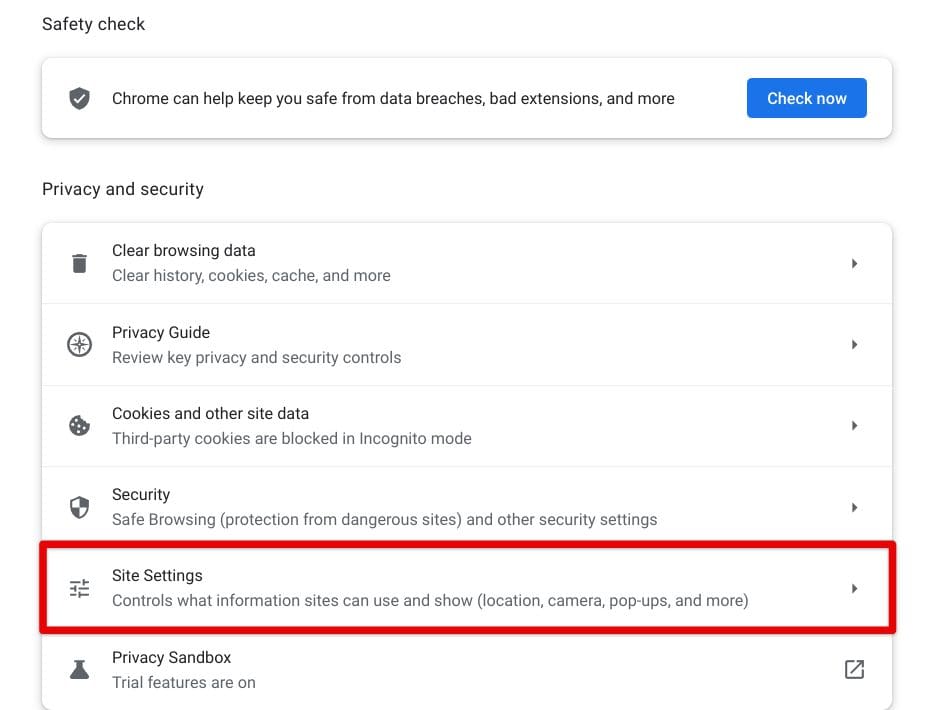
Opening “Site Settings”
4. Now, after clicking on “Site Settings,” you will again be transported to a different section in your Chrome browser. Click on “Notifications” after scrolling down until you see it to get to the next step. There should be an arrow beside this entry, similar to what we’ve illustrated in the comments section.
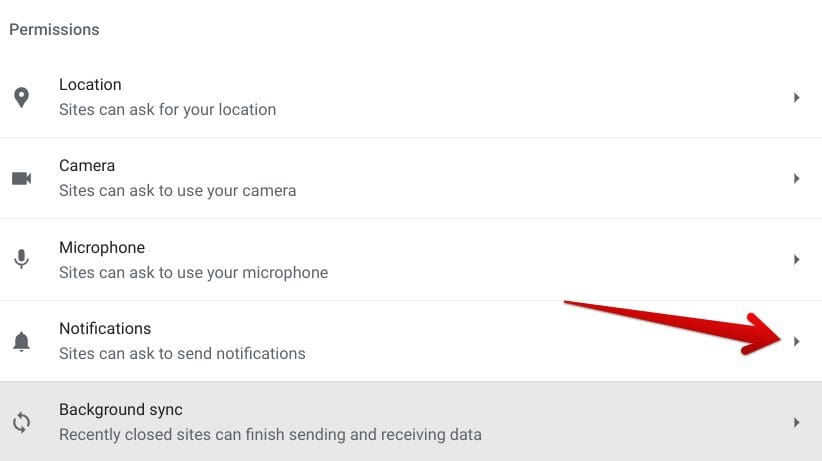
Clicking on “Notifications”
5. You must finally select the “Don’t allow sites to send notifications” button under the “Default behavior” region to turn off notifications in Google Chrome. After clicking on this prompt, you won’t be receiving any notifications on the desktop screen now.
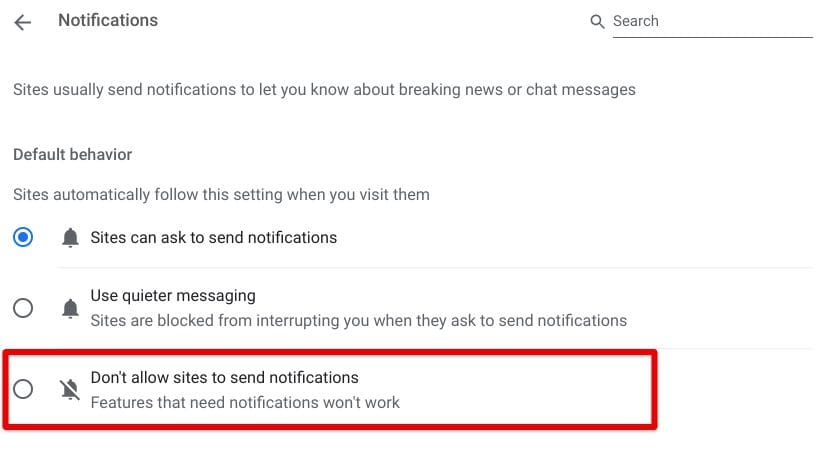
Clicking on “Don’t allow sites to send notifications”
That’s about it for the first method of disabling Chrome notifications. Let us get on with the article and show you another way you can pull off the same trick.
Method 2. Disable notifications of specific websites
As opposed to the method outlined above that removes notifications from the Chrome browser, you can also tweak Google Chrome to block notifications from particular websites. Doing this poses the benefit of only letting your preferred content appear on the screen, not notifications you probably don’t have anything to do with.
After arriving at the last section in the previous subtitle, where you disable sites from sending notifications, scroll down a little to reach the “Customized behaviors” area. This is where you can disallow specific websites from sending you prompts and pop-ups.
By scrolling down to the “Allowed to send notifications” area, you can view what websites are actively sending you prompts. If you spot a website you don’t want to receive notifications from, click on the three vertical dots button to bring up an “Options” submenu. From there, click on “Block” to finalize the process.

Blocking Slack from sending notifications
That’s about it for the second method as well. So we hope you’ve got what you came for with this guide.
Conclusion
There’s no doubt that Google Chrome is exceptionally effective in being fast, reliable, and utterly simple. It comes loaded with a ton of features that enhance the user experience. However, there are certain instances when things don’t go your way, and you’d rather have that specific piece of functionality disabled.
Such is the scenario with Google Chrome’s notification sending feature that allows automatic alerts from various sites. However, when you don’t want this feature enabled, there is a straightforward way to get rid of it quickly. That is precisely what we’ve illustrated in this guide. Let us know if the tutorial helped you below.
We would love to read your feedback!
