Google Drive is a pretty popular cloud storage integrated with Google Workspace and its online platforms. Over the recent years, Drive has grown to a point where it has wholly outpaced its competitors. Currently, you can use Google Drive for several additional web-based tasks that would not have been possible on any other cloud storage.
In particular, we are pointing towards the ability to embed audio in web pages through Google Drive. You might have seen audio files embedded in web pages all over the internet. Embedding an audio file in HTML for a web page is not easy. It might require you to tweak inherent tags. Such a level of technical knowledge cannot be expected from regular users who are just looking for an embedded audio file on their sites.
This is where Google Drive comes in. Once you upload an audio file to your Drive, it becomes surprisingly easy to convert it into an embedded format that can be placed on any site. In the following article, we will look at how you can create these embedded audios and then integrate them into common site layouts. New to Google Drive? Learn how to download files and folders from cloud storage.
What is audio embedding?
For the sake of this tutorial, we are going to assume that you have no prior information on how to embed audios for web pages and other Google services. Firstly, let us go over the basics of audio embedding. That will help you create more customized and professional insertions in the future.
Since the advent of the internet, embedded media processing has played a crucial role in keeping everything presentable. Without this, you would only be able to see HTML code on your browser. There are two main types of media processing; audio-based and video-based. Even though embedding audio files is much less of a task than videos, it is still crucial in the bigger picture of the overall browsing experience.
Once you complete the embedding process, any audio file can be presented on a page with an MP3 player. It takes the form of a long bar with a play/pause button, file tracker, and sound control. Please note that this is only a default display that can be modified for varying use cases. YouTube is one such example of an exquisitely integrated audio embedding. It allows you to take advantage of separate controls and audio sequencing for an enhanced user experience. However, all of that is far beyond what we will be discussing today.
How to embed audio in HTML?
Before we see audio embedding in Google Drive, we will go over the method for doing the same in HTML. The HyperText Markup Language (HTML) is the most common protocol for designing modern web pages and sites. HTML, along with CSS, is responsible for everything you see, hear, and experience on your internet browser.
Just like other programming languages, HTML is formatted with pre-defined syntax which is used for giving context to individual elements on each page. It contains individual tags that can distinguish between different classes of web content. In order to embed audios, we use the <audio> tag before and after the source code. The exact syntax for a generic audio embed is given as follows,
<audio>
<source src=”file_name” type=”audio_file_type”>
</audio>
Here, “src” represents the exact path to the audio file, and “type” represents the file extension such as .MP3 or .WAV. Keep in mind that this is a fundamental implementation of audio embedding. Apart from “src,” you can use several other attributes with the <audio> tag. These attributes enable you to add more functionality to the audio mentioned above the bar. Some common attributes include
autoplay – Specifies the web page to start the audio when it is loaded.
controls – Displays the sound control on the right side.
loop – Loops through the audio unless the user explicitly pauses it.
muted – Keeps the audio muted unless the user unmutes.
preload – Loads the audio metadata even before it starts playing on your browser.
Embedding audio with Google Drive
Now that you have seen how to embed audio with HTML, the next step is to learn to do so with Google Drive. It turns out that when you upload a file to the Drive, you can tweak the file URL to format it into an HTML code. The audio file will still be saved on your cloud storage when you complete the process, but the HTML snippet can be copied anywhere for possible embedding.
Moreover, when you embed audio with Google Drive, you will not have to deal with any Google branding whatsoever. The final display on the web page looks entirely professional and does not seem to be created with an overlay or anything of that sort. For embedding audio files with Google Drive, follow each step listed in the upcoming section stringently. Are you thinking about shifting to another storage solution? Here is a detailed comparison of Google Drive and Dropbox.
Note: When we use the <audio> tag, the embedded audio will take the form of a simple bar that may get distorted with other elements on the page. Therefore, we will be using the <iframe> tag to display the audio more presently. It specifies an inline frame that can be embedded into any page or document within the current display.
How to embed audio in HTML with Google Drive URL?
Step 1: Launch your preferred internet browser and go to “Google Drive.” Log in with your account.
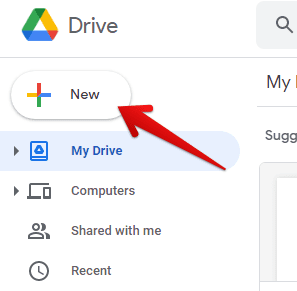
Step 2: From the Google Drive homepage, click on the “New” button in the top left corner. Select “File upload” from the drop-down menu. Upload the audio file you want to embed.

Uploading a new audio file
Step 3: Once the upload finishes, you will be able to see the file preview in the “My Drive” folder. Right-click on it and select “Get link” from the drop-down menu.
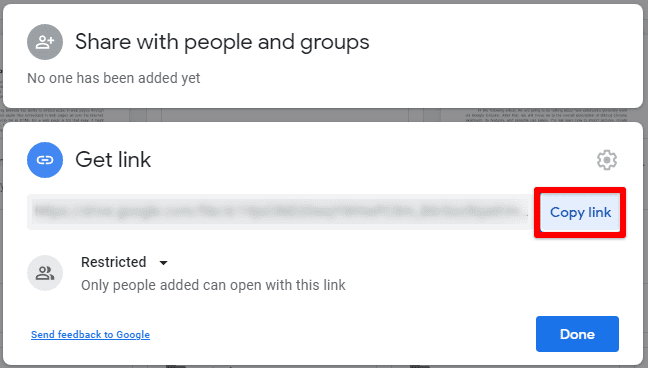
Step 4: Click on the “Copy link” button on the right to move it to your clipboard.

Copying the link to the audio file
Step 5: Open the HTML code for the web page where this file is to be embedded. Create a <iframe> tag similar to the one displayed below. Feel free to copy the same code if you want.
<iframe
frameborder = “0”
width = “400”
height = “200”
src = “Insert the copied link from Google Drive here”>
</iframe>
Step 6: In the link, you just pasted, replace “/view” with “/preview.” Save the HTML code and reload the web page.
You will now see the Google Drive audio file embedded in your web page. Play around with the controls to ensure that everything is working as intended.
The file you uploaded to Drive can also be embedded into other Google platforms if they have inherent support for the relevant format. For example, embedding audio in Google Sheets won’t work, but the same can be done on Google Slides quite quickly. Following are the steps for importing and embedding an audio file from a folder in Dive to a presentation on Slides.
Step 1: Launch your preferred internet browser and go to “Google Slides.” Log in with your account.
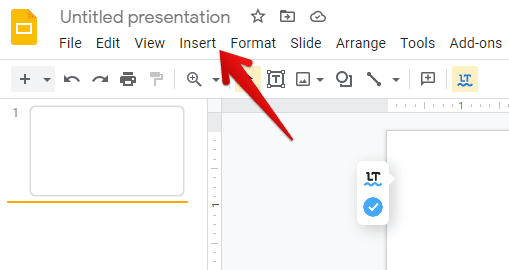
Step 2: Open the presentation where you want to embed the audio. Go to the “Insert” tab in the menu bar and select “Audio” from the drop-down menu.

Inserting an audio file to Slides
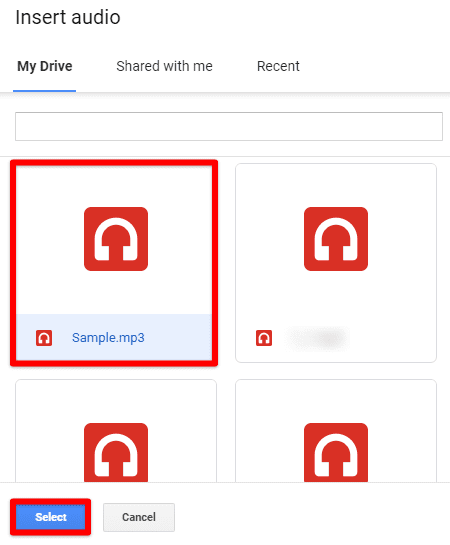
Step 3: An “Insert audio” window will pop up on your screen. Make sure that you are on the “My Drive” tab. Scroll down to find and select the respective file.

Insert audio window
An audio bar will be inserted into the presentation with the same controls. You can even drag the bar around and drop it into any location within a specific slide. Moreover, there are plenty of other format options which become visible as soon as you click on the bar or speaker icon.
Usage notes for embedded audio
If you are someone who needs to embed audio files regularly, we recommend going through some helpful usage notes. Firstly, you need to remember that not all browsers have similar support for file formats and display attributes. To make your file compatible with most browsers, you may want to include multiple sources. If the primary source does not work, the host automatically moves on to enable secondary sources, which link to the same file on Google Drive.
Many people also think of the default audio controls as too minimal and simplistic. If you want to create custom controls, access the HTML Media Element API and its JavaScript structure. Lastly, we would also like to point out that <audio> tags do not have any support for captions or subtitles. As of now, these attributes can only be linked with <video> tags.
Conclusion
Google Drive, which once started solely as cloud-based storage, is now providing plenty of useful tools for web integration. The audio files you upload to your Drive can be embedded in any web page using their native links. All you need is to edit the /view classifier and then paste the link into <audio> or <iframe> tag in HTML. Such developments have allowed users to embed audios without subscribing to hosting websites like SoundCloud or Audioboom. Please read our article on installing and using Picsart on Google Drive.
