Over the recent years, Google has developed an entire range of online platforms that can provide several different services. You can find just about everything from Google Docs for creating rich-text documents to Google Slides to make powerful presentations. Though, with such varied platforms now available, they have not lacked in providing seamless integration and support either. There are quite a few built-in and third-party tools for converting and transforming your files between these inherent formats.
The following article will talk about a Workspace add-on that can automatically convert PDFs, Docs, and Slides into Google Forms. We will install it on these platforms and then use it for self-executing conversions. Moreover, we will also be going over the frequent use cases for the plug-ins present on Google Workspace Marketplace. Please read our article on customizing tables in Google Docs.
What is Google Workspace Marketplace?
If you have been using Chrome, you already know about the Chrome Web Store. The Google Workspace Marketplace is its counterpart for all online Google services. It contains programs, add-ons, plug-ins, extensions, and web applications that can help in improving productivity and overall work efficiency. All items present in this marketplace are developed to integrate seamlessly with their host platforms across all browsers.
Whenever you open a cloud-based Google app, you will see a separate pane containing the incorporated web apps list. The + icon takes you directly to the Workspace Marketplace window. Here, you can browse through a wide variety of helpful products that can help advance the functionalities of each program. They enable you to perform usual tasks in bulk and provide easy-to-use shortcuts to save time and effort regularly.
It contains apps for all sorts of business and personal needs. Besides, the installation is far more intuitive as well. All you need is to click on the “Install” button to add that plug-in to your account at once. Having such effortless access to many options has undoubtedly improved the user experience on all Google services considerably. The following section will discuss a particular add-on in this marketplace that can be employed for automatic conversions into Google Forms. Want to make the most out of your media files? Here is a guide on installing and using Picsart on Google Drive.
What is the Automagical Forms add-on? How to use it?
As described earlier, Google has a cloud-based solution for almost everything. Google Forms is an exquisitely developed program that has become a go-to tool for managing event registrations, creating quick polls, presenting questionnaires, etc. As an administrator, it provides you with an entire list of tools and kits which allow real-time monitoring of different parameters. Google Forms can also distinguish and classify audiences based on diverse aspects.
Now that you know some probable implementations of Google Forms, let us tell you all about the Automagical Forms add-on. It is a web-based plug-in that can create detailed forms and questionnaires from Google Docs, Google Slides, and regular PDFs. It can replicate these results within a couple of minutes which would otherwise take a lot of copying, pasting, and formatting. Automagical Forms uses the power of AI to scan your source files and look for possible questions and responses. Once a form has been generated, you can give it a final read and amend it however you want. This plug-in is specifically helpful for individuals who need to create such forms regularly.
Automagical Forms has both free as well as paid packages. It is developed by Unicorn Magic, also known for providing extensive customer support to its user base worldwide. In the upcoming sections, we will look at step-by-step methods on how to use Automagical Forms for instinctively creating Google Forms out of Docs, Slides, and PDFs.
Installing and using Automagical Forms on Gmail
The Automagical Forms plug-in essentially supports four platforms at the moment. These include Gmail, Google Drive, Google Docs, and Google Slides. We will be describing the installation procedure for Gmail only as you do not have to install it on all programs separately. Once you add it to any of the services mentioned above, the plug-in becomes readily accessible to others as well.
Step 1: Launch your preferred internet browser and go to “Gmail.” Log in with your account.
Step 2: On the Gmail homepage, you will see a vertically assembled list of icons on the right side of your screen. It contains all currently installed web apps for Gmail. Click on the + icon at the bottom.
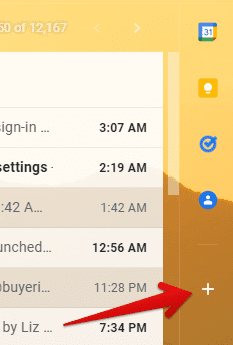
Opening Google Workspace Marketplace
Step 3: That will open a pop-up window for the Google Workspace Marketplace. Search for “Automagical Forms” and click on its preview to open the product page. Next, click on the “Install” button in the top right corner.
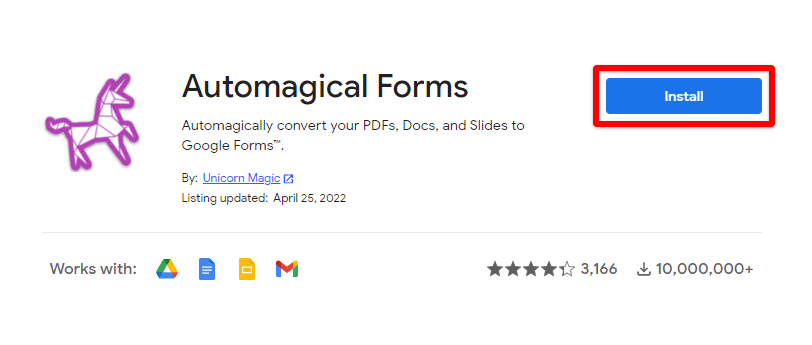
Installing Automagical Forms
Step 4: You will see a prompt for granting respective permissions on your screen. Click on “Continue” to proceed.
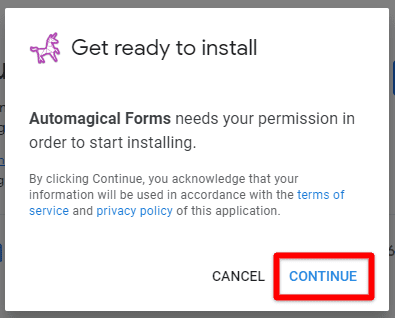
Granting respective permissions
Note: By clicking “Continue,” you acknowledge that your information will be used following Automagical Forms’ terms of service and privacy policy.
Step 5: The “Accounts” window will ask you to choose an account for continuing with the installation. Select your Gmail account from the list below.
The installation will start immediately and may take a few seconds to a minute. Once you see the completion prompt, go back to the Gmail homepage. You will see the Automagical Forms icon in the installed add-ons list.
Step 6: Make sure you are on the “Inbox” page. Scroll down to find the mail which contains the attachment to be converted.
Step 7: As soon as you open that message, Automagical Forms will start detecting possible questions from the attachment. These questions are then listed in a new window with individual checkboxes. Select all relevant items and then click on “Create Form.”
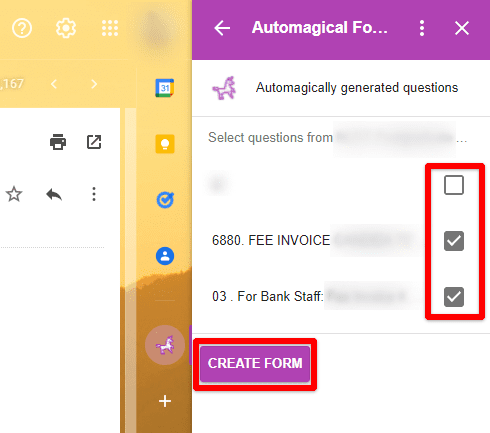
Selecting relevant questions
Step 8: Click on the “Open Form” button to access it from Google Forms. Here, you will be able to make further modifications if needed.
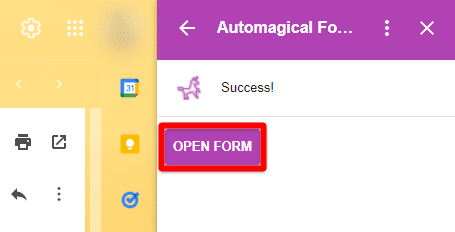
Opening the form with Google Forms
Using Automagical Forms on Drive, Docs, and Slides
Please note that the Automagical Forms functionality is somewhat limited on Gmail. As of now, it only works with image and PDF attachments. Also, there is no support for scanning attachments larger than 5 MB. If you want it to scan other formats, they must be opened in their respective programs. Moreover, the exact steps for employing the plug-in vary on these services. Therefore, we have marked down separate segments for using Automagical Forms on Drive, Docs, and Slides.
On Google Drive
On Google Drive, you can use Automagical Forms to convert PDFs, Docs, images, and hand-written notes. There is an option to set default behaviors as well. It includes everything from inserting PDFs as images to selecting a preferred language.
Step 1: Launch your internet browser and go to “Google Drive.” Log in with your account.
Step 2: Find the file you want to convert and single-click on it. The plug-in window will indicate the scan progress.
Step 3: Select relevant questions and click on “Create Form” to complete the process as the scan completes.
The Automagical Forms application for Google Drive can run for 30 seconds. If your files are noticeably larger, you may have to authorize it to allow for additional time.
On Google Docs
Step 1: Launch your internet browser and go to “Google Docs.” Log in with your account.
Step 2: Open the file you want to convert. Go to the “Automagical Forms” icon from the list of installed add-ons. Doing so will start the scan on the current document.
Step 3: Select relevant questions and click on “Create Form” to complete the process as the scan completes.
If the algorithm fails to identify each question, it is a simple solution. Click on the “Draw on Doc” button. It opens up your document in a pop-up window. Drag and select an area that should be meticulously scanned for possible questions.
On Google Slides
Step 1: Launch your internet browser and go to “Google Slides.” Log in with your account.
Step 2: Open the file you want to convert. Go to the “Automagical Forms” icon from the list of installed add-ons. Doing so will start the scan on all slides of the current presentation.
Step 3: Select relevant questions and click on “Create Form” to complete the process as the scan completes.
If the algorithm fails to identify all questions, click on the “Draw on Slides” button. It opens up the presentation in a pop-up window. Drag and select the slide, which will be scanned for viable questions.
Conclusion
Google Forms is an innovative tool to collect characterized responses from huge audiences. It is nothing short of modern survey software that can handle form-related requirements. It becomes an arduous task for those who need to generate forms frequently to type down all questions and set their formats manually. With the Automagical Forms add-on, you can now automatically convert email attachments, PDFs, Docs, and Slides into an intensive and accurate Forms survey. Are you interested in more online hacks? Follow the linked article on how to make QR codes in Google Sheets.
