Google Chrome is the most common and widely used internet browser worldwide. But it certainly does not mean that Chrome users are immune to browsing problems. There are several issues with this platform that can potentially slow it down quite a bit. You might overlook that initially, but these delays and slow loading times become easily perceptible over time.
Tips for faster browsing with Google Chrome
The following article will list the 10 most valuable tips for faster browsing with Google Chrome. These recommendations have been selected to optimize the browser performance while keeping practicality in mind. Besides, all of these methods are generalized and can be observed even if you are not facing prominent performance issues on Google Chrome. Follow the article in the link to learn everything you need to know about Google Chrome Helper and how to disable it.
1. Updating the browser regularly
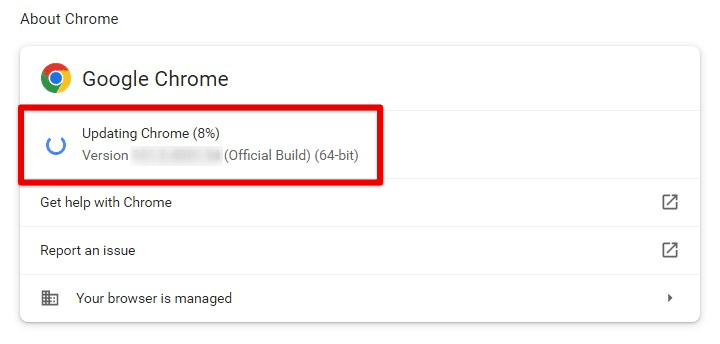
Google keeps on releasing the latest updates to the Chrome browser. It is one of the ways they make sure that their platforms stay ahead of the rest of the market and always host the most recent features. Usually, the Google Chrome updates get installed automatically without you having to accept or start the process manually. However, some adjustments to your browser settings may have stopped that from happening.
Updating the browser regularly
In that case, you would be using an older version which may lead to slow browsing because of outdated tools and features. To update Google Chrome to its latest rendition, you have to open the general settings and go to the “About Chrome” section at the bottom. As soon as you open this section, Chrome will check for updates and then start to install them at once. Here, you can also note down the Google Chrome version and verify it to be the latest from Google.
2. Removing suspicious or harmful extensions
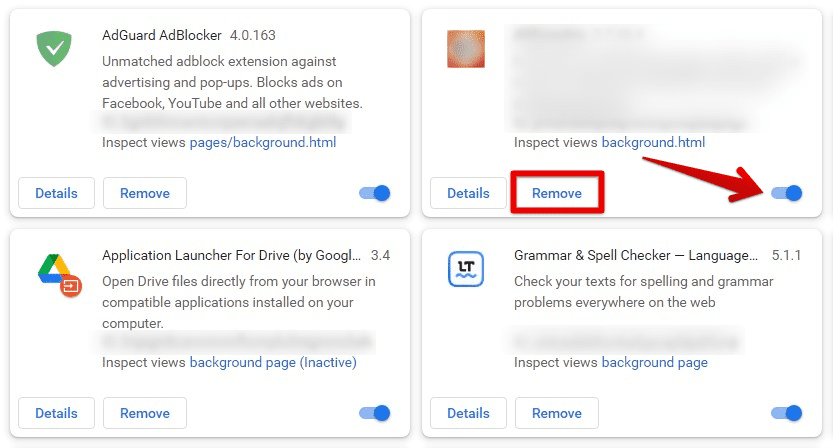
Google Chrome extensions are a great way to add more functionality to your browser. They let you complete day-to-day tasks in minimal time that would otherwise take a lot of effort. Though, some extensions you install on Chrome may do more harm than good. A very common element in most harmful extensions is high CPU usage. This goes unnoticed because of Google Chrome’s already notorious memory issues. It would help if you kept a close eye on any difference in speed or browsing experience after using the extension for a few days.
Removing suspicious or harmful extensions
For confirming possible leads, open the Chrome task manager and see the memory footprint and CPU usage for yourself. Any extension that stands apart from the rest of the group points to something dubious. The most reasonable choice would be to remove that item and look for some alternative in such cases. The “Extensions” page button is found under the “More tools” tab. Click on it and remove any extension identified as detrimental to standard Google Chrome performance.
3. Enabling the preload feature
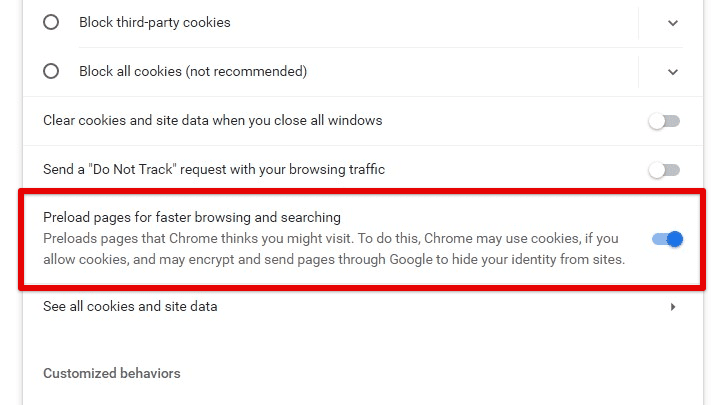
As described earlier, Google Chrome never disappoints when integrating the most inventive features. You ask your browser to load those web pages you might open in that session by enabling preload. Chrome makes the most out of your browsing history and guarantees these forecasts are up to the mark.
Enabling the preload feature
Besides just loading new pages, it can even prepare internal links within a particular website. Having that enabled, you will not have to wait for the connection after the page is requested. For enabling the preload feature, go to Settings > Privacy and Security > Cookies and other site data. Toggle the switch in front of “Preload pages for faster browsing and searching.” Is your browser going into an unresponsive mode? Read on what to do when your Google Chrome is not responding.
4. Cleaning up your computer
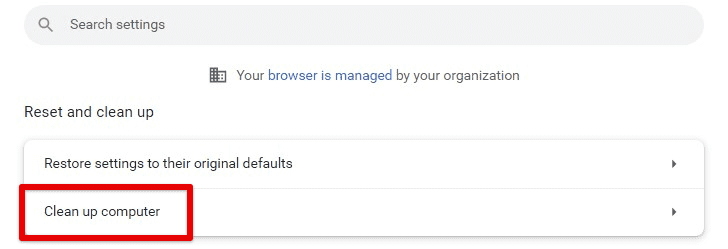
With our internet usage growing day on day, it becomes essential to have something that can ensure maximum security and performance. For those of you who do not know, Google Chrome has an exquisitely developed Cleanup Tool built into it. This cleans up your browser and optimizes the system’s performance for better implementation of Chrome elements. It scans your device for any program or application that may hinder the optimal operation. The applications include detecting and removing glitches, malware, adware, faulty extensions, spammy programs, etc.
Cleaning up your computer
After using the tool for the first time, you will notice an improved browsing experience within moments. It can speed up loading intervals and ensure that you do not get prompted by irrelevant pop-ups and notifications. To clean up your computer with Google Chrome, open the settings page and go to the “Advanced” section. Click on “Reset and clean up” and select “Clean up computer.” The whole scan may take anywhere between 2 and 5 minutes.
5. Testing your internet connection
It is possible that the problems you are facing are not caused by Google Chrome at all. The Internet Service Provider you have subscribed to maybe behind slow browsing. Therefore, before you take stringent measures against the browser, run a speed test on your internet connection. Keep in mind that online speed tests are only one of many ways to verify that your ISP is delivering perfectly.
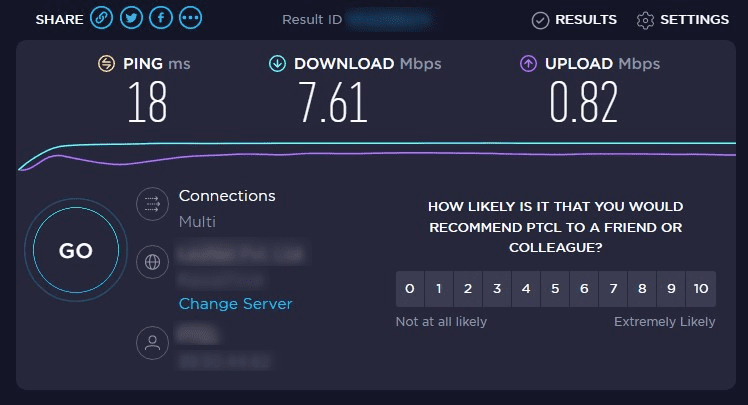
Testing your internet connection
Make sure that you are not using one of the in-house testing services. They can uplift actual numbers to show you that their connection is as fine as ever. Ookla offers the most reliable and trustworthy speed tests. You need a one-tap connection to check for downloading speed, uploading speed, and ping. Their most basic assessment gives enough information on whether the internet connection is to blame or not.
6. Closing excess tabs and windows
People who spend most of their time on Google Chrome become easily distracted to move on from one tab to another. Before you know it, there are more than 15 tabs opened up simultaneously. More often than not, you only need 2 or 3 out of those. To keep matters trouble-free, make sure to close excess tabs and windows habitually. It keeps your session organized and prevents Google Chrome from overloading.
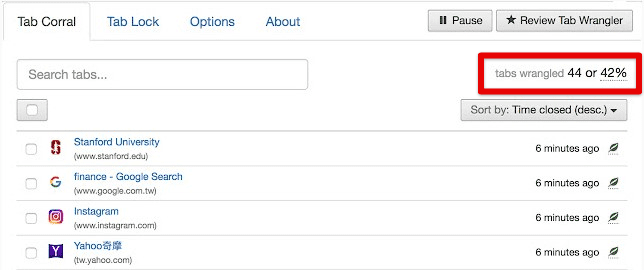
Closing excess tabs and windows
If doing so seems like additional work, there is a straightforward solution. There are Google Chrome extensions available that can do this for you. These extensions automatically close all tabs that have been inactive for a specific period. You can also set the time after which this action is triggered. Besides, the closed tabs are saved under a buffer which enables you to open them again whenever you want.
7. Removing idle Chrome applications
Like Google Chrome extensions, there is an entire library of Chrome apps that work to improve the connectivity and features of your browser. Though, most of us never use these apps. Many of them also come pre-installed, which means several users do not even know that they exist in the first place.
Removing idle Chrome applications
To reduce the load on your browser as much as possible, we suggest removing these redundant Chrome apps. That will free up tons of resources which then provide much faster browsing. Open a new tab on Google Chrome and type “chrome://apps” in the address bar. That will take you to the “Applications” page. Click on the item you want to delete and select “Remove from Chrome” from the drop-down menu.
8. Clearing cache, cookies, and browsing history
If the above methods fail to do the trick for you, the next logical step would be to clear the browser cache, cookies, and browsing history. All of that combined makes up a lot of data in total. These old files are not used by the end-user and usually block the effective performance of the processor. Therefore, it is advised to have them cleared every few weeks, even if you are not facing any apparent issues.
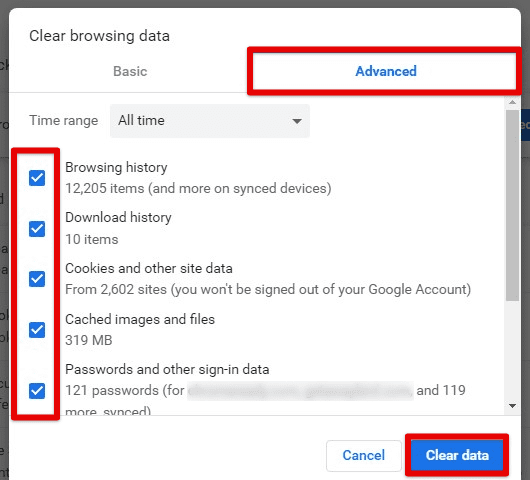
Clearing cache, cookies, and browsing history
Go to the Google Chrome menu and click on “Clear browsing data” under the “More tools” tab. You can also access the same window with the “Ctrl + Shift + Del” shortcut. Open the “Advanced” tab and select “All time” for the time range. Make sure that every checkbox is chosen from the list below. Then click on “Clear data” to start the process. This may take some time, but it will clear your browser from any item, possibly slowing it down.
9. Restricting sites from displaying images
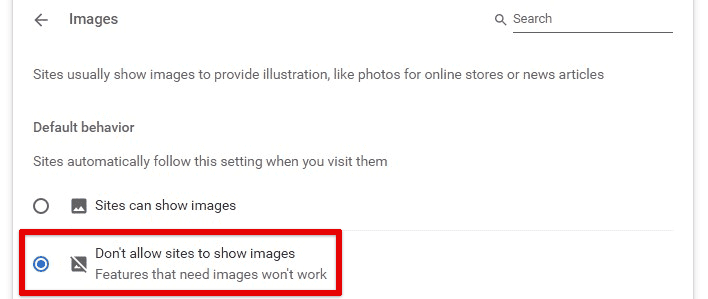
The most bandwidth-consuming element over the internet is media files. If you want faster browsing and are willing to make any tradeoff whatsoever, then an option is to disable images from all sites. Google Chrome lets you control site settings which monitor what can or cannot be done through them. Once you disable the setting for displaying images, every website is forced to mask all pictures.
Restricting sites from displaying images
Go to “Privacy and security” from Chrome settings and click on the “Site settings” tab. Scroll down to find “Images” under the “Content” section. Select “Default behavior” and “Don’t allow sites to show images.” Please note that any features that need images will also stop working. Nevertheless, you can always include some frequently visited websites in the “Allowed to show images” list. They will be marked as an exception from the default site behavior.
10. Resetting Chrome to default settings
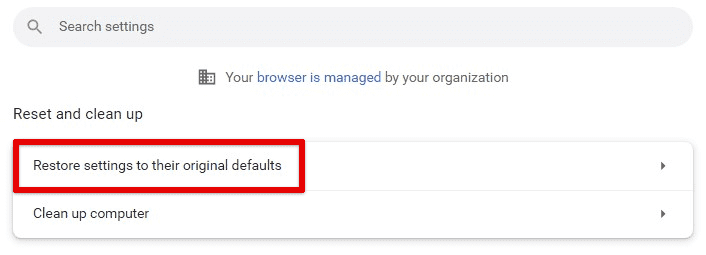
Sometimes, a slow browser can be fixed by resetting it to the default settings. During regular usage, you might have knowingly or unknowingly changed some critical setting that is causing problems. Once Chrome is reset to its default settings, the chances are that most of the underlying causes will be eliminated. Do not forget that it is like a factory reset, and changes that are not causing any issues will be lost.
Resetting Chrome to default settings
We recommend that you keep this fix to yourself until every other option has been exhausted. For resetting to default settings, open Chrome settings and go to the “Advanced” section. Click on “Reset and clean up” and select “Restore settings to their original defaults.” This process will also disable extensions, delete cookies, and remove other temporary site data.
Conclusion
After using it for years, people have started to complain about Chrome’s slow performance. This shows that Google Chrome is not some unrealistically perfect product and still has a few issues. Though, there are multiple solutions to Chrome not being as fast. By following the tips mentioned in this article, you are sure to improve the browsing speed on Google Chrome by a considerable margin. Are you still facing problems with your browser? Learn how to fix high CPU usage in Google Chrome.
