Google Docs is a rich text editing platform that hosts several customization features. Until recently, the options to add and edit tables in Google Docs were quite limited. Though, it is not the case anymore. You will now find several tools for quickly adding and customizing tables in Google Docs. These include a new sidebar for managing table properties. It is used to edit row height, column width, cell alignment, table alignment, display properties, etc.
Other than that, Google Docs now also supports overlays that only appear once you hover the cursor over a specific part of the table. These intuitive menus allow the addition of new rows and columns in particular locations.
Customizing tables in Google Docs
In the following article, we will describe these features and how you can use other inventive tools for customizing tables in Google Docs.
Inserting a table in Google Docs
Before you see table customization, let us see how to insert a new table inside a document. If you have converted a PDF or another file format into Google Docs, the already included tables might not be as customizable. When you insert a new table manually, you can choose between options that might not become available otherwise.
Step 1: Go to “Google Docs” on your internet browser and log in with your account. Open the respective document.
Step 2: From the Google Docs toolbar at the top, click on “Insert.” It will open a drop-down menu. Next, hover your cursor over “Table.”
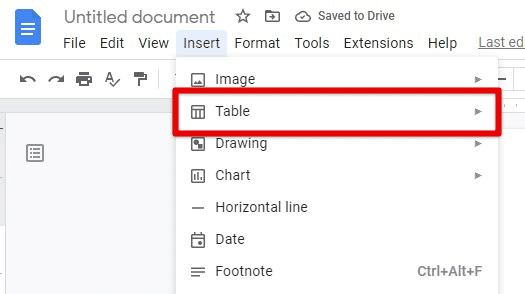
Inserting a table
Step 3: You should see a small side window with a virtual table layout. Select the number of rows and columns.
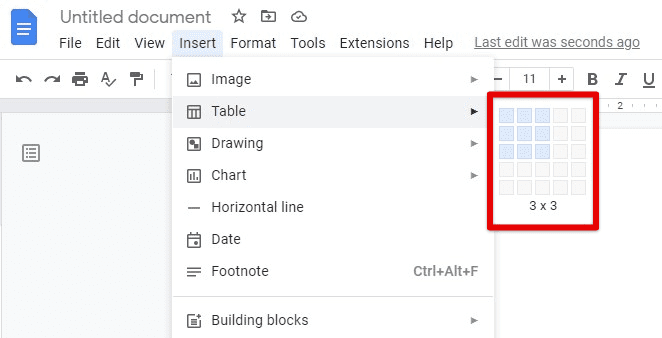
Specifying table dimensions
Note: You can insert a table with 20 rows and 20 columns this way. If you need more than that, all other rows and columns will have to be annexed afterward.
Step 4: The table layout will now appear in your document. You can start filling the contents in each cell one by one.

Table inserted
When inserting a table in Google Docs, make sure that you place the insertion point correctly beforehand. After the table is set, it may become difficult for you to move it around. Besides, the problem with relocating tables is that they disturb the entire layout of your file. Therefore, confirm to see if the placement is correct the first time. Are you a big fan of dark themes? Here is how to enable dark mode in Google Docs.
Inserting or deleting rows and columns
Let us say that you want to change the number of rows and columns in your table. There are two main ways to do so. You can either open the options menu and insert or delete entire rows and columns. The other method is to use the Google Docs overlays by hovering your cursor over where the change is to be made.
Step 1: Go to “Google Docs” on your internet browser and log in with your account. Open the respective document.
Step 2: Scroll down to find the table you want to modify. Right-click the place where the insertion or deletion needs to take place. It opens up a long menu with tons of different options.
Step 3: The cell you clicked will be considered a reference point for new insertions. You can then choose from one of the following four possibilities; inserting a row above, inserting a row below, inserting a column on the left, and inserting a column on the right.
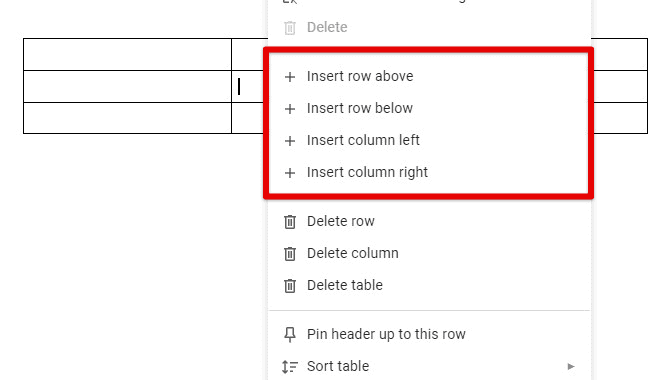
Inserting a row or column
Step 4: The cell you clicked will be considered a shortcut for its entire row or column for deletions. You can then choose from two possibilities; deleting the respective row or deleting the individual column.
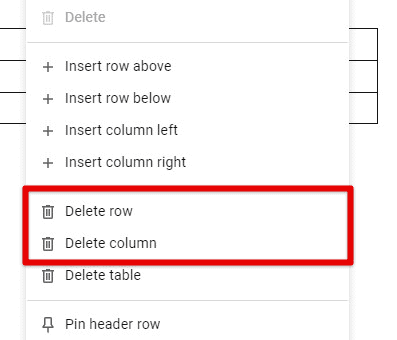
Deleting a row or column
Step 5: As described earlier, adding new rows and columns to a table is another way. Float your mouse over any cell in the first row or first column. Then, click on the + icon. That instantly adds a column on the right or a row below that cell.
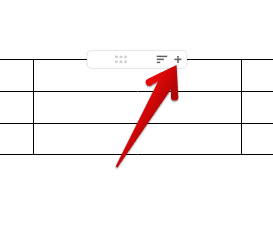
Inserting with overlays
Adjusting height, width, and alignment
After learning how to add and delete rows and columns, the next step would be to adjust their height, width, and alignment. All of that is present under the table properties. These settings are categorized into four different sections. We will take a detailed look at how you can tweak these to customize tables in Google Docs.
Step 1: Go to “Google Docs” on your internet browser and log in with your account. Open the respective document.
Step 2: Scroll down to find the table you want to modify. Right-click anywhere on the table. Go to “Table properties” from the drop-down menu.
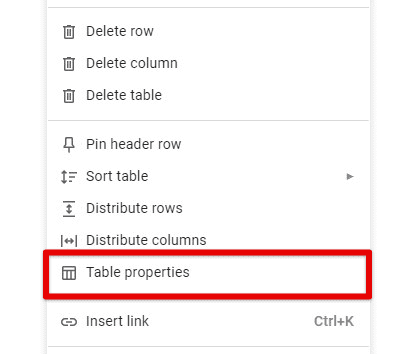
Opening table properties
Step 3: That opens a new panel on the right side of your screen. Here, you will see four different tabs; row, column, alignment, and color.
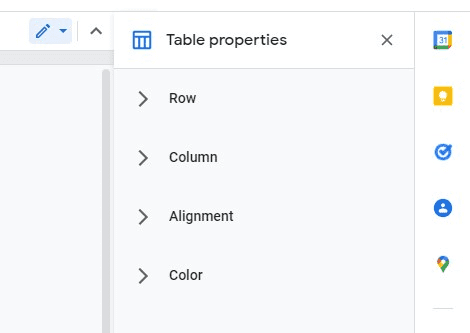
Table properties panel
Step 4: Click on “Row” to adjust the minimum row height. This section also contains the checkbox for pinning the header row. Your table will always start from the same position you inserted in the first section with that enabled. Otherwise, all rows are allowed to overflow across pages.
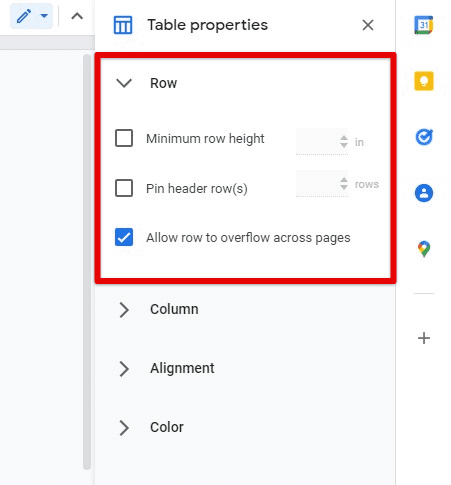
Row properties
Step 5: Click on “Column” to adjust the column width. Please note that it will only change the width of the column you right-clicked on in Step 2.
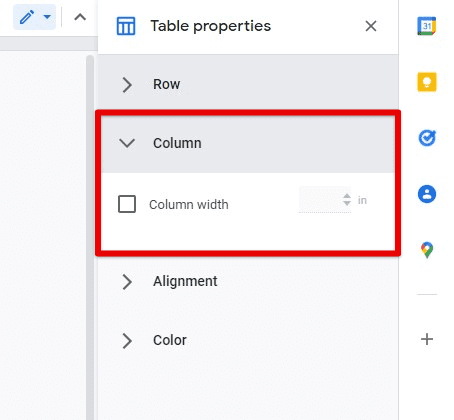
Column properties
Step 6: Click on “Alignment” for shifting cell and table alignment. For cells, you can choose from top, middle, and bottom. You can set it aligned left, center, or right for the entire table. The “Alignment” section also contains left indent and cell padding adjusters.
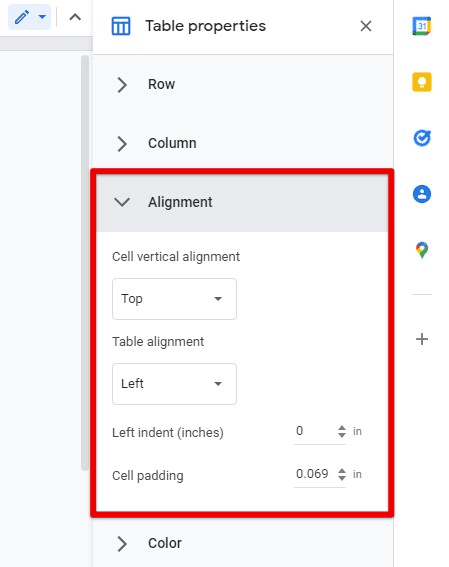
Alignment properties
Customizing table border and background-color
When speaking of customization, changing borders and the background color is probably the first thing that comes to mind. Even though Google Docs does not support as many customization features as you get on MS Word, they are still enough to give each table a unique overall look.
Step 1: Go to “Google Docs” on your internet browser and log in with your account. Open the respective document.
Step 2: Scroll down to find the table you want to modify. Right-click anywhere on the table. Go to “Table properties” from the drop-down menu.
Step 3: That opens a new panel on the right side of your screen. Here, you will see four different tabs; row, column, alignment, and color.
Step 4: Click on “Color” to modify the table border and cell background color. The border thickness can be selected from 0 pt to 6 pt. Moreover, you can also change the border color to either one of the existing shades or a custom palette with hex code.
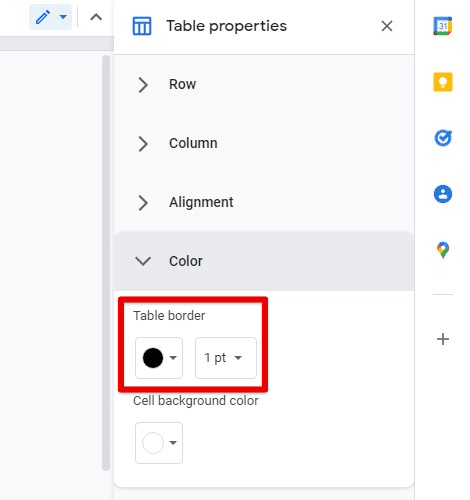
Table border
Step 5: Similarly, you can also assign any color to the cell background. It is set to “None” or “Transparent.”
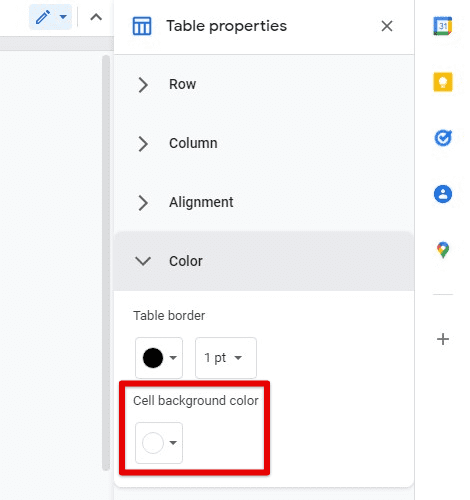
Cell background-color
There is also a quick method for modifying the borders of a particular cell. Hover your mouse cursor over one of the cells. A small down arrow appears in the top right corner. Use it to open a window with nine different border selections. Click on any selection to edit it accordingly. Learn how to add emoji reactions on Google Docs on the web.
Sorting and distributing the table elements
Lastly, we will see how you can work on the table contents in Google Docs. The program lets you sort the table rows or columns in any preferred order. Almost every time, the data you type in the table is numerical or textual. The sorting tool in Google Docs works on both forms and lets you arrange the data in either ascending or descending sequence.
Step 1: Go to “Google Docs” on your internet browser and log in with your account. Open the respective document.
Step 2: Scroll down to find the table you want to modify. Select all cells that are to be sorted. Right-click on any one of the selected cells. It opens up the drop-down menu.
Step 3: Go to “Sort table” and then select either “Sort ascending” or “Sort descending” from the side window.
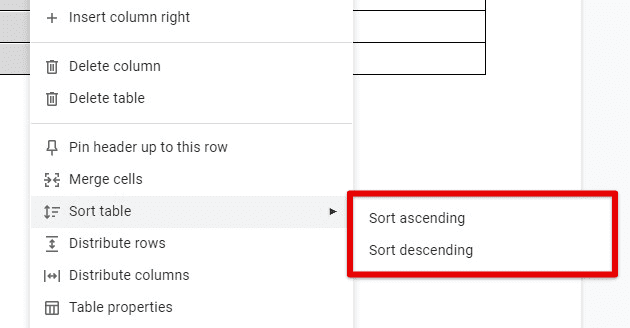
Sorting table
Note: The row or column you selected in Step 2 will be considered a reference for the sorting algorithm. All other cells in the table will be adjusted correspondingly.
The table becomes uneven and asymmetrical after changing the cell width or height from the table properties. There is a quick option to distribute to assign all cells with the same height and width once again.
Step 4: Right-click anywhere on the table. Select “Distribute columns” for assigning the same cell width and select “Distribute rows” for assigning the same cell height.
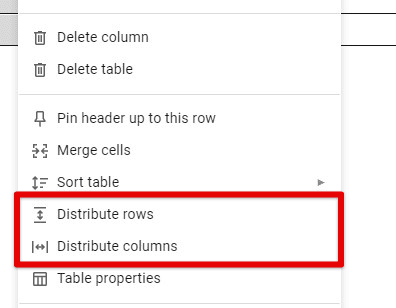
Distributing rows or columns
Note: Both of these options do not change the height and width of the entire table. They divide the total length between the total number of rows or columns.
Conclusion
Google Docs is a widely used office software that has handled most of the text editing needs of a regular user. Recently, it was also equipped with a range of customization options for tables. That paved the way for more visually appealing documents and provided new tools for organizing and managing tabular data. Are you looking for more customization? Please read our guide on how to create page borders on Google Docs.
