Gmail is the most commonly used email client all over the world. The sheer size of its user base indicates that it works perfectly for emails and has several other features under its belt. Today, we will be looking at one of these in particular. For those who did not already know, Gmail can be used to create and manage tasks. Depending upon the account through which you access this feature, these tasks can range from personal to-do lists to office-related chores.
Gmail integrates perfectly well with Google Calendar is more reason for employing it in creating daily tasks. Besides spawning new entries, Gmail lets you set due dates or include additional notes for context. You can also set preferences or arrange the individual items however you want. In the following article, we will see how to use Gmail as an effective tool for listing and managing day-to-day ventures.
Creating a task through the inbox
Let us start with the most straightforward way of creating a task from Gmail. When you open Gmail on desktop or mobile, you are greeted with your default inbox. What if we told you that there is a way to immediately create a new task on that page? All you need is to scroll down and find the respective email.
Step 1: Open your preferred internet browser and go to “Gmail.” Log in with the account which typically receives task-related emails.
Step 2: Browse through your inbox and find an email to be included in the tasks. Select it by ticking the box on its left.
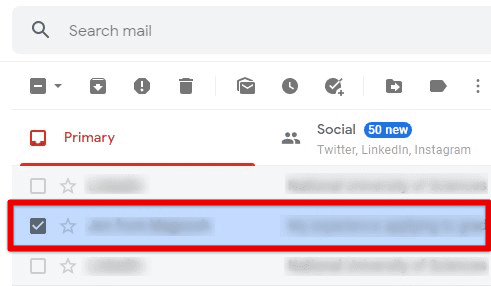
Selecting an email
Step 3: You will now see several additional options displayed at the top. Go to the checkmark icon and click on it.
Add to tasks icon
Step 4: As soon as you click, a new window will pop up on the right side of your screen. Rename the task to something which can be easily recalled. Include any additional details if you want.

Task created
You have marked an email as a task in your list. The task also contains a default link at the bottom. Clicking on that link redirects you to the corresponding email. When you create a new task this way, it will be included in the main section at first. If you want it in a separate list, that needs to be done afterward. Learn how to share Google Drive with non-Gmail users from this article.
Creating a task through the Google Tasks panel
You might want to add a customized task that has nothing to do with emails. In that case, the already integrated Google Tasks panel will have to be accessed. Please note that you do not need to install any add-ons or plug-ins for this to work. All Gmail accounts inherently support the panel used for creating and managing tasks.
Step 1: Open your preferred internet browser and go to “Gmail.”
Step 2: You will notice four vertically assembled items on the right side. Click on the blue “Tasks” icon.
Google Tasks icon
Step 3: Doing so will open a new panel on the right side of your screen. If you have some unfinished tasks, they will be displayed here. Click on the “Add a task” button at the very top.
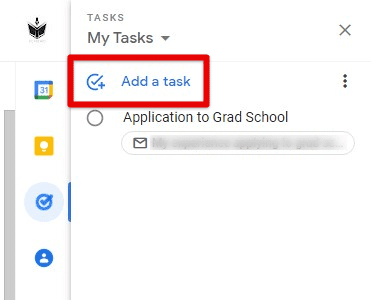
Add a task button
Step 4: You will now be asked to type in the task title and details. Do not forget to set the date and time as well.
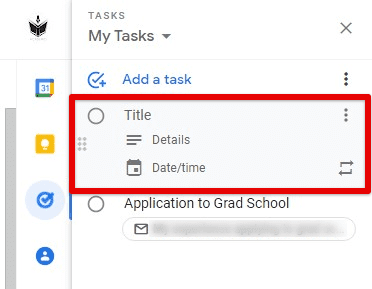
Creating a task
Now, drag the newly created task and drop it to any position on that list. This allows manual rearrangement, so high-priority activities are always positioned above the rest.
Sorting and deleting tasks from Gmail
After creating new tasks, the next step involves learning how to sort and delete them. These operations can be done from the same panel we just discussed. Keep in mind that there are no shortcuts available, and users must open Gmail to sort and delete their tasks.
Step 1: Open your preferred internet browser and go to “Gmail.”
Step 2: You will notice four vertically assembled items on the right side. Click on the blue “Tasks” icon.
Step 3: Doing so will open a new panel on the right side of your screen. If you have some unfinished tasks, they will be displayed here. Click on the three-dot icon in the top right corner of that panel.
Three-dot icon
Step 4: You will see the “Sort by” section at the top of the drop-down menu. You get to choose between two options; “My order” and “Date.”
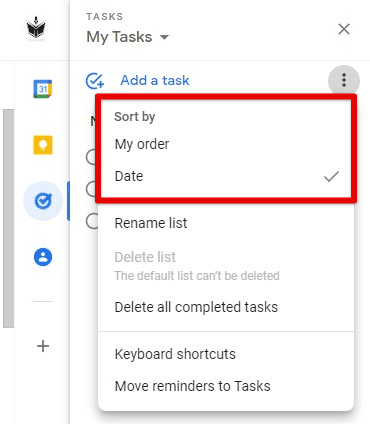
Sorting tasks
Selecting “Date” will sort all tasks in chronological order (If task A is due earlier than task B, it will be displayed above task B). Selecting “My order” will rearrange them in the same sequence you set previously.
Step 5: Once you mark a task as completed, it is just relocated to the “Completed” section and is not deleted. Click on the three-dot icon and select “Delete all completed tasks” from the drop-down menu to remove such tasks.
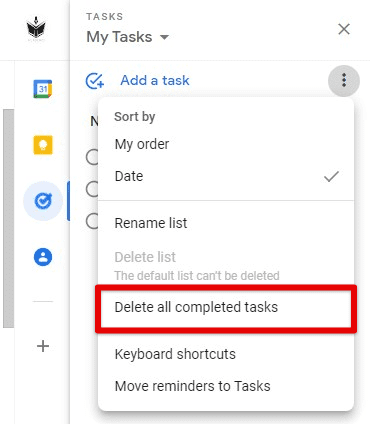
Deleting all completed tasks
Creating a new list of tasks
If you have just started using Google Tasks, you might not deem any need for lists and task management. However, as soon as the number of tasks grows, it becomes increasingly difficult to set them apart and manage them independently. Therefore, for people dealing with many tasks at once, creating separate lists for similar entries is recommended. That would make it somewhat easier for them to manage these tasks regularly.
Step 1: Open your preferred internet browser and go to “Gmail.”
Step 2: You will notice four vertically assembled items on the right side. Click on the blue “Tasks” icon.
Step 3: Doing so will open a new panel on the right side of your screen. If you have some unfinished tasks, they will be displayed here. By default, the panel opens up the “My Tasks” list. Click on the down arrow right next to it. Go to “Create new list” from the drop-down menu.
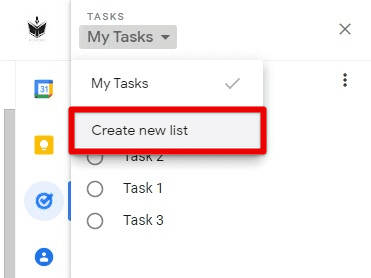
Creating a new list
Step 4: Enter the name for the new list and click on “Done.”
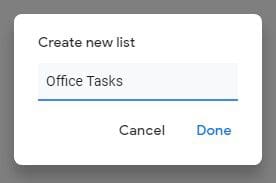
Naming the new list
Go through the same process to create as many lists as you want. The menu at the top can be used as a switch between these lists. Moreover, you can drag entire lists to rearrange them just like you do with individual tasks.
Note: All lists other than the default one can be deleted. When you delete a custom list, every task contained within it (unfinished or completed) will be removed.
Helpful keyboard shortcuts
When you need to rush through things, keyboard shortcuts can prove helpful. They save a lot of time in the long run and give you increased control over how to manage these tasks. In the following section, we have listed down some helpful keyboard shortcuts you can use while working with tasks from Gmail.
Moving through tasks: After opening Google Tasks from Gmail, you see the default list. That list contains all unfinished tasks. However, only their titles and due dates are displayed. To read additional details or any side notes, you need to open the task by clicking on it. As you click on a task, its tab grows to present relevant details. Then, you can use the up and down arrow keys to move through all tasks in that list. That saves plenty of mouse clicks you would otherwise need for opening multiple tasks.
Rearranging tasks and lists: In one of the previous sections, we described how you could drag a task or a list and drop it to whichever position you want. It turns out you can also rearrange these items using keyboard shortcuts. Select the task you want to move and press “Ctrl + Up” or “Ctrl + Down.”
Creating subtasks: Another handy trick for organizing and arranging tasks more effectively is to generate subtasks. They allow you to categorize a list of actions that are somehow related to one another. To create a subtask to an existing task, click on it and press “Ctrl + Alt + Enter.” You can also indent and unindent entries with “Ctrl + ]” and “Ctrl + [” respectively.
Opening shortcut menu: Lastly, we will tell you about the shortcut to all shortcuts. We have only described the most useful keyboard shortcuts in this section. Pressing “Ctrl + /” will take you to the menu containing all Google Tasks shortcuts. All records are categorized into task actions, list actions, editing tasks, and applications.
Conclusion
Google Tasks is an activity manager that is used to create to-do lists. It is a simple yet remarkably worthwhile tool. Having it accessible on Gmail makes it even more applicable in official settings. That lets you use the same window for managing emails and creating and finishing tasks on the go. Knowing how to handle the Google Tasks menu on Gmail certainly proves equally valuable for all users. Read the article on how to change your Gmail password on Chromebook.
