One of the greatest strengths of Chrome OS lies in its swift and minimal user interface. It’s exempt from the unnecessary convolution of many graphical elements, and what users get to work with every day is nothing but simple, fast, and blatantly effective.
However, little do many people know that the Chrome OS status bar—that small-scale area in the bottom-right corner where you can see the date and your battery health—can be utilized more productively, allowing Chromebook owners to get the best out of their machine on a day-to-day basis.
This guide will cover 3 of the best ways to make the Chrome OS status bar more useful, including its features. Let’s dive right into this write-up without any further ado.
- More from Chrome Ready: How to share files with devices using Nearby Share on Chrome OS.
What is the Chrome OS status bar?

The Chrome OS status bar and all its inclusions
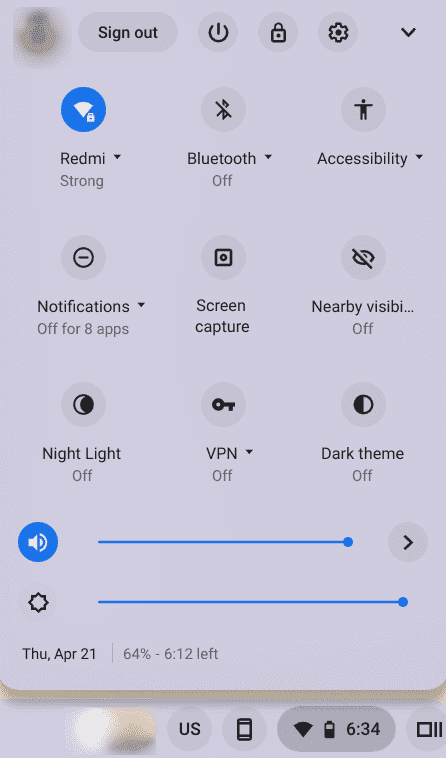
The Chrome OS status bar—also called the Status Tray or Shelf—is one of the major constituents of this operating system’s interface. It sits at its dedicated place in the lower right corner of Chrome OS and functions as the main control center. With its help, you can perform various tasks on your Chromebook.
For instance, the Chrome OS status bar lets you toggle on and off major system components at a glance. These include Wi-Fi connectivity, Bluetooth, Night Light, volume, brightness, and screenshot-taking, among other features. It’s pretty helpful in getting around the Chrome OS interface, given its shortcuts for accessing specific portions of the operating system.
With all of this being said and done, there are ways to make you utilize the Chrome OS status bar even more effectively. Let’s get into what these are in the following section. Keep on reading if you’re after the best details on the subject.
Getting the best out of the Chrome OS status bar
The following is our round-up of the best ways you can use to make the Chrome OS status bar more useful.
1. Enable Calendar View
The first trick that’ll help you get more out of the Chrome OS status bar is enabling an experimental feature called Calendar View. This tip-top functionality makes it possible for users to realize the date instantly as soon as they look at their interface’s status bar.
However, as iterated earlier, Calendar View isn’t enabled on Chrome OS by default. It’s still in its experimental phase, so you’ll have to tend to it yourself. Fret not, though. Toggling it on is straightforward and painless, no matter what Chromebook you’re on.
The following steps will illustrate how to enable Calendar View and get the Chrome OS status bar to show you the date.
1. The first step is to open the Google Chrome browser and type the following into the address bar. Once done, press the “Enter” key, and you’ll be taken straight to the Chrome flag in question.
chrome://flags#calendar-view
2. When you see the Calendar View experimental feature on the screen, click on the toggle beside it and select “Enabled.” That should take you to the next step.

Enabling the Monthly Calendar View in Chrome OS
3. The next step is to give your Chromebook a reboot, which should kick things in motion. You’ll be able to restart the device from the prompt that appears at the bottom of the screen when you click on “Enabled.”

Restarting the device
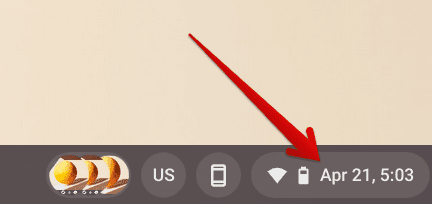
As soon as your Chromebook boots back on, look at your Chromebook’s status bar to discover the Calendar View feature in action. Congratulations! You’ve now made the Chrome OS status bar a tad more valuable than it previously was.

Calendar View in action
With the first method covered, let’s get on with the second one.
- If you want to explore this subject in more depth, take a look at this dedicated guide on enabling Calendar View on Chrome OS.
2. Enable the “Overview” button for the Chrome OS status bar
The Chrome OS status bar can be upgraded to host a dedicated “Overview” button. This will allow you to quickly retract your opened windows and get a quick rundown of everything running on your Chromebook.
It’s a pretty effective way of utilizing the multitasking capability of Chrome OS, especially when you’re employing the use of several virtual desks at once. However, this one, too, is a Chrome flag that you will need to enable by yourself. It doesn’t come pre-loaded at the moment for stability reasons.
We stumbled upon this convenient feature a while back, and it’s only logical to include the added functionality in this guide. You will need to follow the steps given below to turn on the “Overview” button on your side of things.
1. Get started by opening the Google Chrome browser on your end and typing the following into the address bar. When you’re done, press the “Enter” key to get transported straight to the Chrome flag in question.
chrome://flags#ash-overview-button
2. As soon as you arrive at the “Overview” button Chrome flag, click on the toggle beside it and select “Enable” out of the subsequently appearing options. Check out the following screenshot for a visual explanation of this step.

Enabling the “Overview” button for the status bar
3. Time to restart your Chromebook again. A restart is always imminent whenever you make changes to Chrome flags to apply them to the device. Use the prompt at the bottom of the page to finalize the process.

Restarting Device
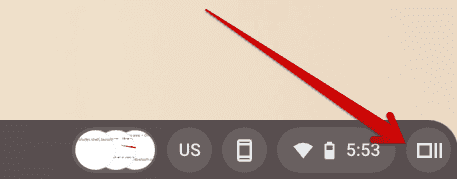
When the device turns back on, you’ll observe an extra button in the Chrome OS status area. If you click on it, you’ll prompt the interface to “Overview” mode. It’s as painless and effective as that.

The “Overview” button alongside the Chrome OS status bar
3. Tweak the theme of the status bar
If you’re looking to make your Chromebook’s status bar more intuitive in terms of the looks and thereby give off a much more radiant vibe, there is yet another Chrome OS experimental flag that can help you achieve this.
Although this tweak includes switching up the design of the rest of the graphical elements of a Chromebook’s user interface, it’s worth mentioning for what it does to the status bar alone.
Again, you’ll have to follow the steps listed below to slap this feature onto the Chrome OS status tray. You’ll undoubtedly love the outcome by the time you’re done enabling this forthcoming Chrome flag.
1. The first step is to use the following in the Chrome browser’s address bar. Doing so should take you straight to the experimental flag that we have to toggle on.
chrome://flags#dark-light-mode
2. Once done, click on the button beside the Chrome flag and choose “Enabled.” That should turn the feature on for you, but not before completing the following step.

Enabling the system UI dark and light mode theme
3. In the final step, all you have to do is perform a reboot of your Chromebook to apply the newly made change, and you’ll be all set. Use the subsequent prompt at the bottom of the screen for quick and easy results.

Restarting the device
That’s about it for tweaking the theme of the status bar and making it more appealing than ever! After enabling this Chrome flag, the Chrome OS Status Tray will adjust to the overall theme of the operating system whenever a change is made.

All-new Chromebook status bar
- Related read: How to change Chrome OS to dark mode.
Conclusion
The Chrome OS status bar doesn’t have to be kept minimal in its looks and functionality. The developers have introduced various ways for us to tweak this essential system component and get more out of it on the fly.
This guide has covered just that by presenting three unique ways of making the Chrome OS status bar more useful. We hope that you’ll enjoy these adjustments as much as we did. Chrome Ready wishes you good luck!
- Before you go: The 10 most useful Google Chrome shortcuts you will ever need.
