The accessibility features of Chromebook have seen a significant bump in quantity over time. For instance, the latest stable release for ChromeOS has brought new dictation-oriented functionality for users, allowing individuals to dictate their text and delete any hiccups with the backspace feature effortlessly.
Over time, Chromebooks also became great host devices for printing purposes. You can set up a printer for your ChromeOS and print documents from a Chromebook quite swimmingly. Of course, this does warrant that you’ve got your hands on the best Chromebook-compatible printers out there. Otherwise, you won’t be finding success in that domain, unfortunately.
This guide will illustrate how to add a WiFi printer to your Chromebook so that you can print wirelessly on ChromeOS with minimal effort. Follow the instructions listed ahead for nothing but the best results.
- While you’re at that, do check out our in-depth guide on how to 3D print using Chromebooks.
Printing with a WiFi printer on ChromeOS
The following steps will walk you through the process of setting up a wireless printer for your Chromebook. We’ll also talk about some critical configuration and troubleshooting guidelines so that you can fix any arising issues on the spot. Let’s dive right in without any further ado.
1. The first step is to open the “Settings” system app on your Chromebook. You can do this painlessly by clicking on the “Settings” icon from your Status Tray menu or the Launcher area.
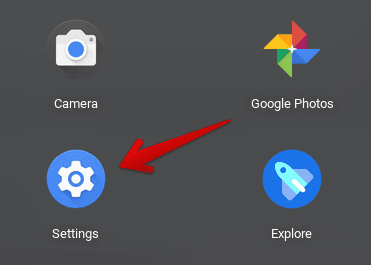
Opening “Settings”
2. To continue, click on the “Advanced” button in the sidebar to the left of the screen to continue. Doing so will reveal many extra options that we need to access to get to the printing part of the device.
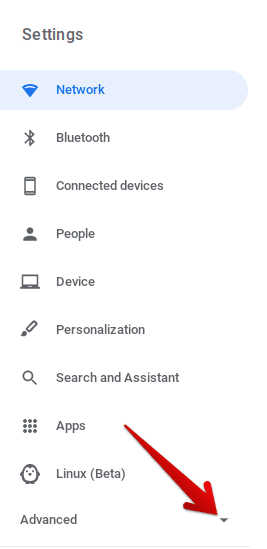
Clicking on “Advanced”
3. The next step is to select “Print and scan” from the sidebar. That should take you to the next step.
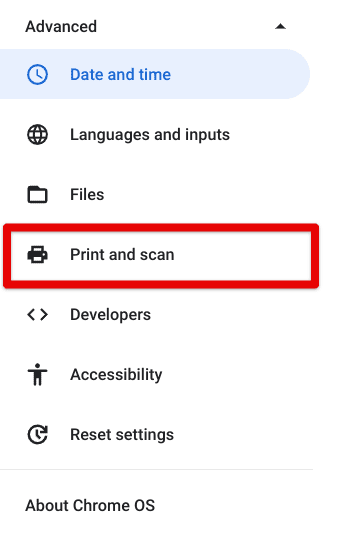
Clicking on “Print and scan”
4. After clicking on “Print and scan,” you’ll be taken straight to the relevant section that we need to get into within your Chromebook’s settings. From here, the next step is to click on “Printers.”

Clicking on “Printers”
5. Selecting “Printers” will lead you to a new page. Now, at this point, you have to turn your WiFi printer on so the Chromebook can detect its wireless signals and connect to it. Make sure the printer is emitting WiFi and is ready to go. Afterward, you should see the name of your specific printer now.
In addition, a “Save” button has to be present right beside your printer’s ID name. Click on “Save,” You should have your printer set up automatically and ready to print.

Saving the wireless printer on ChromeOS
6. After saving it, if your printer does not automatically configure itself after connecting to your Chromebook, you’ll see a “Set Up” button beside your printer’s name. Click on it and then proceed to dial in the device. This shouldn’t take long since all you have to do is select the manufacturer and the model of your printer from two drop-down menus, and you’ll be good to go.
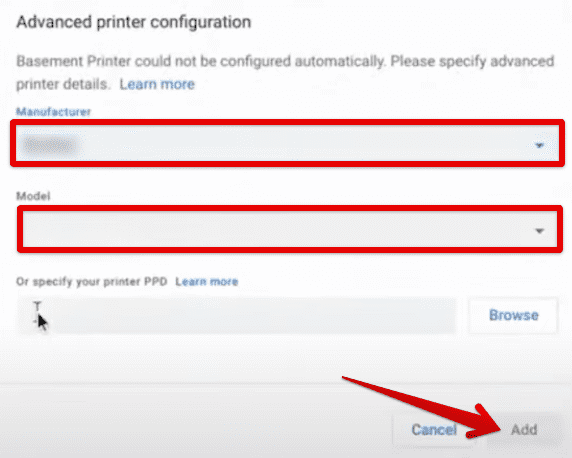
Configuring the printer manually
7. After going through the previous step, there’s a strong likelihood that you can then use your WiFI printer to print documents easily on your Chromebook. However, if the system isn’t detecting the device, you can click on the three vertical dots beside your printer’s name under the “Your saved printers” section. This will allow you to “Edit” the printer.
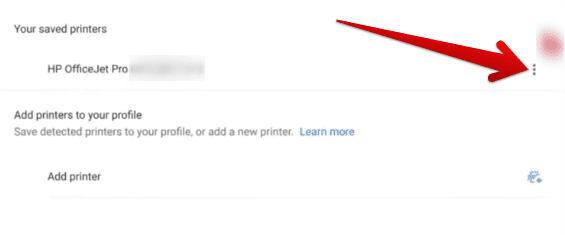
Editing the saved printer
8. After clicking on “Edit,” a window will appear comprising the specifics of your saved printer. Here, your job is to check all entered information and confirm its authenticity. Your printer might not be working because of an incorrect input in any required fields. Double-check the manufacturer and the model of your printer and click on “Save” to finalize the process.
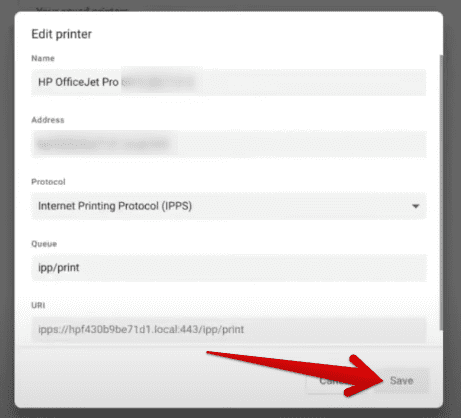
Double-checking the specifics of the printer
That’s about it for the walkthrough of adding a WiFi printer to your Chromebook! We’ve outlined all of the steps needed to be performed to start printing wirelessly on ChromeOS, so you shouldn’t be left scratching your head in confusion during any step of the way now.
With that being said, even after the last step, you cannot get your Chromebook to connect to the printer. Therefore, we suggest removing your printer from the “Your saved printers” section and adding it back again. More often than not, doing so helps users troubleshoot the issue.
A word on Google Cloud Print
If you’ve been around Chromebooks for a while now, you might have heard of Google Cloud Print. The service ran well on ChromeOS and provided users with an effortless way of connecting their device with a cloud-connected printer. It considerably streamlined the process, especially for Chromebooks, where a lackluster of dedicated drivers was noticeable.
Google Cloud Print was active for 10 whole years until the developers decided to scrap the project in favor of enhancing native ChromeOS printing. The service in question was an attempt from Google to formulate its protocol for wireless printing. The ideology behind the project was pretty understood and promised to be convenient for users on a large scale. However, the way this service was implemented turned out to be questionable.
The main problem with Google Cloud Print was that it lacked the most popular manufacturers’ support. This made it quite hard to find compatible printers to work with this service. Therefore, Cloud Print couldn’t be sustained for long and had to be scrapped as a whole. If you’d like to find out more about this program, take a look at our in-depth guide.
Conclusion
Chromebooks have come a long way from where they started their journey. Today, ChromeOS is capable of many things, and printing is one of them. We’ve shown you how to connect a WiFi printer to your Chromebook in a handful of easy-to-follow steps, so we genuinely hope you get to find this write-up helpful on your end.
Chrome Ready wishes you good luck!
