While Google Chrome is popularly crowned as the best internet browser of all time, mainly due to its experience in the field, some other products are showing up as of late and appear to be quite promising. One might typically tend to Microsoft Edge, Mozilla Firefox, or Opera, for that matter. Still, there’s another, more of an underdog type of net surfer that’s making headlines for being even faster than Chrome.
Enter Brave browser. Having its launch date tracing back to 2016, Brave has gradually become a tip-top internet browser with enticing features. It implements what it refers to as “Shields” in its interface, a collection of elements that improve the user’s privacy while browsing the internet.
In this write-up, we won’t be getting into much detail about Brave, but here’s a guide covering all you need to know about it. Let’s check out how to view and clear the Brave browser download history on a Chromebook. Keep on reading for detailed guidelines.
- Related read: 5 of the best fast browsers for Chromebook to download.
Viewing and clearing the download history of the Brave browser
The task at hand is nothing but straightforward. If you want to view and remove your download history in the Brave browser, you must know your way around the internet browser’s user interface. To illustrate this in-depth, the following steps will take it from here.
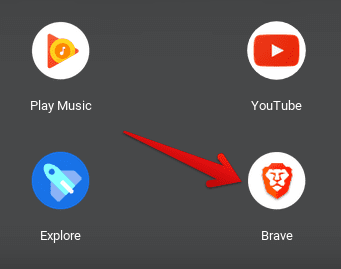
1. The first step is to launch the Brave browser on your Chromebook. This can be done effortlessly from the Chromebook Launcher or the shelf of the interface if you have it pinned there.

Launching Brave browser on Chrome OS
2. Next, click on the three vertical dots in the top-right corner of the app’s interface. That should reveal plenty of options for you on the screen.

Clicking on the three vertical dots
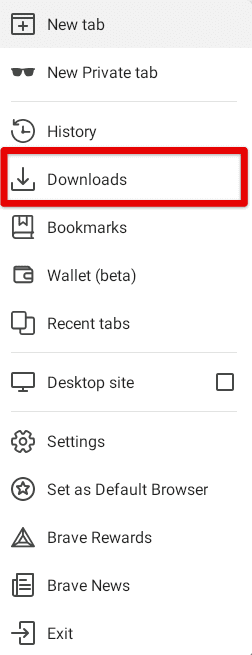
3. Select “Downloads” from the drop-down menu to get to the next step. You’ll see the relevant button easily after clicking on the three vertical dots button.

Clicking on the “Downloads” button
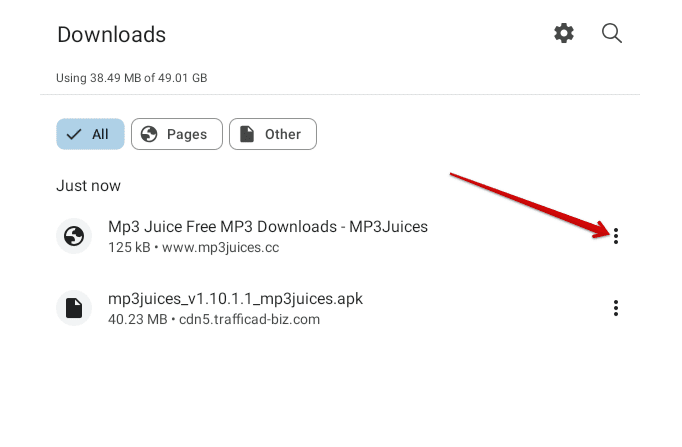
4. You will be effortlessly able to spot the list of items that you downloaded during your time on the internet surfer. Unfortunately, no singular button will allow you to wipe all downloads at the same time completely. You will have to go through this manually. Click on the three vertical dots beside each download item to be able to delete it.

Clicking on the “Options” button
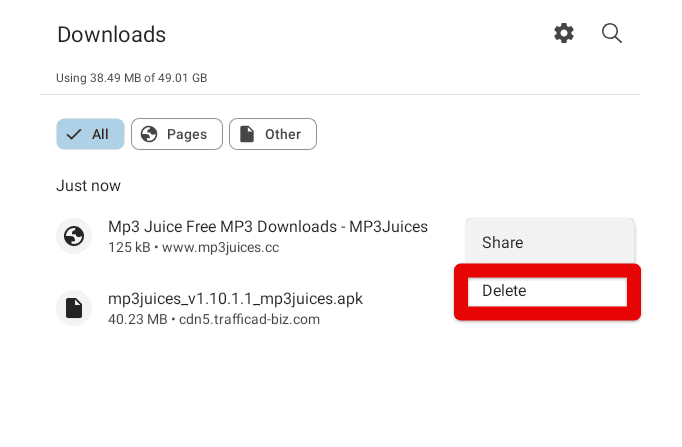
5. Now, completing the previous step will enable you to select the “Delete” button. Click on it to remove the download item from your download history on the Brave browser. Repeat the process until you have to, and you’ll soon be done with the procedure. That’s about it for viewing and deleting your download history on Brave.

Deleting the download history item
6. Now, the next two steps aren’t related to clearing your downloads on Brave, but they are worth mentioning here. If you want to tweak your download preferences while surfing the internet on this speedy internet browser, consider clicking on the “Settings” icon. That should take you to an entirely different section.
Clicking on the “Settings” icon
7. You’ll be taken straight to the download preferences area of Brave. Here, it will be possible to adjust the destination path of your downloads. If you want your downloaded files to go to a particular section on the Chromebook, click on “Download location” and specify the path accordingly. Moreover, you can also set whether you want to be asked before saving files or not.

Tweaking the Brave browsers download preferences
That’s all about it! You’ve successfully learned how to view and clear the history of your downloads on Brave. In addition, we’ve also illustrated the process of tweaking your download preferences while you’re at that. We hope that you can now replicate the procedure painlessly on your end.
- Recommended from Chrome Ready: How to get email links in Google Chrome to open with your Gmail.
Conclusion
Brave is a high-grade internet browser that guarantees enthusiastic users worldwide the utmost reliability and safety. It employs a speedy user interface with plenty of features to help people have a great time with it.
If you ever find yourself downloading some incorrect files on Brave, you know comfortably how to delete them any time you want and view them. We’ve laid out the essentials of the procedure in this guide, so we genuinely hope you’ve learned what you needed to hear. Chrome Ready wishes you good luck!
