If you’ve been trying to look for some sort of a “deleted files” section on your trusty Chromebook, you might not be able to find anything viable. The operating system we all know and love doesn’t come with the Recycle Bin feature by default like all Windows laptops do. Although the functionality is there, you will have to dive deep into the interface and dig out the feature you’re looking for.
This article will explain and cover how to enable the Recycle Bin in Chrome OS with the help of step-by-step instructions, so you never have to search for another tutorial again for the purpose at hand. Be sure to follow the guidelines below meticulously for the best results. With that said, let’s dive into the heart of this write-up without any further ado.
- Chrome Ready essential: How to boot from a bootable USB drive on a Chromebook.
Enabling the Chrome OS Recycle Bin
To unlock the feature of the Recycle Bin on your Chromebook, you have to replicate the steps listed ahead. In the meantime, though, we’ll give you a rundown of what we’re about to do so that you can understand the procedure. The Chrome OS Recycle Bin cannot be enabled or toggled on from the operating system’s in-built “Settings” system application. Instead, it’s hidden behind a Chrome flag that we’ll simply be enabling from our Google Chrome browser.
1. On your Chrome browser, type in the following or copy it and paste it afterward into the address bar. Once done, press the “Enter” key, and you should directly be taken to the Google Chrome “Flags” section in a separate window. Here, we’ll be enabling the Chrome OS Recycle Bin.
chrome://flags
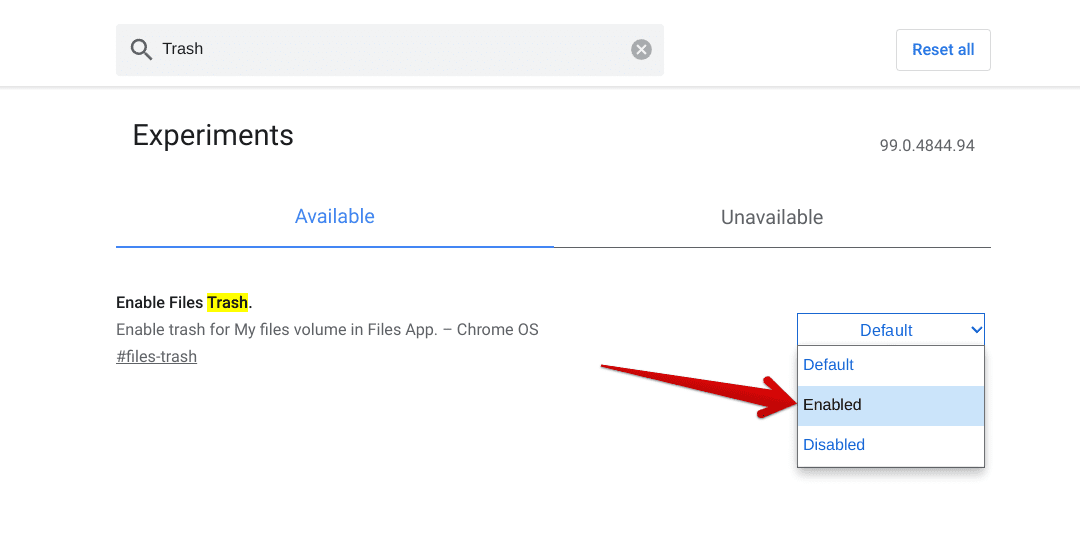
2. Once done, use the search bar provided within the interface of the “Flags” web app and type “Trash.” The latter is otherwise referring to the Chrome OS Recycle Bin here.

Searching for “Trash” in the “Flags” web app
3. Doing so should reveal the flag in question and allow you to enable it effortlessly. Click on the drop-down menu beside the “Trash” flag, and you can turn the feature on. Check out the following screenshot for a more detailed explanation.

Enabling the “Trash” feature
4. After clicking on “Enabled,” you will be prompted to restart your Chromebook for the changes to take effect. It’s easy to use the “Restart” button for the purpose at hand that will appear from the bottom of the “Flags” web app interface.

Restarting the device
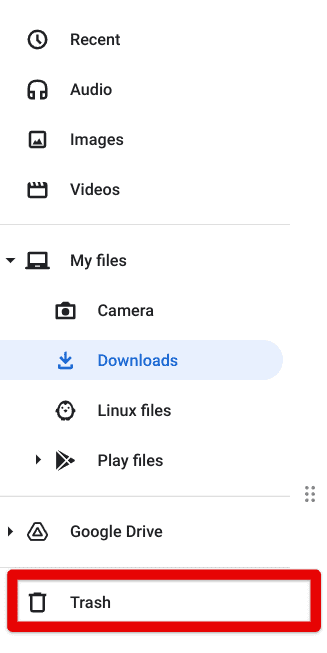
5. As soon as your Chromebook is back on, go to the “Files” system application and find the unique “Trash” section waiting for you in place. Look to the sidebar to see the feature in action.

Chrome OS Recycle Bin enabled
That’s all about how to enable the Recycle Bin in Chrome OS. The instructions above effectively accomplish the task in question, so follow them verbatim for favorable results. Next, let’s look at how you would use this Trash feature on your Chromebook.
How to use the Recycle Bin in Chrome OS
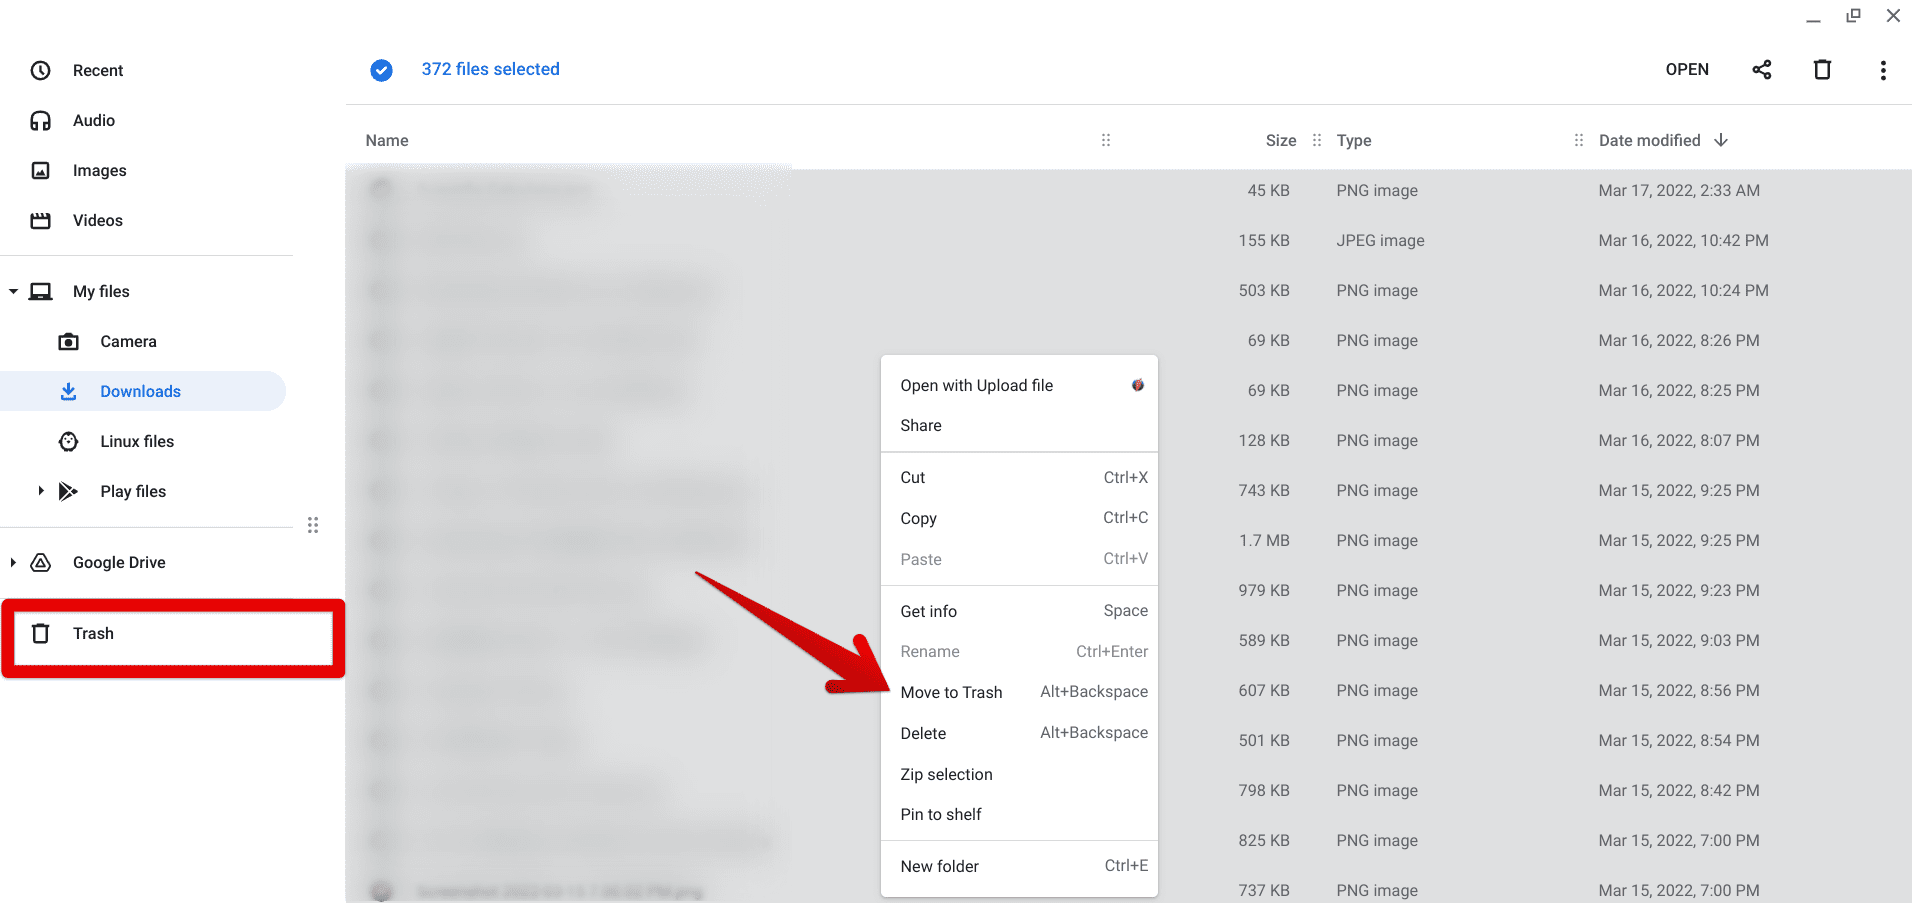
Utilizing the Chrome OS Recycle Bin is relatively straightforward. The first step is apparent here. You have to be inside the “Files” system application to be able to use it. Second, select whatever you want to delete but not permanently. It doesn’t matter if there are five files that you want to erase or 50. Select them with your mouse and perform a double-tap when you’re done. You should be able to see the “Move to Trash” option.

Moving the files to the Chrome OS Recycle Bin
You can either click on it to begin the process or input the provided shortcut key combination of “Alt” and “Backspace.” That should get you going in the right direction just as well. As soon as you’re done there, go to the “Trash” section, and you’ll find the “Empty Trash” button in the top-right area. Click on it to finalize the process. Alternatively, you can also press the “Alt,” “Shift,” “Ctrl,” and “Backspace” keys together to empty your Chrome OS Recycle Bin instantly.

Emptying the Chrome OS Recycle Bin
If you don’t want to empty your Recycle Bin, please pick out the items you’d specifically like to delete from the “Trash” section. You’ll also be able to recover files that you erased unintentionally beforehand.
The Chrome OS Recycle Bin is a handy feature, but don’t consider it permanent storage for your deleted files. The warning label clearly states that all Trash items will be deleted automatically after 30 days. You have been warned.
What is the Recycle Bin in Chrome OS?
The Recycle Bin in Chrome OS functions similarly to how it does on other operating systems and platforms. It allows users to store deleted files temporarily and clear space from their main folders for a temporary amount of time. It’s a valuable feature that makes it possible to keep things clutter-free and allows you to rethink your decision with your deleted files.
As iterated earlier, this feature isn’t officially out yet for the stable channel of Chrome OS and is still an experimental feature found in the “Flags” web app. It does bear noticing that you have to be over Chrome OS 89 to see the “Trash” flag on your Chromebook. If you’re using an outdated version of the operating system, we recommend updating to the latest one immediately. Here’s how to do it.
- On a side note, though, here are the top 10 Google Docs resume templates that you should check out.
Takeaway
The Chrome OS Recycle Bin doesn’t come enabled by default, given that it’s not a fully stable functionality yet. However, that cannot stop you from enabling and using it by following a handful of easy-to-follow steps. You should now be all caught up on what is the Chrome OS Recycle Bin that’s otherwise known as “Trash” around these parts, how you can toggle the feature on, and, most importantly, how you can use it.
We hope that you have found this helpful write-up for your cause. Chrome Ready wishes you good luck!
- Recommended read: How to delete bookmarks on a Chromebook.
