Have you meant to learn how to set custom DNS on a Chromebook? Well, then! You’ve landed on just the right spot. Changing the custom DNS on a Chromebook is as easy as ABC, so you truly shouldn’t be facing difficulty in doing it. In this complete guide, we’ll go over how you can access your device’s “Settings” app and alter them to get the DNS of your preference.
Apart from learning how to change your device’s DNS, we also recommend acknowledging the steps involved in reverting Chrome OS to an older version, launching Crosh on Chrome OS, and installing Crouton on a Chromebook. Becoming a specialist in this operating system can help you reap the benefits profoundly in the long run. So let’s learn what DNS is and how you can set a custom DNS on a Chromebook.
- Trending on Chrome Ready: The 5 best and free apps to convert photos to art on Chromebook.
What is DNS?
DNS is an acronym that’s short for Domain Network System. To put it simply, this is a directory that keeps a firm record of IP addresses, making it possible for your computer to communicate with websites online. Without an appropriately working DNS, you can forget about browsing or working on the internet. It’s one of the most prominent pillars of the vast interweb that is, although often neglected and isn’t known very well.
When the concept of Domain Network System originated, things used to be much simpler back then. A handful of Internet Protocol (IP) addresses were known that were used to connect to a niche group of websites. As the internet grew and more and more websites started to surface, it eventually became impossible to keep using the same overall network connectivity system.
DNS then continued to evolve and got much more expansive. Today, it takes up the overwhelming responsibility of converting domain names, such as “chromeready.com,” to numerical labels in a specific format. The latter goes along the likes of 191.168.83.223. Changing your DNS settings can bring many advantages, depending on your situation.
Certain DNS servers are more focused on security and privacy. The free-to-use public DNS server offered by Google is a standard in this business and allows users to surf the web in a balanced manner. You are free to change your DNS settings on your Chromebook and switch things up at will. Without any further ado, let us get into the facts of the matter.
Setting custom DNS on Chrome OS
Setting a custom DNS on Chrome OS is nothing short of a straightforward affair. We’ll be explaining all of it with the help of the step-by-step instructions given below. Make sure to follow them as they’re written for the best results.
1. The quickest way to change your DNS settings is through the Status Tray section of your Chrome OS interface. This is basically where you can see the clock, the remaining battery, and the Wi-Fi signal. Click on the area to get to the next step.
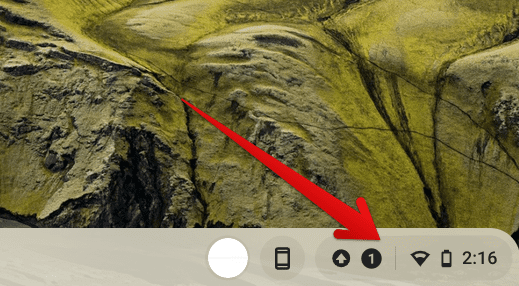
Clicking on the Status Tray area
2. Doing so should reveal a whole menu on your end. From there, click on the name of the internet connection that you’re connected to. Make sure not to click on the “Wi-Fi” icon since that’ll turn off your device’s Wi-Fi.
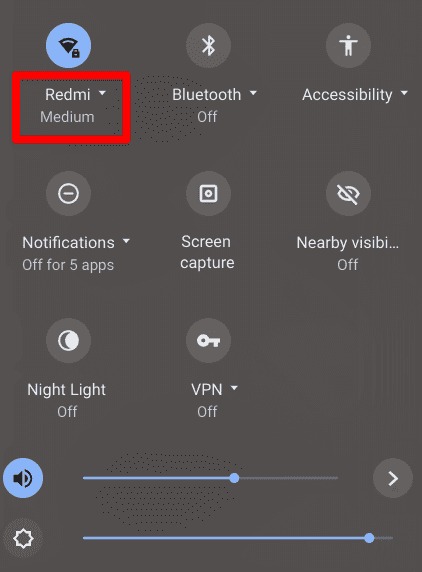
Clicking on the internet connection’s name
3. You’ll be taken to your device’s “Network” area. Click on the “Settings” icon shaped like a cog in the top-right corner of the section to get to the next step.
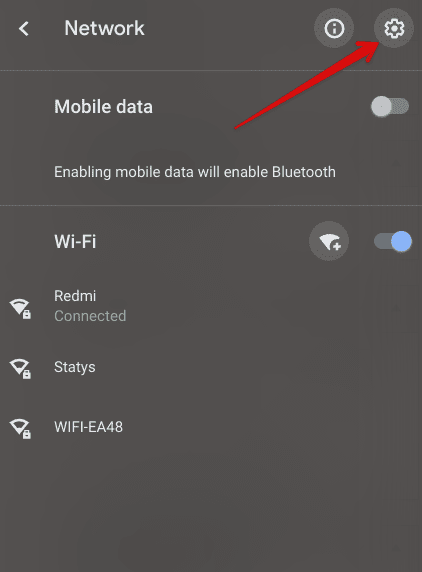
Clicking on “Network” settings
4. Clicking on the cog-shaped icon will lead you to open a new window on your end. Scroll down a little until you find the “Network” section. Click on it to progress ahead.
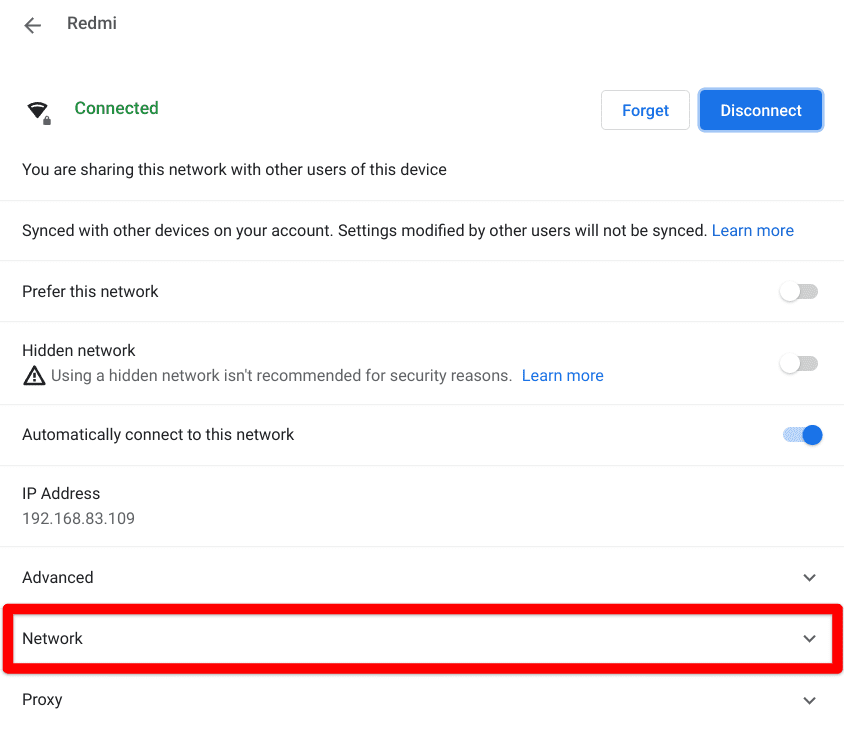
Clicking on the “Network” section
5. After clicking on “Network,” a series of options and informative bits will appear. Go under the “Name servers” section to find “Custom name servers.” Click on it to get to the next step.
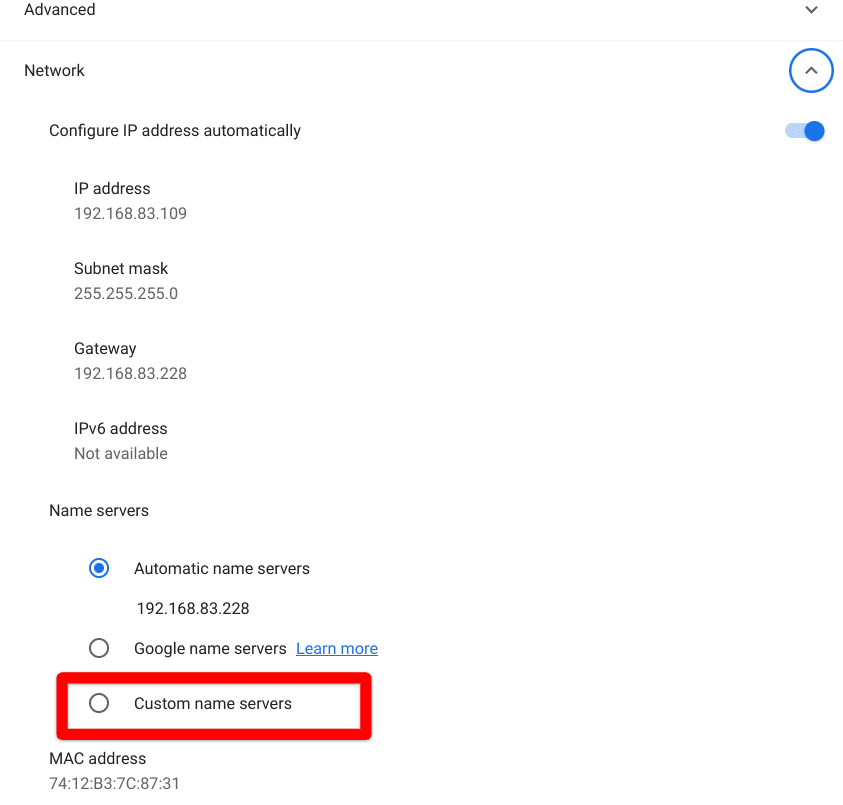
Clicking on “Custom name servers”
6. In the last step of this tutorial, all you have to do is enter the custom DNS you need on your Chromebook. As soon as you are done, feel free to close down the window and restart the system for the best results. The whole of the procedure was as simple as that.
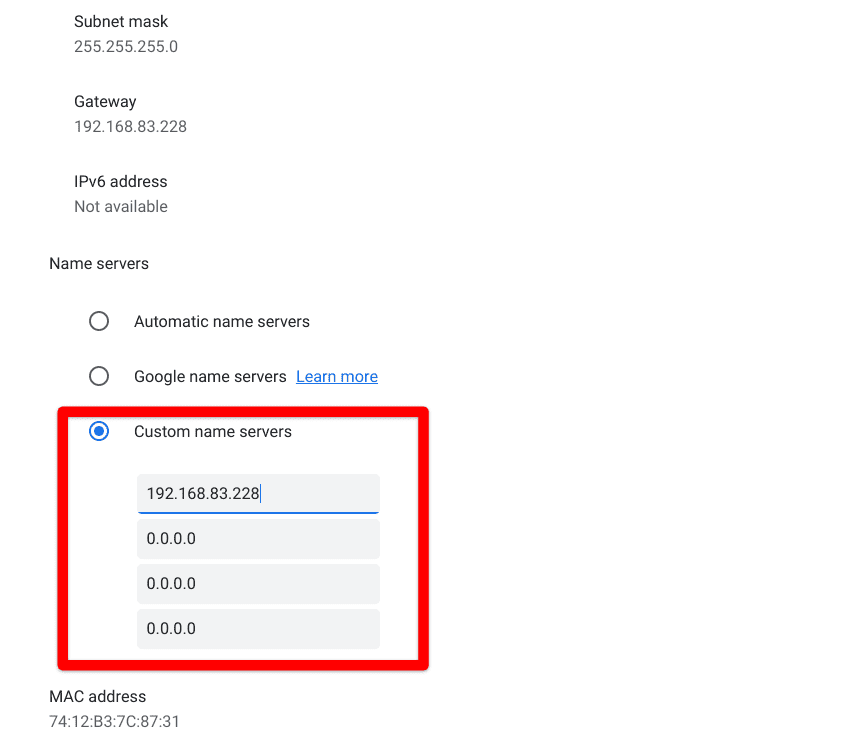
Entering custom DNS settings on Chrome OS
That’s about it for knowing how to set custom DNS on a Chromebook. You’ve successfully learned all there is to know about doing this using Chrome OS. As you can comprehend, there wasn’t anything involved that could come across as difficult to interpret. Most of the process was relatively straightforward, so you shouldn’t be having any issues by the time you’re done reading this guide.
Conclusion
Network connectivity issues can often arise when the default DNS isn’t working right. However, this big ordeal can be quickly alleviated if you know how to set a custom DNS yourself on a Chromebook. We’ve outlined the process of doing that in this write-up in many easy-to-follow steps.
Therefore, you should be relieved and ready to get your connectivity back on track with the help of modified DNS settings. Please let us know in the comments section if you found this guide helpful for your cause. Chrome Ready wishes you good luck!
