There is quite a diversity of operating systems in the world, but none of them are quite like our trusty, sleek, and utterly stable Chrome OS. It came out a year more than a decade ago and had been kicking it hard ever since. Google has implemented a surreal number of system updates for Chromebooks to make them capable of doing more and being more.
However, every major operating system has its shortcoming. Whether it’s the “Google Play Services keeps stopping error” or something entirely different, there might come a moment when you will need to recover your Chromebook.
Truth be told, recovering the software is nothing but straightforward. In this article, we’ll be talking about an essential system component and prove that Chrome OS recovery is simpler than you think. Without any further ado, then, let’s jump right into the write-up.
- Trending Read: Top 5 new features in Chrome OS 98
What is Chrome OS recovery?
Chrome OS recovery is a last resort-level procedure that permanently wipes all local data on your Chromebook and restores the operating system to its original or factory reset state. This feature is not to be confused with a Powerwash, another related process concerned with reinstalling Chrome OS.
On the other hand, Chrome OS recovery is where you first remove the operating system from the get-go and install it back again with the help of an external USB drive. It is more concerned with the Chromebook itself rather than the operating system. In multiple cases, performing a recovery can help revitalize your once-dormant device.
While we will delve into the details of this in one of the forthcoming sections, it’s worth noting for now that recovering your Chromebook makes the device function like brand-new again. With that being said, there’s one crucial facet of recovering a Chromebook that you need to be aware of.
A successful Chrome OS recovery, as we iterated earlier, will delete the data of the device it’s being performed on. Therefore, you need to have a spare copy of your locally present files safely stored on a USB drive or other external hard drive.
For this purpose, you can also opt for a cloud-based storage solution quite effectively. pCloud, according to our testing, is a fantastic option that millions of users are actively using at present. Consider checking more of its features and benefits in one of our guide articles here.
The first step in recovering any major operating system is to gather its recovery image in the format of ISO. If you’re a Windows user, you might be well aware of how complicated it can get when trying to restore the operating system to its natural habitat.
However, you have Chrome OS in the other corner of the ring, ready to be let loose. This speed-centric system makes the recovery process simple by bringing in the help of an application called Chromebook Recovery Utility. This tool streamlines the Chrome OS recovery operation and doesn’t demand a decked-out IT degree from the user.
We will illustrate how to use the Recovery Utility tool further on in this article, so let’s reserve the details for that. But, for now, let’s take a brief look at why you would ever need to recover Chrome OS in the first place. After all, no one likes getting their files removed for no reason, do they?
Why would you need to recover Chrome OS?
Although the developer has consistently kept pace with improving Chrome OS, we’re all human at the end of the day. That is why this slick operating system—no matter how invulnerable it gets to viruses, errors, and bug fixes—can mess up from time to time. In retrospect, when Chrome OS version 91.0.4472.147 made its way to the stable release channel, it practically disrupted the Chromebooks of some users, particularly those who had “hatch” or “grunt” mainboards.
People reported that not even a Powerwash was bringing any cure to the debacle. Fast-forward a couple of days, Google had finally addressed the issue, but the compromise came in the shape of Linux. Unfortunately, the latter was rendered useless in the subsequent update, marring thousands of users from accessing the feature. It was genuinely a real mess-up at the time.
That scenario is just one of the many cases where you will need to recover Chrome OS. Even a simple issue, such as “Google Play Store stuck at ‘Pending’ while installing apps,” can sometimes exacerbate and push your device to its very limit. This is another case when you’ll need to go for the recovery hammer.
Lastly, we have the ever-irksome Chrome OS is missing or damaged issue. This is when things get serious, and your most definite fix is recovering the operating system. Sure, hard resetting the device helps users in some cases, but recovery will be required for the rest of the time.
Before we get into the raison d’etre of this write-up, let us quickly go over all the different measures you can try before going for a proper recovery. The following section is going to take it from here.
What to try before going for Chrome OS recovery
As iterated earlier, Chrome OS recovery should only be carried out when you do not have any other option. Scenarios where your Chromebook has become outright unusable best define the necessity of recovering it. The following are all the different steps you can take before bringing in the big gun.
Perform a hard reset
Performing a hard reset is probably the way to go whenever an issue of considerable weightage surfaces on Chrome OS before you dive right into performing a full-blown recovery. A hard reset is similar to a factory reset on other operating systems like Android and Windows. On Chromebooks, therefore, that would translate to a Powerwash.
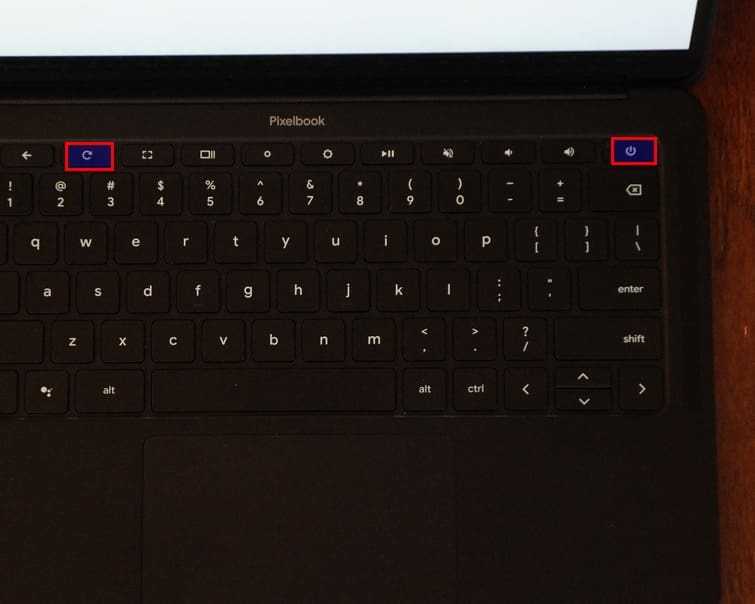
However, performing a hard reset on Chrome OS means entirely different and allows users to refresh the device’s hardware components. To get going with a hard reset, all you need to do is press two different keys on your Chromebook’s keyboard. Begin by pressing and holding the “Refresh” key and following it up by giving the “Power” key a swift touch.
No matter what you’re doing on your Chromebook—even if it’s frozen in place—the screen will black out after you input the key combination successfully and restart the device at once. This is known as a hard reset on Chrome OS. The following is a visual representation of what keys you need to press to perform a hard reset.

Key combination for a hard reset
Try a Powerwash
Last but not least, a Powerwash helps immensely for fixing Chromebooks to a decent extent. It reinstalls Chrome OS from the beginning and then allows you to set up your device afresh. That way, there’s a strong likelihood of fixing recurrent errors on Chromebooks without going through proper recovery.
Please be warned that a Powerwash differs significantly from a hard reset. Going forth with this feature will erase all locally available data on your Chromebook, so proceed with caution. Back up anything important that might come in use later for you to avoid any further complications.
That said, performing a Powerwash is outright painless. All you need to do is go through a couple of settings, and you’ll find the option to do it effortlessly. To be more specific, you’ll have to open the “Settings” system application, click on “Advanced” in the sidebar, and hover over to “Reset settings” to find “Powerwash.” Once done, click on it to get started.
A prompt will appear after you’ve clicked on “Powerwash” that’ll ask you to reboot the device to commence the process. Click on “Restart,” and you’ll be good to go. The following is a screenshot of the notification that’ll ask you for confirmation before initiating a Powerwash.

Performing a Powerwash
As soon as you click on “Restart,” the device will reboot itself and take a brief moment to process the Powerwash. As soon you observe the device back on again, you’ll find it greeting you with the initial setup screen. Follow the on-screen instructions, and you’ll be good to go. Do note that updates will be required for the device’s appropriate functioning from this point on.
Now that you know the basic way of performing a Powerwash on a Chromebook, there’s another, even quicker way of doing the same thing that you should know about. This approach involves inputting a specific shortcut key combination at the Chrome OS log-in screen. When you are in the specified area, press the “Ctrl,” “Alt,” “Shift,” and “R” keys together.
Doing so should initiate a Powerwash effectively and bring you the same results as the previous method. Now that you’re aware of these two fundamental measures to take before going for Chrome OS recovery, you’ll be all set to take care of most issues related to the operating system. However, in other cases, you will need to go forth with the big, bad option.
There’s no need to fret, though, as we’re going to lay down the instructions needed to be followed for recovering Chrome OS. By the time you’re done reading the next section, you’ll scoff at yourself for previously thinking that this whole procedure was anywhere near demanding.
Chrome OS recovery – an effortless affair
To make things simpler, we are going to the whole operation of Chrome OS recovery down in three different steps, so you’ll find the entire scenario easy to follow through. Primarily, you will need three different items to go forth with this process:
- A device that can install the Chromebook Recovery Utility extension
- A USB drive with at least 8 GB of free storage
Step 1. Install the Chromebook Recovery Utility extension on a different device
While the subheading of this step may sound like a mountain to conquer, it isn’t anything challenging. All you need to do here is install the Chromebook Recovery Utility web application on a device other than the Chromebook whose operating system you want to recover. This second device can be a Macbook, a Microsoft Windows laptop, or another Chromebook.
If you’ve got any of these, you should be good to go. If not, you can always borrow a friend’s laptop for the purpose in question. Once you have a device ready to go, install the Chromebook Recovery Utility tool on it with the help of the Chrome Web Store. The following steps are going to explain how to do this easily.
1. To get started, use this direct link and get straight to the official app page of Chromebook Recovery Utility. Once you’re there, click on the “Add to Chrome” button.

Installing the Chromebook Recovery Utility extension
2. You’ll be notified with a prompt from the top of the screen, asking you to confirm the installation of Chromebook Recovery Utility. Click on “Add app” to begin the download.

Adding the Chromebook Recovery Utility
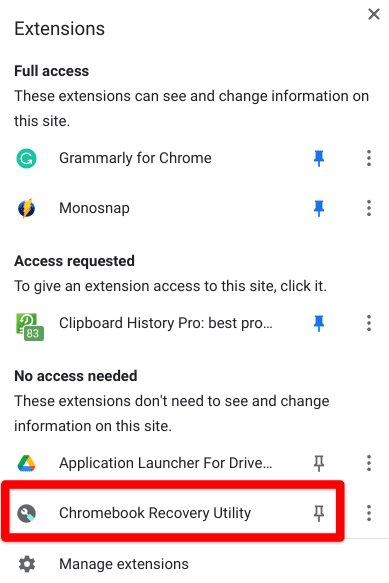
3. When done, check out the extension toolbar for the Chromebook Recovery Utility app. It’s bound to be there.

Chromebook Recovery Utility installed
Good job on making it this far. You now have to launch the Chromebook Recovery Utility to install the Chrome OS recovery image or, in other words, the Chrome OS ISO.
Step 2. Prepare the USB drive
Begin by clicking on the extension icon within the extension toolbar. Once done, you should see the following screen on your device. Click on “Get started” to further the process.

Getting started with Chromebook Recovery Utility
You will now have to proceed by entering the model number of your Chromebook. Things could’ve been a lot easier if you were performing this on your Chromebook right now, as the system would’ve detected the model number automatically. However, since that is not the case here, you’ll have to independently look for the device’s model number.
Turn your Chromebook upside down to see if the model number is written somewhere. You can also search your device online. Once you know the model of the device, enter it carefully in this third step. The Chromebook Recovery Utility extension will take a moment to get things rolling. As soon as it does, you can click on “Continue” to get to the next step.

Entering the Chromebook model number
This is where you will have to bring in a USB drive so the tool can detect it and further the process. Therefore, get an external storage device with at least 8 GB of free space and insert it into the machine. Once done, select the USB from the drop-down menu, and click “Continue” to get to the next step.
Please be warned that this USB drive’s contents will be erased. The device will be flashed with Chrome OS, so make sure no crucial files, photos, or other documents remain on the USB.

Inserting the USB drive
Next, the time has come to create the recovery image of Chrome OS. The page that you will see on the device at this stage will notify you that all data and partitions on the USB will be deleted. Click on “Create now” to begin the recovery image creation process.

The process will take a minute or two to complete. But, when it does, all you’ll have to do is click on “Done,” and your recovery media will be ready. You can now safely take out your USB drive.

Step 3. Insert the USB drive into the faulty Chromebook
Excellent work so far. You now have to turn to the faulty Chromebook to proceed from here on out. If the device can boot up, you will be required to enter the Recovery Mode on it with the help of the “Esc,” “Refresh,” and “Power” keys. If, upon turning on the device, you’re taken straight to the “Chrome OS is missing or damaged” screen, then that’s going to work for us too.
Begin by inserting the USB drive containing the Chrome OS recovery image into the defective Chromebook now. As soon as you do that, the screen will back out, and the system will start verifying the files you have stored on the flash drive. The procedure doesn’t take too long, and it will only take a few minutes for the recovery operation to commence.
Once the recovery is complete, you’ll be prompted to pull out the USB drive. Do that and let the device reboot itself. After that, you’re going to have a completely fresh install of Chrome OS, and there you have it! In just three easy steps, you’ve learned how to recover Chrome OS. Now, be the judge and tell us if that was so hard.
Another way to recover Chrome OS
The method of Chrome OS recovery described above is known as the traditional way. However, some relatively recently released Chromebooks have now been given the features of automatic recovery, which is nothing but cutting-edge. To confirm whether your device supports this level of functionality, you will need to boot your Chromebook into the “Recovery Mode,” which we’ve described above.
To give you a quick reminder, you need to press the “Esc,” “Refresh,” and the “Power” key to boot into the Recovery Mode. Some devices support the “Maximize” button, which is right next to the “Refresh” button for this purpose, so do try the combination of “Esc,” “Maximize,” and “Power” as well. Once done, you will observe the Chromebook blacking out with a flash and returning you with the “Please insert a recovery USB stick or SD card.”
However, if your device is compatible with the automatic recovery feature, you will see an option to “Recover using internet connection.” This is what you need to select to recover Chrome OS. You’re very much in luck if you’re able to reset your Chromebook this way. Follow the on-screen instructions and let the operation do its thing.
With that said, though, you will have to resort to the traditional method if your device doesn’t support this feature. We thought it was worth putting it out here to allow users to confirm the presence of this functionality. We’ve now reached the article’s conclusion.
Conclusion
Chromebooks have been at large for a considerable amount of time now, thanks to their effectiveness at getting things done. Chrome OS is a simplistic operating system specializing in a clutter-free user interface and an overly speedy environment. However, if you have a worn-out device personally that’s slowly starting to show signs of age and is giving you a ton of trouble lately, you might need to look into a full-fledged Chrome OS recovery.
Some people have assumed that recovering Chromebooks is a complicated process. That said, the truth cannot be farther from this. In this guide, we have walked you through the process of Chrome OS recovery in three easy steps, proving to users that Chromebooks are entirely minimal when it comes to making them work again. We hope you’ve been cleared of your doubts in this guide. Thanks for reading!
