Even though Google Chrome is the most famous and widely used internet browser globally, it too can have issues. Google Chrome is not entirely error-free by any means. You might have heard many people complaining about their Google Chrome browser going into the Not Responding mode from time to time. The root cause behind this issue can be different in each case. However, some typical reasons make your browser go into the not responding state.
Google Chrome is a very reliable and secure internet browser. There is no doubt regarding its exquisite performance and useful features. But this browser has been notorious for memory management and system adaptability. If you have been using Google Chrome for some time now, chances are you have faced the issue of Google Chrome not responding more than once.
This speaks of the fact that this is a genuine problem and needs to be catered for once encountered. Once your browser goes into the not responding mode, you cannot complete whatever action you perform. This can be even more frustrating if you end up losing progress or some unsaved online work. Therefore, a Google Chrome user needs to know what to do when this issue arises next time.
Reasons for Google Chrome not responding
It has been widely reported that this issue is most common in Windows 7 and Windows 8. This shows that some compatibility issues with the browser configuration might be causing this issue. Due to this reason, there is a growing concern among Chrome users who have Windows 7 or Windows 8 installed on their devices. However, you should know that the solutions we will explain in this article are non-specific and can get rid of this issue within minutes.
Another reason behind this issue can be processor clogging. If you have third-party applications installed on your browser, Google Chrome can quickly stack up the memory. This leaves the system’s chip unable to process so many actions simultaneously, causing the browser to go into the not responding mode. Another variation of this problem is the crash of the Google Chrome browser. In this case, you will not see the not responding message, but instead, the browser will crash and immediately close. This usually occurs when you have tons of browser cache stored up in its memory.
Sometimes your browser activity freezes without the display of any warning or message. It is triggered by a rigorous change to the default settings of Google Chrome. If this is the case, you will have to reset your browser. Another possibility is some suspicious extension causing all of this. Some users have also reported that their browser does not open whenever they click on its icon located in the taskbar. This happens if the fundamental cause behind the not responding issue is not resolved even after the browser has closed. Malware infection might be causing this as well. Since we use our browser to surf the internet filled with these infections, it is plausible that the first landing target for these viruses is Google Chrome.
These are the most common triggers for Google Chrome going into the not responding state. Of course, the actual reason might differ when you face this issue. Still, we will list the possible course of action for you that is more than likely to resolve this problem. So, let us go over these methods one by one without further ado.
Updating Google Chrome
Having the most recent version of Google Chrome installed on your system is one way to ensure maximum security and efficiency. Whenever a new update rolls out for Google Chrome, it means that the developers have worked and come up with a solution to resolve some bugs and issues. Even though Google Chrome updates itself automatically, it is possible that these new updates can remain pending for extended periods due to some unexpected reason. In that case, you can manually update the browser to the latest version. For doing so, you will have to take the following steps,
Step 1: Open “Google Chrome” on your device.
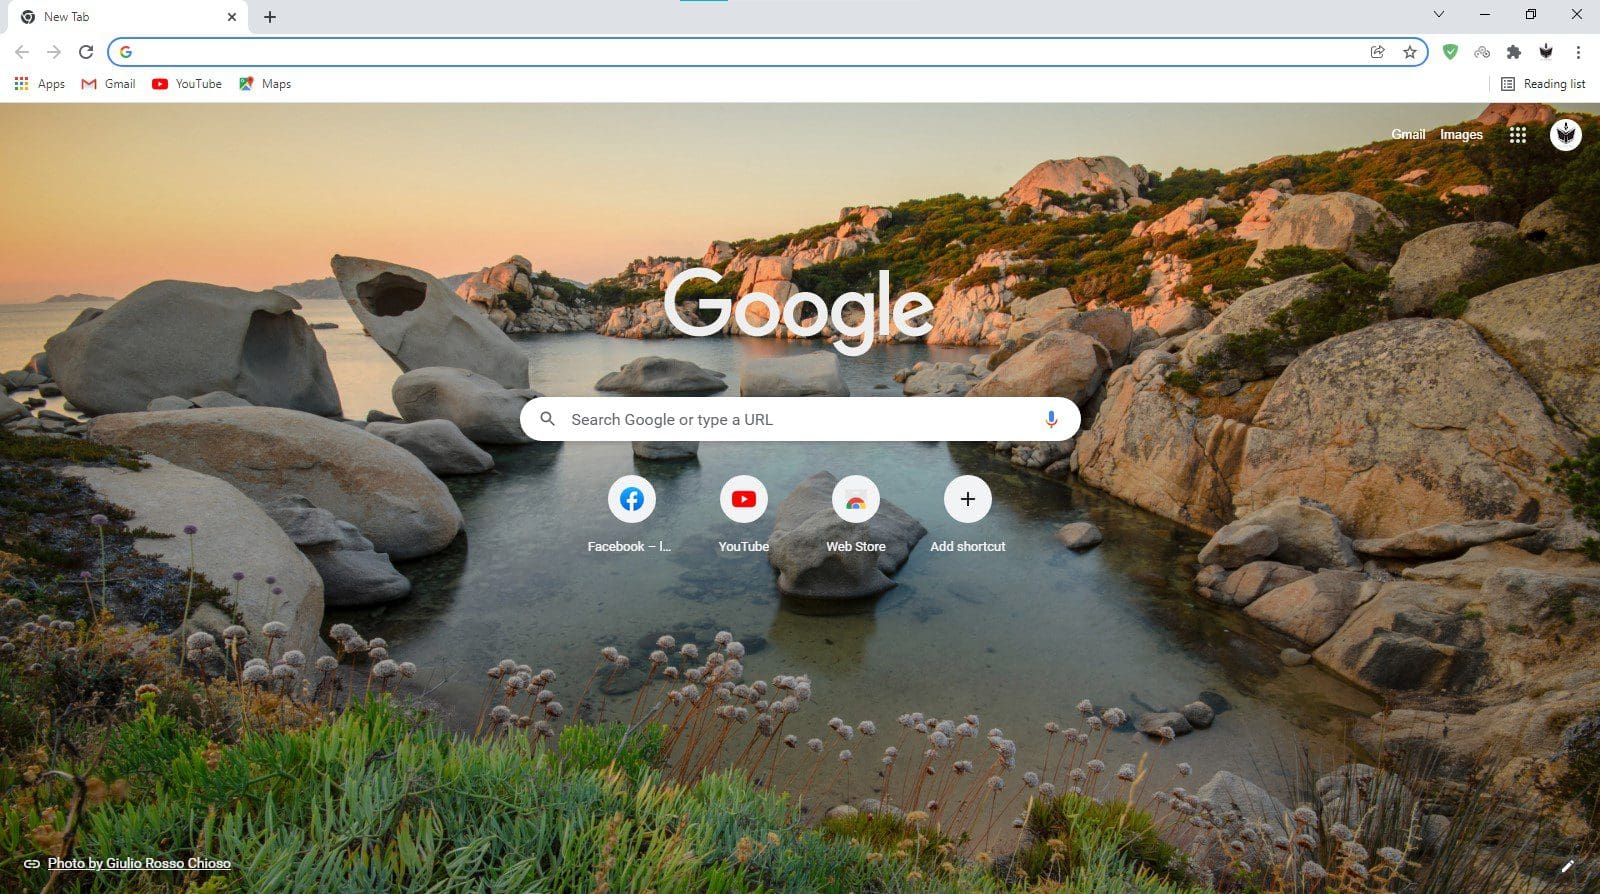
Google Chrome Homepage
Step 2: Click on the three-dot icon to open “Google Chrome Menu.” This will launch a drop-down menu.
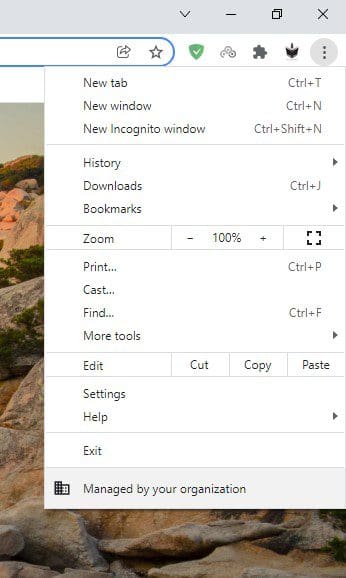
Google Chrome Menu
Step 3: Go to “Help” and click on “About Google Chrome.”
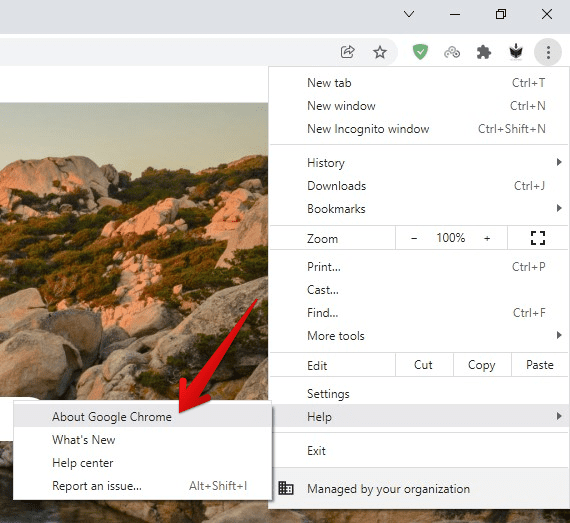
About Google Chrome Under Help
Step 4: This will open up the “About Chrome” page in a new tab. At the very top, you will see the current version of your browser. Google Chrome will start checking for further updates by clicking on this tab. The download will start automatically if a more recent browser version is available for your device.
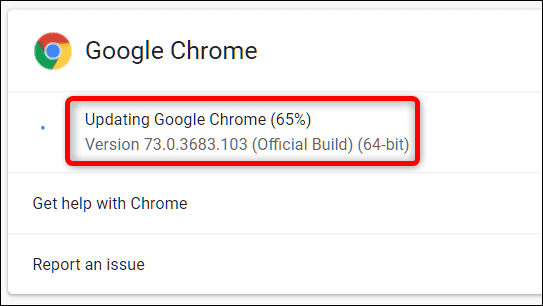
Updating Google Chrome
Step 5: Once the update has been downloaded and installed, a “Relaunch” button will appear on your screen. Click on this button to restart Google Chrome. This will kick in the new settings immediately.

Relaunch Button
Before starting the update, ensure that you do not have any unsaved data. Anything you are currently working on must be completed before the update is installed. Otherwise, you can end up losing it.
If Google Chrome has automatically downloaded the new update but could not complete the installation, your three-dot icon will change into an upwards arrow. This icon will have one of these three colors:
- Green – Update has been available for two days.
- Orange – Update has been available for four days.
- Red – Update has been available for seven days.
Once the three-dot icon changes into an upwards arrow, the “Google Chrome Menu” will have an additional “Update Google Chrome” tab. You can click on that button to install the update immediately.
Clearing Browser History & Cache
If you cannot eliminate the Google Chrome not responding issue with the first method, the next logical step would be to clear the browser history and cache. These old files are not used by the end-user and usually block the adequate performance of the processor. Therefore, it is advised to have them cleared every few weeks, even if you are not facing any apparent issue. For clearing browser history and cache, the following steps are to be assumed,
Step 1: Open “Google Chrome” on your device.

Google Chrome Homepage
Step 2: Click on the three-dot icon to open “Google Chrome Menu.” This will launch a drop-down menu.

Google Chrome Menu
Step 3: Go to “Clear Browsing Data” under the “More Tools” tab.
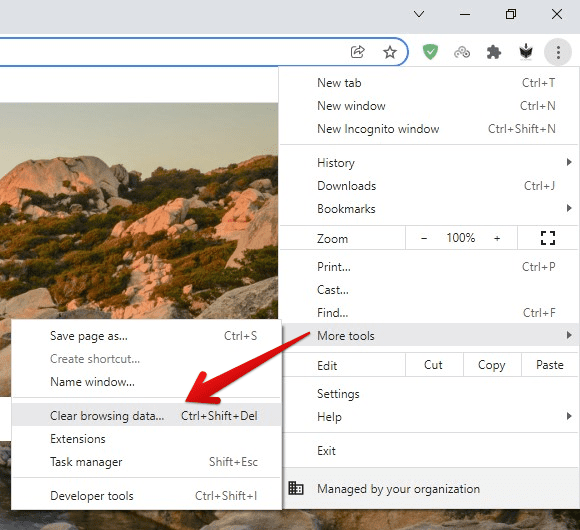
Clear Browsing Data Under More Tools
Step 4: This will open up the “Clear Browsing Data” window in a new tab.
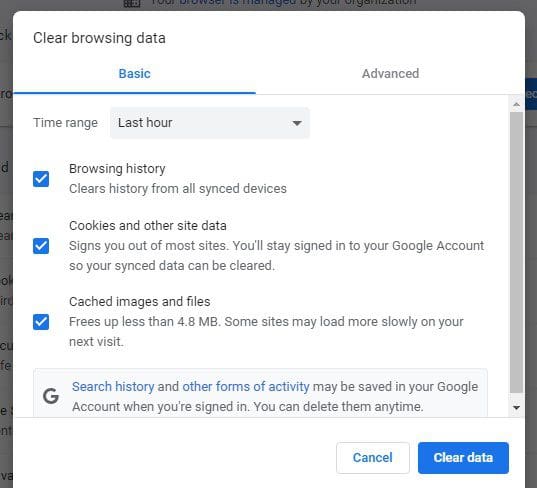
Clear Browsing Data Window
Step 5: Go to the “Advanced” tab from the top. Make sure to tick all checkboxes on the left and select “All Time” as the time range of this action.
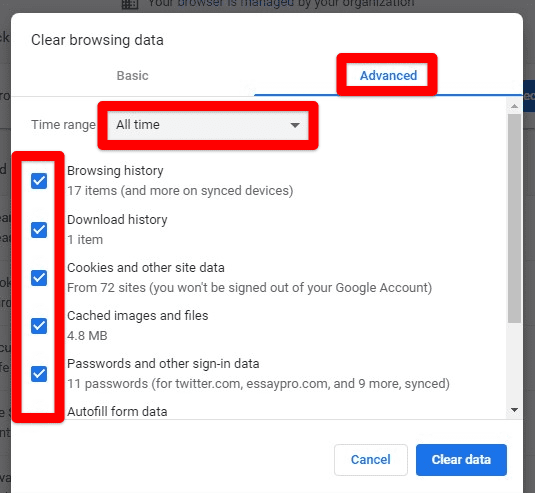
Advanced Tab
Step 6: After that, click on the “Clear Data” button in the bottom right corner of the window.
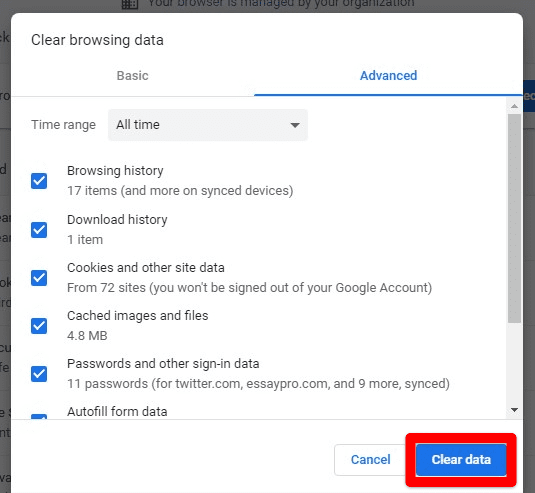
Clear Data Button
This process might take some minutes, but it will clear your browser from all history and cache that might be slowing down its performance once the clearing process has been completed. Hopefully, the Google Chrome not responding issue will be resolved.
Removing or disabling troublesome extensions
Many users have found the solution to the Google Chrome not responding issue by removing extra extensions installed on their browser. Some of these extensions may also contain malware slowing down your processor over time. This is why, this too, is a necessary step whether you are faced with the Google Chrome not responding issue or not. For removing installed extensions from Google Chrome, you need to follow these basic steps,
Step 1: Open “Google Chrome” on your device.

Google Chrome Homepage
Step 2: Click on the three-dot icon to open “Google Chrome Menu.” This will launch a drop-down menu.

Google Chrome Menu
Step 3: Go to “Extensions” under the “More Tools” tab.
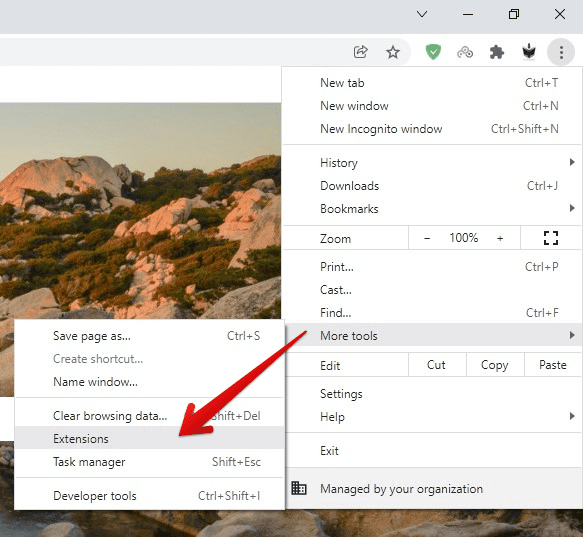
Extensions Under More Tools
Step 4: This will open up the “Extensions” page in a new tab. It will contain the information of all extensions that are currently installed on your browser.

Extensions Page
Step 5: Check if any extension is no longer needed or looks suspicious. You can remove any extension by clicking on the “Remove” button on its badge.
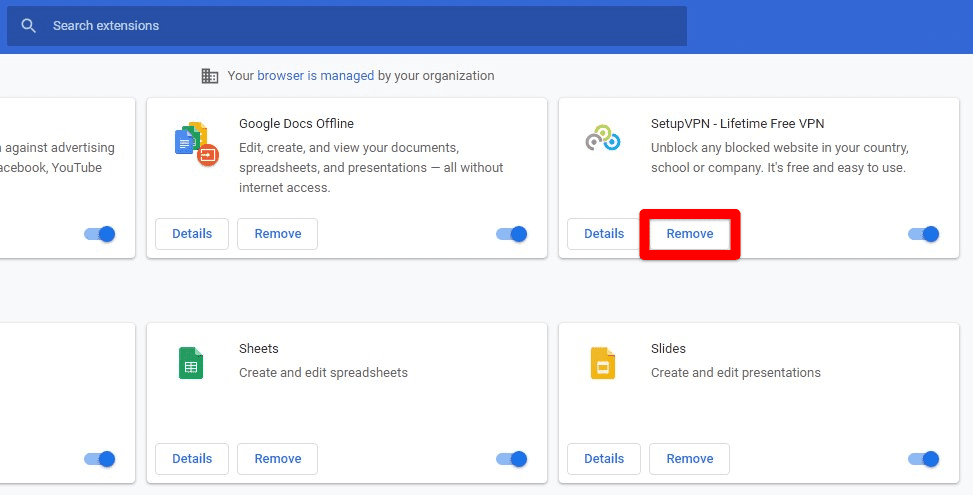
Remove Button
If you think that an extension is no longer required, but you may need it at some point in the future, you can disable it instead. It can be done by toggling the switch to the disabled position. Once you have checked for all extensions, close Google Chrome and open it again. Check to see if the not responding issue is now resolved or not.
Resetting Google Chrome to default settings
Sometimes, Google Chrome not responding issue can also be fixed by simply resetting Google Chrome to its default settings. You might have knowingly or unknowingly changed some critical setting during regular usage, causing this problem. Once the browser is reset to its default settings, the chances are that the not responding issue will now be eliminated. For resetting your browser to default settings, you need to undertake the following steps,
Step 1: Open “Google Chrome” on your device.

Google Chrome Homepage
Step 2: Click on the three-dot icon to open “Google Chrome Menu.” This will launch a drop-down menu.

Google Chrome Menu
Step 3: Go to “Settings” and click on “Advanced.”
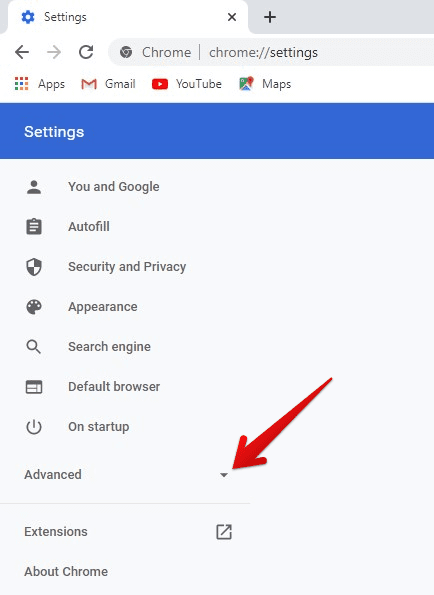
Advanced Settings
Step 4: Inside the “Advanced” settings, go to the “Reset And Clean Up” tab.
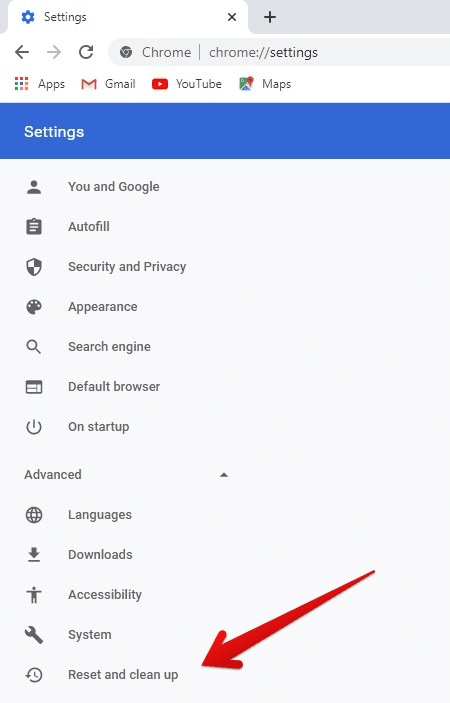
Reset And Clean Up Tab
Step 5: In the “Reset And Clean Up” tab, click on “Restore Settings To Their Original Defaults.” This will open a pop-up window on your screen.
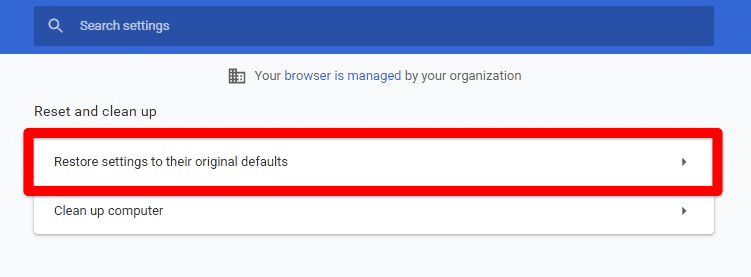
Restore Settings To Default
Step 6: Click on the “Reset Settings” button to complete the action.
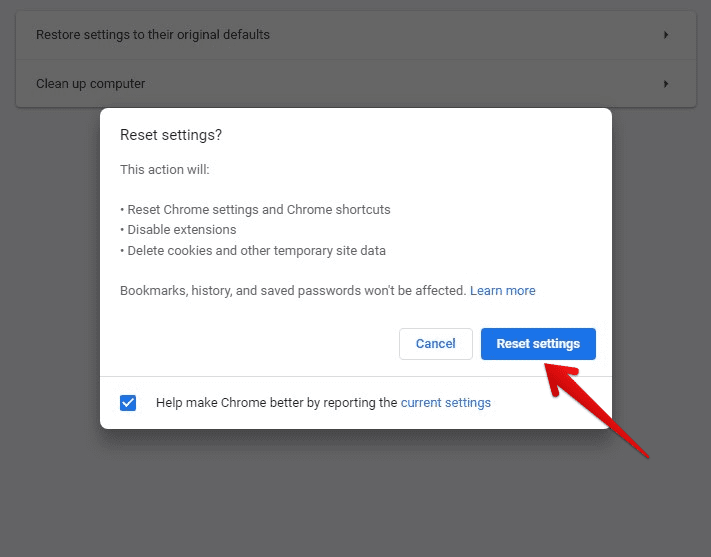
Reset Settings Button
After resetting the browser to its default settings, close Google Chrome and open it again, check to see if the not responding issue is now resolved or not.
Conclusion
Google Chrome is an exquisitely designed web browser, and there is no doubt about that. However, nothing is perfect, and there is always room for improvement. For Google Chrome, this room lies in memory and processor management. While the Google Chrome not responding issue is quite common, any regular user can implement easy and generic fixes. This makes it not as troubling as some other complications in internet browsing.
