You might have noticed that when you continuously use your browser for more extended periods or open more than 10 tabs simultaneously, the system starts to lag, and the response time increases dramatically. This is because of the high CPU usage in Google Chrome. This issue has concerned Chrome users for years, and it still poses some problems. However, since the issue is widespread, there are more than a few solutions that can fix it quickly.
There are several reasons behind why this issue is a thing. The problem primarily arises because of how your browser is configured inside your operating system. Don’t be worried at all as this is not something that cannot be fixed. The most typical indication that you need to check your CPU usage is your system freezing from time to time. This is the characteristic marker of this issue and must be associated firstly and foremost with it. Therefore, if you face any such issues, the first thing you need to look out for is CPU usage inside your system’s task manager.
Reasons behind Google Chrome’s high CPU usage problem
Google Chrome is the most popular and widely used browser in the world. The industry’s leader in more things than you can count. Due to this, it seems complicated to realize why a big platform like Google has failed to address this issue after so many years. That’s because the root cause of the problem does not lie with Google but with your device. Many reasons can cause this issue, but these are somehow related to the local system more often than not.
One of the most common reasons for this issue is using online apps and extensions that the device’s processor does not support. Google Chrome is an efficiently built browser and can handle programs that are orders of magnitude complex and more prominent than what your PC or laptop can manage. Whenever installing a browser-based application or an extension, you should check for Chrome compatibility and System compatibility. Unfortunately, many users ignore this issue, which clogs their processor with more than it can control at a time.
Another common reason which causes this issue is opening unnecessary tabs that are not regularly used. If designed to overpower the local system, any platform is considered faulty. The same should be the case with the usage of that platform. If you are currently working with 5 tabs at most, there is no good sense in opening 20 more in the background, which you probably won’t even open during the entire length of the day.
Also, while browsing the internet, we open suspicious links or install third-party applications. These URLs and apps can harm your device by bringing in viruses, malware infections, and adware. These viruses and malware also affect the regular usage of Google Chrome, clogging the processor as a result. Therefore, it is always recommended to verify and authenticate your source before you even open a link on the internet.
It is also possible that you have been using Google Chrome for quite some time now. Due to extended usage, the internal cache and cookies of the browser pile up massively. They can noticeably slow down the performance and effectiveness of the processor. Whatever the reason is, once you face the high CPU usage issue, the next step is to fix it accordingly. Since there are numerous causes to the problem, you will have to follow the hit and trial method while searching for a solution. The good thing is that you will get rid of this issue within these methods in almost all cases. Let us take a brief look at them one by one.
Analyzing Google Chrome Task Manager
Whenever you feel like you are facing a high CPU usage issue, you need to check the first, and foremost thing is the Google Chrome Task Manager. Doing so will tell you whether your assumption is correct or not. Moreover, it will also tell you an in-depth analysis and the division of CPU usage. Through this task manager, you can know which plugin, extension, tab, or process is using your CPU the most. To analyze the Google Chrome Task Manager, you will have to observe the following steps,
Step 1: Open Google Chrome on your device.

Google Chrome Homepage
Step 2: Click on the three-dot icon to open Google Chrome Menu. This will launch a drop-down menu.

Google Chrome Menu
Step 3: Go to “Task Manager” under the “More Tools” tab.
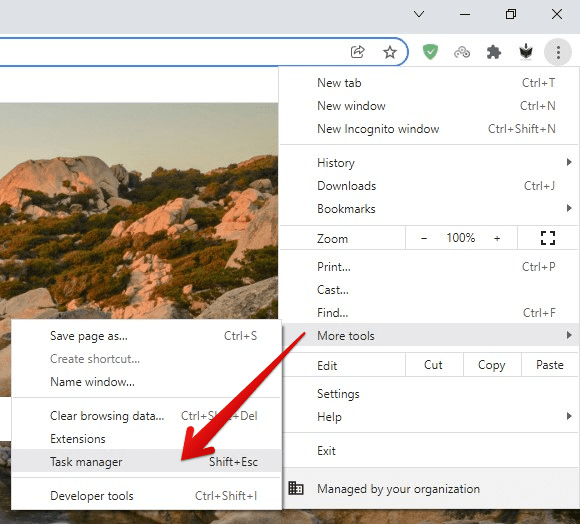
Task Manager Under More Tools
Step 4: This will open up the task manager in a new window. Here, you will see the Memory Space, CPU Usage, and Process ID of all currently active processes inside the browser.
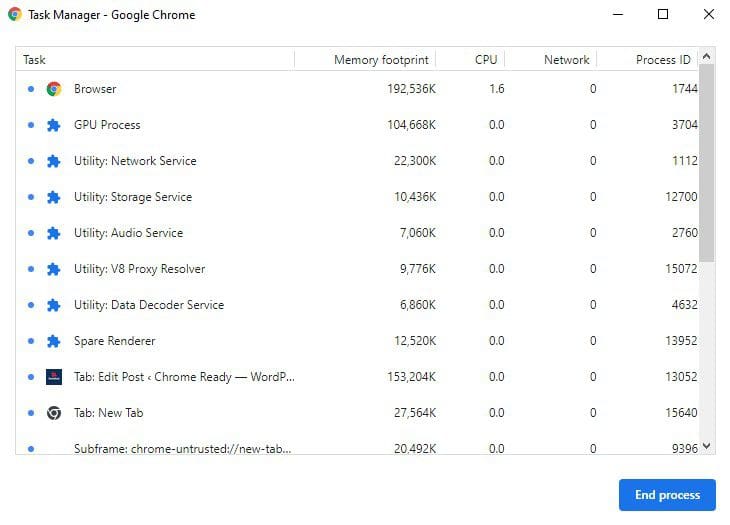
Task Manager
Step 5: End any process that might seem to take up higher CPU usage. This can be done by clicking it with the left mouse button and pressing the End Process button in the bottom right corner of your screen.
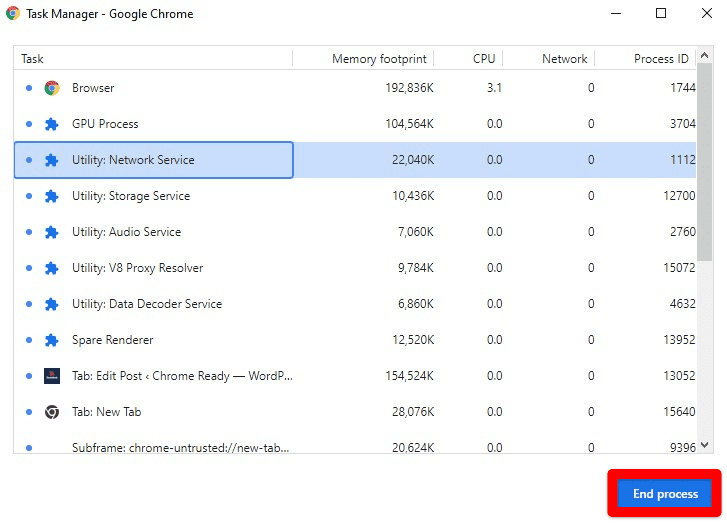
End Process Button
Once the process has ended, close Google Chrome and open it again. Check to see if the problem is now resolved or not.
Clearing browser cache & cookies
If the first method fails to do the trick, the next logical step would be to clear the browser cache and cookie data. These old files are not used by the end-user and usually block the effective performance of the processor. Therefore, it is advised to have them cleared every few weeks, even if you are not facing any apparent issue. For clearing browser cache and cookies, the following steps are to be assumed,
Step 1: Open Google Chrome on your device.

Google Chrome Homepage
Step 2: Click on the three-dot icon to open Google Chrome Menu. This will launch a drop-down menu.

Google Chrome Menu
Step 3: Go to “Clear Browsing Data” under the “More Tools” tab.
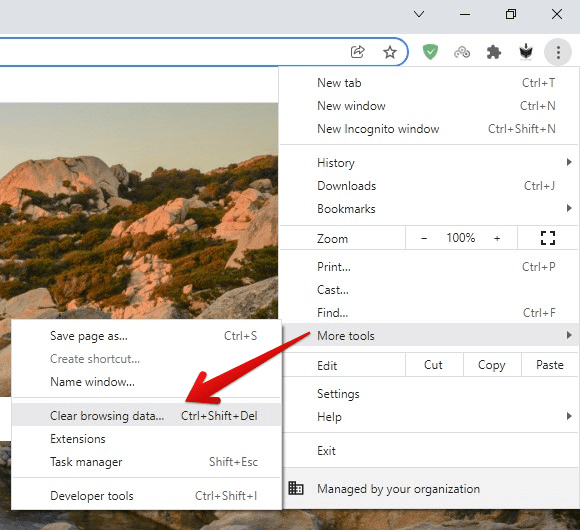
Clear Browsing Data Under More Tools
Step 4: This will open up the Clear Browsing Data window in a new tab.
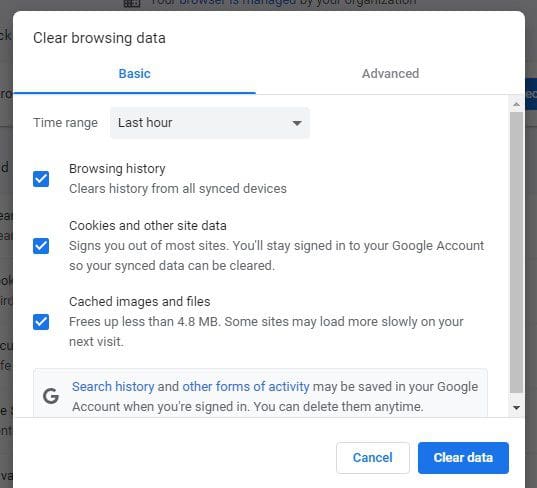
Clear Browsing Data Window
Step 5: Go to the “Advanced” tab from the top. Make sure to tick all checkboxes on the left and select All Time as the time range of this action.
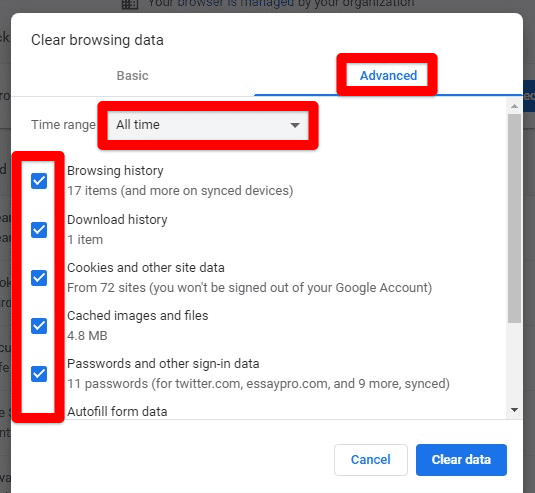
Advanced Tab
Step 6: After that, click on the “Clear Data” button in the bottom right corner of the window.
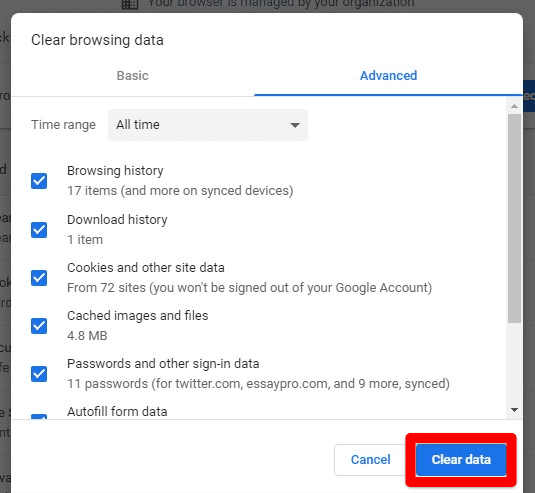
Clear Data Button
This process might take some minutes, but it will clear your browser from all cache and cookie data that might be slowing down its performance. Once the clearing process has been completed, close Google Chrome and open it again. Check to see if the problem is now resolved or not.
Removing irrelevant & suspicious extensions
Many users have found the solution to the high CPU usage issue by removing extra extensions installed on their browsers. Some of these extensions may also contain malware slowing down your processor over time. This is why, this too, is a necessary step whether you are faced with the high CPU usage issue or not. For removing installed extensions from Google Chrome, you need to follow these basic steps,
Step 1: Open Google Chrome on your device.

Google Chrome Homepage
Step 2: Click on the three-dot icon to open Google Chrome Menu. This will launch a drop-down menu.

Google Chrome Menu
Step 3: Go to Extensions under the More Tools tab.
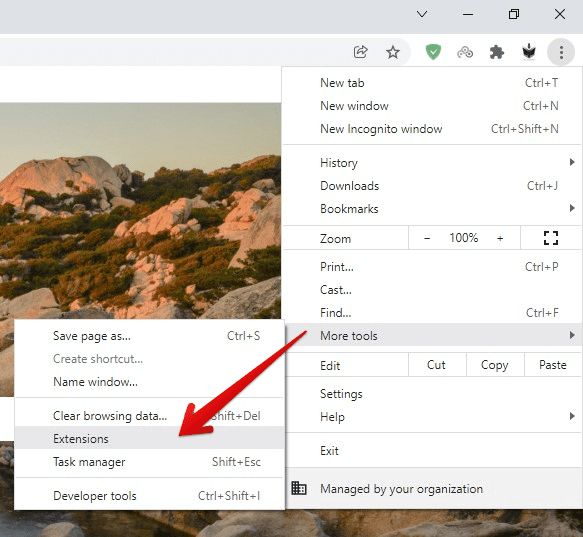
Extensions Under More Tools
Step 4: This will open up the Extensions Page in a new tab. It will contain the information of all extensions that are currently installed on your browser.

Extensions Page
Step 5: Check if any extension is no longer needed or looks suspicious. You can remove any extension by clicking on the Remove button on its badge.
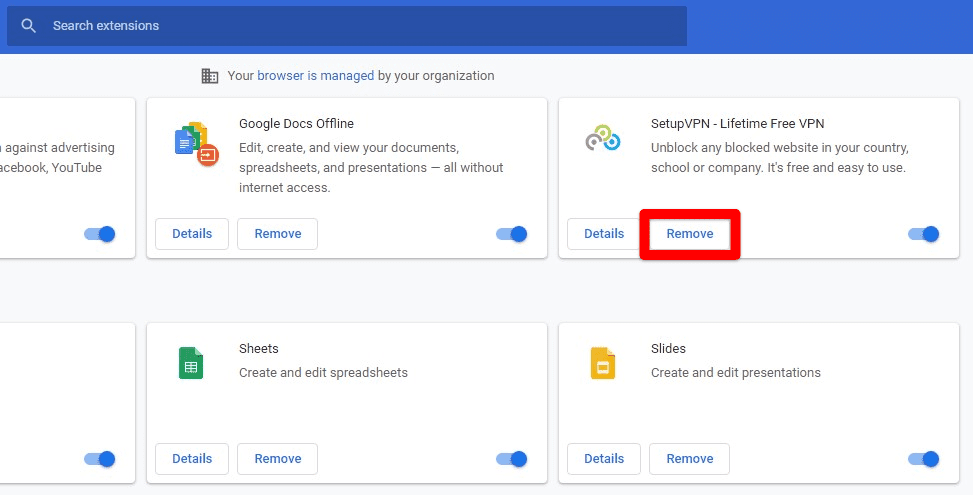
Remove Button
If you think that an extension is no longer required, but you may need it at some point in the future, you can disable it instead. It can be done by toggling the switch to the disabled position. Once you have checked for all extensions, close Google Chrome and open it again. Check to see if the problem is now resolved or not.
Resetting Google Chrome
Sometimes, the high CPU usage can also be fixed by simply resetting Google Chrome to its default settings. You might have knowingly or unknowingly changed some critical setting during regular use, causing this issue. Once the browser is reset to its default settings, the chances are that the high CPU usage issue will now be eliminated. For resetting your browser to default settings, you need to undertake the following steps,
Step 1: Open Google Chrome on your device.

Google Chrome Homepage
Step 2: Click on the three-dot icon to open Google Chrome Menu. This will launch a drop-down menu.

Google Chrome Menu
Step 3: Go to Settings and click on Advanced.
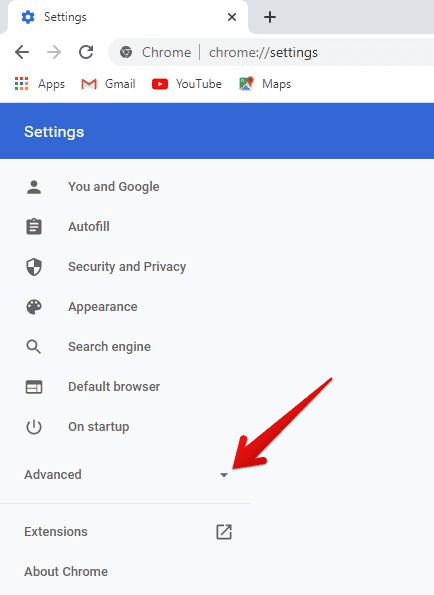
Advanced Settings
Step 4: Inside the Advanced settings, go to the Reset and Clean Up tab.
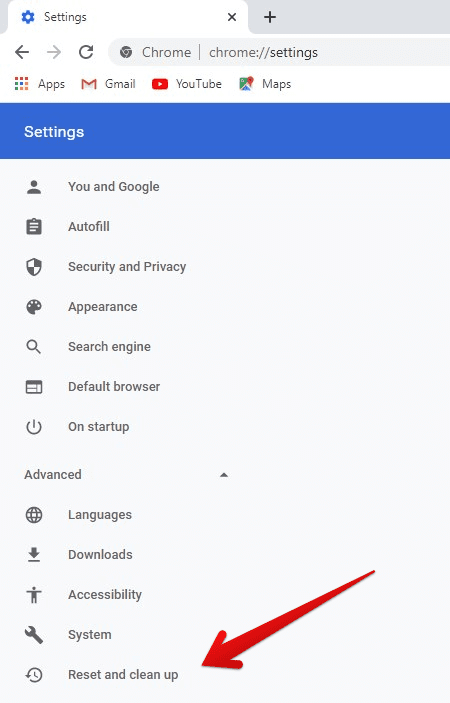
Reset And Clean Up Tab
Step 5: In the Reset and Clean Up tab, click on Restore Settings To Their Original Defaults. This will open a pop-up window on your screen.
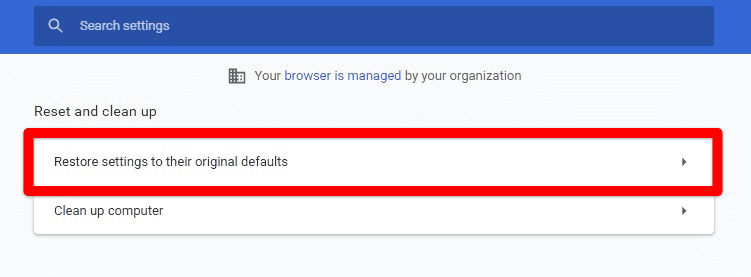
Restore Settings To Default
Step 6: Click on the Reset Settings button to complete the action.
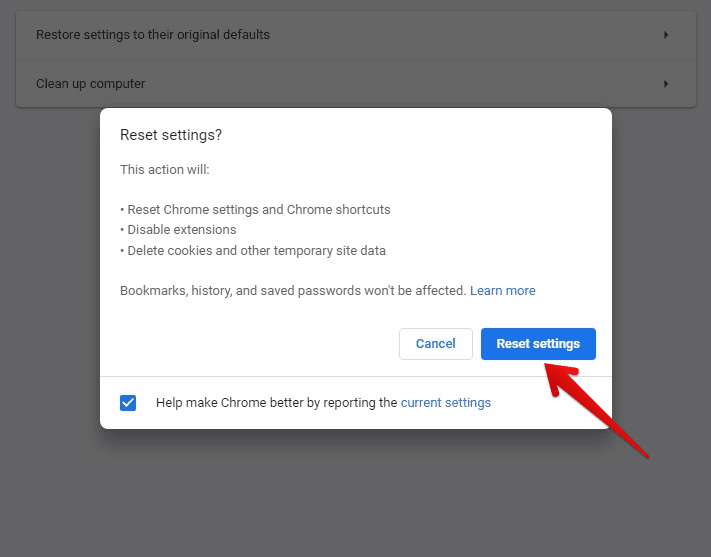
Reset Settings Button
After resetting the browser to its default settings, close Google Chrome and open it again, checking to see if the problem is now resolved or not.
Conclusion
After completing each of these methods, make sure to check if the issue is now gone. Only proceed to the next one if the high CPU usage issue continues. This issue should not be a cause of concern for you in any way. All you need to do to avoid it in the future is to update your browser regularly and use it the way it is intended to be used. By preventing other applications to tinker with the browser and system settings, you can save your time and effort in the long run.
