Are you going to switch devices soon but can’t leave your bookmarks behind? Fret not for we’re about to show you how to export Google Chrome browser bookmarks easily on your PC, so you can import and get them back on your new device without breaking a sweat.
Every modern web browser in the computing world, whether it’s the ever-popular Google Chrome or the up-and-coming Brave Browser, consists of a feature called bookmarks. In the real-life context, a bookmark is a piece of any material, most commonly paper, that is used to slide in between pages of a book. This is done so the reader can continue reading from where they left off.
In digital terms, a bookmark is no different. The interweb is no less than a book with innumerable pages. You stumble upon different websites on your networking journey, but it can get hard to keep track of them all without a handy tool by your side. That is where bookmarks come in again, making it seamless for you to return to the web pages you previously wanted to explore fully.
Without any further ado then, let’s get into the process of exporting bookmarks on the Google Chrome browser.
Exporting bookmarks on the Google Chrome browser
The following is a step-by-step guide that will walk you through the procedure of exporting your saved bookmarks on Google Chrome. Be sure to follow them as instructed for the best results.
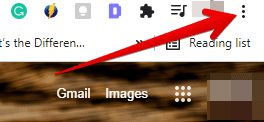
- Begin by clicking on the “Customize and control Google Chrome” button in the top-right corner of the browser window to expand it and reveal more options.

Clicking on the “Customize and control Google Chrome” button
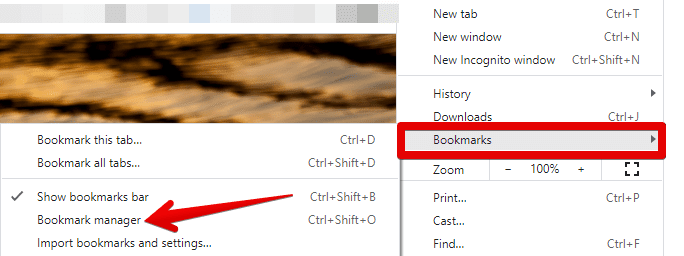
2. The next step is to hover over the “Bookmarks” button to make more settings appear on the screen related to bookmarks. Out of the options that show, click on “Bookmark manager” to prompt the browser to open another tab. Doing so will take you to the next step.
- Alternatively, you can also use the shortcut key combination of “Ctrl,” “Shift,” and “O” to fire up the “Bookmark Manager” on your PC.

Opening the “Bookmark manager”
3. Once you’re at the main “Bookmarks” page on your Chrome browser, you’ll see all of your bookmarks listed one by one. There will be another distinctively apparent three-vertical-dots-shaped button in the top-right corner of the screen, similar to “Customize and control Google Chrome.” Click on it to reveal more options and get to the next step.
- As for the bookmarks that you no longer have anything to do with, it would be a good idea to delete unwanted bookmarks before proceeding from here on out.

Clicking on the “Organize” button within the Bookmark manager
4. You will now have to click on the “Export bookmarks” option after the last step to finally load the bookmarks and prepare to save them t your PC’s local storage. The following screenshot depicts where to click.

Clicking on “Export bookmarks”
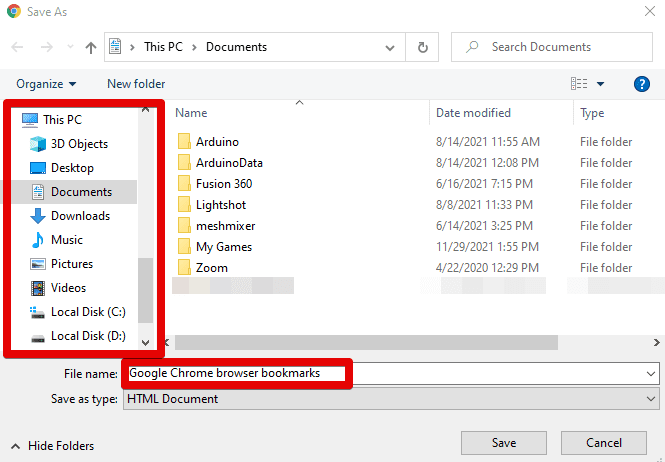
5. As soon as you click on “Export bookmarks,” a window will appear on your screen that’ll allow you to tweak a couple of parameters related to exporting the bookmarks. First off, you have to decide where in your PC do the bookmarks have to be saved for later use. Secondly, you should rename the bookmark file to locate it in an even more effortless manner. As you can comprehend from the screenshot below, we’ve named our collective bookmarks reasonably simply. Once you’re done with these settings, press the “Enter” key to finalize the process and save your bookmarks as an HTML file on the PC’s local storage.

Exporting the bookmarks to the PC’s local storage
That’s all there is to know regarding exporting Google Chrome browser bookmarks. The file that will be stored on your PC will be in HTML format. This file format will be painlessly recognized when you try importing the bookmarks from another browser, such as Mozilla Firefox or Opera. So have a fun time with your bookmarks back in place!
- Tip: If you’re looking to pick up a new internet browser for your device, consider taking a look at our top picks.
