Google Chrome’s utmost reliability is one of the reasons this internet browser sits proudly on its throne. Sure, other compelling options like Mozilla Firefox, Brave, and Opera may come close to its overall functionality. Still, there’s no beating the prevalence of Chrome that has stretched all across the globe.
That said, it’s not just the speed and stability of Google Chrome that makes it the best browser in the world. There’s this magical other feature embedded in it that unlocks a myriad of extra features. We are talking about extensions readily available for Chrome on a dedicated marketplace called the Chrome Web Store.
In this article, we’ll be going over everything you need to know about these special add-ons, including how to install, manage, and uninstall them if required. So let’s jump right into this guide without any further ado.
- Do check out 5 of the best fast browsers for Chromebook to have a worthy alternative of Google Chrome standing by your side.
What are Google Chrome extensions?
Extensions are a magnificent way of injecting Google Chrome with new features. It’s a way of customizing the famed internet browser, so it’s capable of doing more and being more effortlessly. These powerful add-ons are seamlessly integrated with Chrome and are a crucial component of its build.
Chrome extensions can be easily downloaded from the Chrome Web Store, as iterated earlier. Most of them are pretty small-scale in size, so you won’t have to worry about performance issues or them bogging down your system in any way. On the contrary, you could hook yourself up with one of the best Chromebooks for performance to remove the doubt altogether.
In addition, there is no single developer of Chrome extensions. The Chrome Web Store is open to HTML, CSS, and JavaScript developers who are willing to create these add-ons for the Chrome browser. This means that anyone with a creative idea and the right skills can launch their extension, even you.
Now that you’re aware of the fundamental concept behind Google Chrome extensions, let’s get into the nitty-gritty and discuss the significant parameters surrounding these software programs.
Installing Google Chrome extensions
Google Chrome extensions can be installed relatively painlessly. If you’re on a Chromebook, you’ll find that the Chrome Web Store’s web app icon is already present in the Launcher area. The gist of it is that you have to head over to this marketplace, find the extension you want to install and follow the on-screen instructions to begin the download.
Since the vast majority of Chrome extensions comprise a small file size, the download will take no more than a moment or two. The following steps will walk you through the process in a step-by-step fashion. We’ll be installing Monosnap for this tutorial—an exceptionally convenient screenshot-taking tool that comes packed with several advanced features.
- The first step is to go to the Chrome Web Store on Google Chrome. You can do that by clicking on this direct link or by clicking on the web app’s icon in your Chromebook Launcher if you’re on Chrome OS. We’re going to go with the latter.
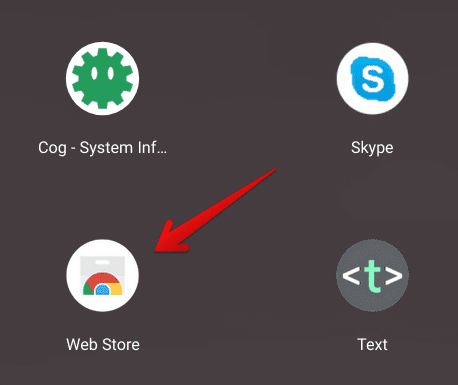
Opening the Chrome Web Store
2. Once you’ve opened up the Chrome Web Store, you’re free to browse the marketplace to find anything that could interest you. There’s a “Recommended For You” section that brings up extensions that may suit your preference, so better check that out whenever possible. For now, click on the Web Store’s search bar type in “Monosnap.” Press the “Enter” key when you’re done to get to the next step.

Searching for Monosnap on the Chrome Web Store
3. Pressing the “Enter’ key will bring you the search results. You should be seeing “Monosnap” on the screen now. Click on the extension icon to continue.

Clicking on the Monosnap extension search result
4. You’ll now be taken to the official extension page, where the installation can commence. To get started, click on the “Add to Chrome” button.

Adding Monosnap to Chrome
5. After clicking on “Add to Chrome,” the system will start verifying your device to see if it’s compatible with Monosnap. That should take a couple of seconds and no more. After that, a prompt will appear at the top of the page asking you for confirmation regarding the download. Click on “Add extension” to continue the installation.
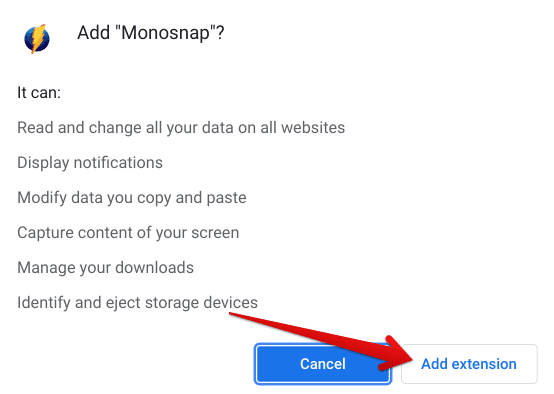
Adding the extension to Chrome
6. After clicking on “Add extension,” the download will begin. This will take a brief moment, so expect the notification for installation to be complete right away. The prompt will appear right below the extensions toolbar. It’ll look similar to the screenshot embedded below.
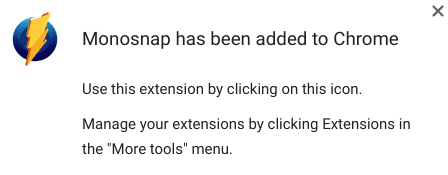
Monosnap extension installed
That’s about it! You’ve successfully learned how to install an extension on the Google Chrome browser. This was just a mere tutorial of the whole process. You can explore the Chrome Web Store and find other extensions to use and uplift your browsing experience. If you’re looking for the best ones for that purpose, take a look at our top 15 Google Chrome extensions guide and get steered in the right direction.
Now that you know how to install extensions let’s talk about managing them.
How to manage Google Chrome extensions
Managing Google Chrome extensions is a fairly straightforward process. First, you must know what permissions a particular extension requires to operate. If you’re uncomfortable with granting it that specific permission, you can either block the extension from accessing what it needs or uninstall the add-on altogether.
To know what permissions a Google Chrome extension requires, follow the steps listed ahead.
- The first step is to click on the “Customize and control Google Chrome” button in the top-right corner of the screen and hover over “More tools.” This should reveal several more options on the screen for you. Next, click on “Extensions” to continue.
- Alternatively, you can also copy and paste the “chrome://extensions/” URL into the Chrome search bar and press the “Enter” key to get to the tab in question.
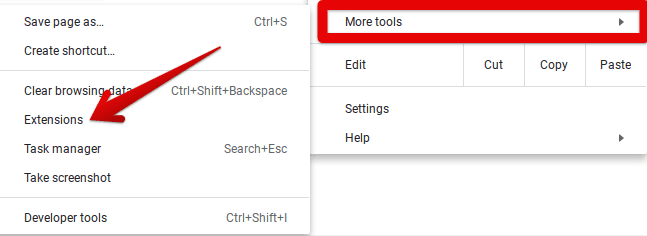
Clicking on “Extensions”
2. Once done, select the extension you’d like to manage. You’ll find all of your Chrome extensions and web apps present on this page. Click on “Details” under any extension to view the permissions it requires. Since we installed Monosnap just now, we’ll be checking it out.
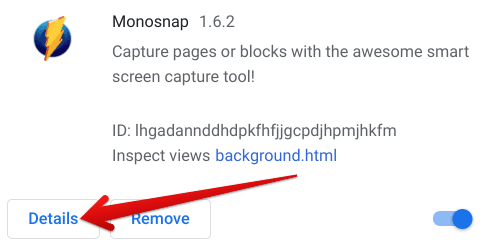
Clicking on the details of the Monosnap extension
3. The page that will open after the last step will contain every information regarding that specific extension—in our case, Monosnap. Scroll down a little and find the “Permissions” section. You can quickly grasp here what the extension requires from your end. If you do not want Monosnap accessing any of the permissions it needs to operate, disable the extension.
While we’ll show you how to do that later on, you can, however, pursue a workaround here. You can change when the extension starts working, and there are three options to opt for here: On click, On specific sites, and On all sites. We recommend going with “On click” for the best results. Doing so will enable the extension only when it’s prompted to do so.
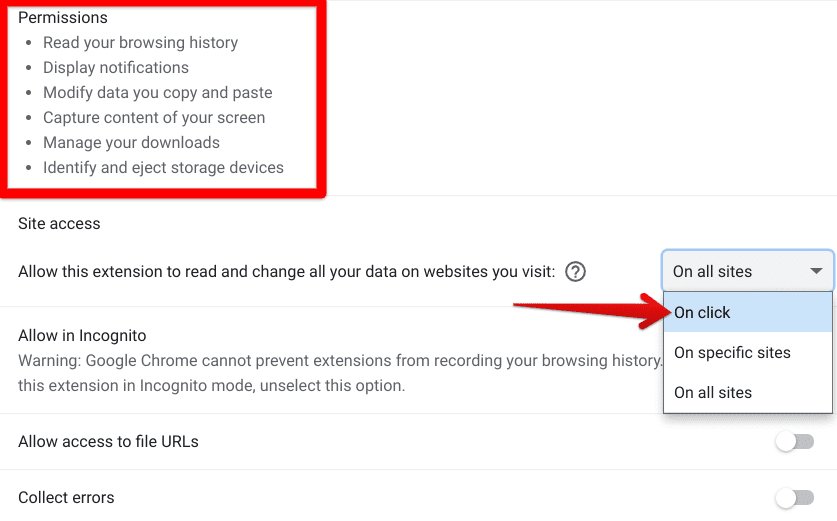
Managing Chrome extensions
That’s all that you need to know about managing Chrome extensions at a basic level. However, we’re not entirely done with it yet. Let’s further the section and talk about two more important features that you can use to control your Chrome extensions.
How to update extensions
It’s recommended to keep all of your software updated and not just Chrome extensions for their optimal functioning. Therefore, it’s only for the best that you know how to do that. So let’s go over the process in the following steps.
- The first step is to go to the “Extensions” page on your Chrome browser. That can be done through the “Customize and control Google Chrome” button or by inputting the following URL into your search bar.
chrome://extensions
2. Once you’re there, click on the “Details” button under the extension that you want to update and get to the next step. We’re going to choose Monosnap again for this tutorial.

Clicking on the details of the Monosnap extension
3. You’ll be taken to Monosnap’s settings page right after that last step. You now have to click on the “Update” button present at the top of the page. Doing so will prompt the Chrome browser to get the extension up to speed.

Updating the Google Chrome extension
4. The update process isn’t going to take long at all. It’ll start and end in an instant. A small-scale prompt will appear near the bottom of the tab, stating that the extension is being updated and then following it up by saying, “Extension updated.”

Extension updated
That’s all about updating your extensions on Google Chrome. The process above can be repeated for any extension, so don’t think it applies to Monosnap only.
How to disable extensions
Disabling extensions when you do not need them is a good way of keeping your add-ons under control. Note that this isn’t the same as uninstalling an extension, which is the ultimate deletion from the browser—disabling means that you’re putting it out of order temporarily. You can always enable the extension again whenever you want it to operate.
To disable extensions, hover over to the “Extensions” page on Google Chrome through the “Customize and control Google Chrome” button. Once you’re at the main page, click on the toggle below the extension that you want to disable that should do the trick. Check out the following screenshot for a visual explanation of this whole procedure.

Disabling a Google Chrome extension
You’ve successfully learned how to disable Google Chrome extensions. If you’d like to learn more about managing extensions, we’ve written a detailed guide on how to control permissions of Chrome extensions that you should check out.
How to uninstall Google Chrome extensions
The final part of the trifecta is uninstallation. Ridding the system of an extension for whatever reason is helpful knowledge. You will find tons of excellent extensions on your adventure of exploring the Chrome Web Store, so it’s only logical to keep the best ones only.
The good news is that uninstalling a Chrome extension couldn’t be any simpler. For the sake of making you acknowledge all possible ways of doing the deed, we’re going to go in-depth here. Let’s jump right in without any further chit-chat then.
Option #1. Uninstalling Chrome extensions directly from the extensions toolbar
The first option for uninstalling Chrome extensions pertains to the extensions toolbar. All you have to do is hover over the extension that you want to uninstall and double-tap on it to reveal more options. Once done, you’ll see an option called “Remove from Chrome.” Click on it to further the process.
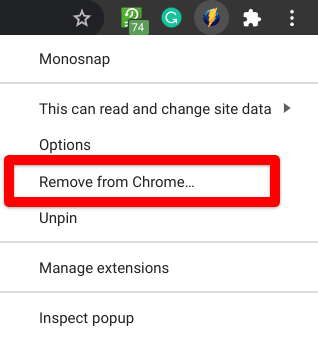
Removing the extension from Chrome
A prompt will appear at the top of the screen asking you to confirm the removal. Click on “Remove” to finalize the process.
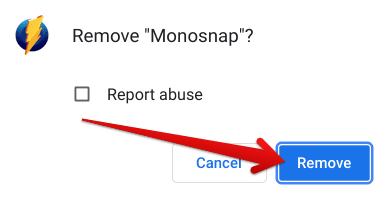
Confirming the extension removal
Excellent work getting to the bottom of the first method. We think it’s suitable to include an extension of this option here, which is optimal for when you don’t see the extension pinned to the toolbar.
To get started, click on the “Extensions” button in the top-right corner of the screen to expand the area and get all of your add-ons in front of you.

Clicking on the “Extensions” button
From there, click on the three vertical dots present right beside the extension that you want to uninstall. This will reveal more options in the section for you. Out of the buttons that appear, click on “Remove from Chrome,” just like how you did above to continue the process.
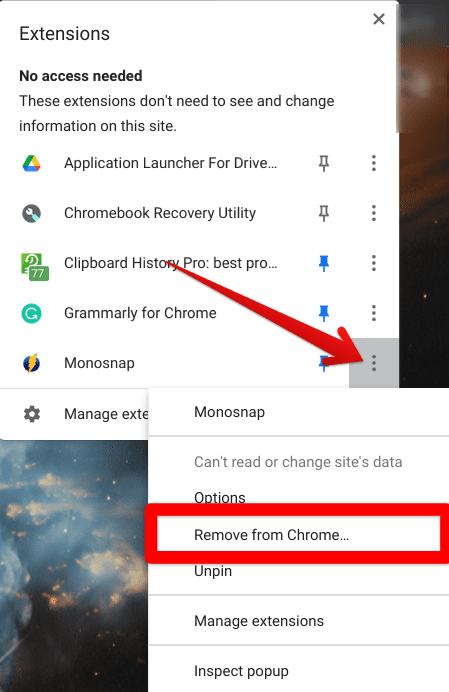
Removing the Google Chrome extension
You will yet again receive a prompt that will ask for confirmation to remove the add-on. Click on “Remove” to uninstall the extension.

Confirming the extension removal
That’s all about the first method of uninstalling extensions on the Google Chrome browser. Let’s talk about the second option for this process, so you know all the available techniques.
Option #2. Uninstalling Chrome extensions from the extensions web page
If you’d like to view all of your installed Chrome extensions on a single web page and decide what to do them accordingly, this option is for you. To get started, copy “chrome://extensions/” and paste it into the address bar to go to the extension web page. Look for the “Remove” button underneath each add-on when you’re there. Choose the extension you want to uninstall from the Chrome browser and click on “Remove.” We will take the Chromebook Recovery Utility tool as an example for this tutorial below.
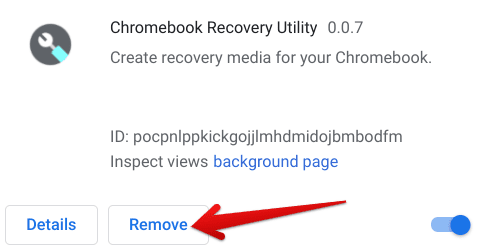
Clicking on the “Remove” button
Once done, a prompt should appear at the top of the page, asking you to confirm whether you would like to uninstall the extension or not. Click on “Remove” one more time to finalize the process.
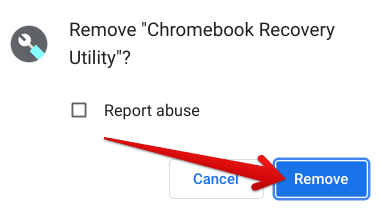
Removing the Google Chrome extension
That’s all about it for uninstalling your Google Chrome extensions on a Chromebook or a Windows PC. The multiple methods illustrated above should get you going in the right direction.
Conclusion
Google Chrome extensions are no less than a blessing for our browsing experience. They make this internet surfer capable of so much more seamlessly and unlock a swath of functionality. There’s no reason you shouldn’t already be using the best Chrome extensions around to explore the interweb like a boss. However, to do that, you must be aware of the correct information surrounding these add-ons to make sure you’re always in control.
For that purpose, we’ve laid out no less than a complete guide centered on Google Chrome extensions that takes you through the process of installation, management, and finally, uninstallation. We hope that you find this article helpful for your networking experience. Chrome Ready wishes you good luck!
- Similar Read: Top 15 Google Meet extensions for Chromebook.
