Chrome OS is a favorite in the education and enterprise space due to its reliability, speed, and simplicity. However, the relatively recent integration of Linux with Chromebooks has allowed these minimalistic yet exceedingly slick devices to undergo a metamorphosis of one sort. You can now sport the best Google Play Store applications on Chrome OS, get yourself high-end software using the built-in Linux container, and even start coding on your very own Chromebook — the possibilities are seemingly far-flung.
In addition to that, Chromebooks are a dominant entity in the United States education system. Millions of units have been shipped to classrooms all across the land of opportunity and more than 85% of all schools today boast a Chrome OS-oriented technical infrastructure. In doing so, it’s common practice for the IT department of schools to employ their Chromebooks under management through the Google Admin program.
That brings us to discuss Kiosk mode in Chromebooks, what it truly is, and how it can be bypassed effortlessly by users with even little to no technical background. In this article, we’ll discuss all the latter and the method you can use to disable “Switching to Chrome OS” while in Chromebook Kiosk mode. So without any further blabber, let’s jump right into this guide.
What is the Chromebook Kiosk mode?
A feature worth taking into use by classrooms, enterprises, and any other professional environment is the Kiosk mode that restricts full-blown access to a Chromebook. This program makes devices more appropriate for students and anyone else in a controlled environment.
Kiosk mode is often referred to as a single-app or a single-window mode where the administrator only lets the user of the Chromebook access one application and no more. This ideology makes students study or work distraction-free, but it’s also considered the go-to state testing software for different applications.
Many Kiosk apps can be set up on a Chromebook, such as the MIST Kiosk that can be grabbed from the Google Play Store. MIST Kiosk is famous for being used for school testing purposes, but what if there was a blatantly obvious method of disabling everything that the Kiosk mode stands for? Let’s get into a more detailed explanation of this in the next section.
How Kiosk mode can be effortlessly disabled
It doesn’t take an individual a terminal degree or a P.hD to find out how to disable the Kiosk mode in Chromebooks. All you have to do is input a specific shortcut key combination, and you’ll be taken out of Kiosk mode just like that. This can happen either on the splash screen of Chrome OS when the device is at the start-up screen and is just about to boot into the main user interface or while using the Kiosk-enabled program.
The keys that a person has to press to do that are “CTRL,” “Alt,” and “S.” Upon a successful input of said key combination, the device will take you to the sign-in area if you disable the Kiosk mode at the splash screen. People have been pretty upset, especially corporate environment individuals who cannot seem to make students comply with the classroom rules.
The scenario is made even worse by the splash screen of Chrome OS itself. Whenever the device is running in Kiosk mode, it will give the user on-screen instructions on how to disable the Kiosk mode at the splash screen, which is the same key combination that we’ve mentioned before.
Therefore, if you can resonate with this irksome case, you’re probably looking for a solution that could prevent users from tapping out of Kiosk mode so painlessly. In the next section, we will talk about just that, so keep on reading to get to the raison d’etre of this write-up.
How to disable switching to Chrome OS in Kiosk mode
The surprising part about all this debacle is that there used to be a pretty straightforward method of making devices stay permanently in Kiosk mode unless otherwise disabled. You would have to go into the “Enterprise” section of your Chrome Enterprise Upgrade or Chrome School Upgrade plan within the Google Admin console. You would then have to venture into the “Kiosk” part of the settings to access the Kiosk management UI.
A checkbox would be there stating, “Permanently keep this device in kiosk mode,” and it could be easily toggled to disable switching to Chrome OS from there on out. However, many reports have been saying that such a setting doesn’t exist anymore and has been removed from the enterprise management program. As a developer and enterprise manager, you’re free to check out the console and double-check if the “Permanently keep this device in kiosk mode” option exists for you.
It’s unclear why the developers would decide to remove this feature, given its usefulness. However, now that they’ve done it, you now have to seek a workable alternative. The good news is that we’ve done the digging for you, and there is a way of preventing users from using shortcut keys and finding their way out of the Kiosk mode. All you have to do is disable the shortcut keys on the Chromebook, and that should do the trick.
Unfortunately, there isn’t a way to mass deploy this feature, and you’ll have to do this individually on each Chromebook. However, the following steps are going to show you how.
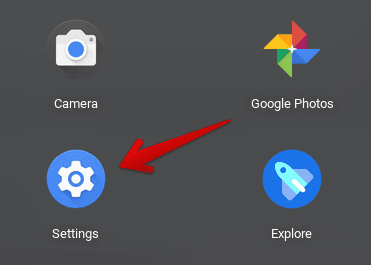
- Begin by opening your Chromebook’s “Settings.” You can do that through the Chromebook Launcher or from the shelf area if the app is pinned there.

Opening “Settings”
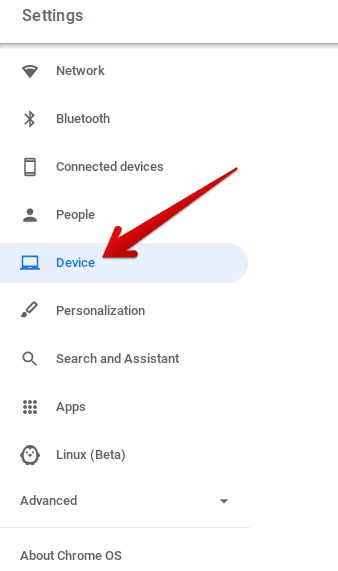
2. Once you have the device’s settings opened, click on “Device” present on the left column. This should take you to the next step.

Clicking on “Device”
3. The next step is to click on “Keyboard” under the “Device” area. Doing so should further the process.

Keyboard Settings
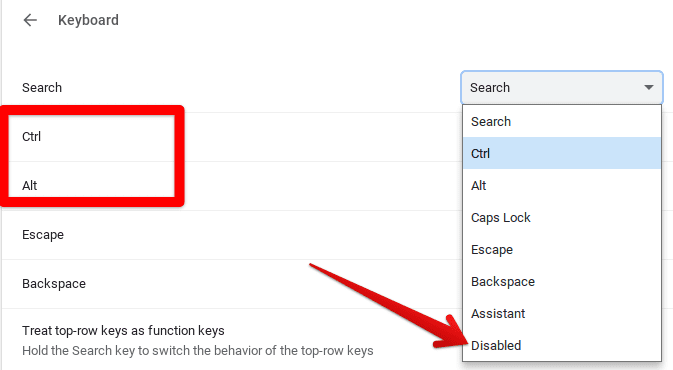
4. Having arrived at the settings of the Chromebook’s keyboard, you’ll now have to pick out the “Ctrl” and “Alt” keys and disable them both. Next, click on the section beside the keys to reveal more options for mapping. Select “Disable” subsequently, which should do the job for us. We’ll highlight both keys together in the following screenshot but bear in mind that you have to disable them individually.

= Disabling the “Ctrl” and “Alt” keys of the Chromebook keyboard
That’s about it for disabling switching to Chrome OS in Kiosk mode! You have now successfully made it impossible for students and other users to boot out of the highly regulated environment of kiosks. They’ll have to ask for special permission from the IT administrator or anyone managing the device to let them use shortcut keys again.
Conclusion
Chrome OS has been killing it in the education industry and for all the right reasons. By bringing forth a terrific balance of affordability and quality, Chromebooks are on their way to dominating the realm of PCs as well, but we’re not quite there yet. Nevertheless, a bevy of exciting prospects is planned for Chrome OS in the future, including project Borealis, which is just a fancy way to coin official Steam support headed to Chromebooks.
However, there are shortcomings and exploits to each operating system globally, no matter how advanced it is. On a lighter note, our Chrome OS is relatively less complex and less problem-causing, but there is one aspect where IT administrators are left asking for more. This is where the Kiosk mode comes in, locking in applications for a specific target audience and letting them focus on only what’s essential.
However, an easy-to-input key combination that also makes itself vividly apparent at the Chrome OS flash screen makes it easy for users to hop back out of the Kiosk mode. In this article, we’ve talked about a relatively simple approach of preventing that from happening, which is by the flat-out disabling of the “Ctrl” and “Alt” keys on Chromebook.
We genuinely hope that Google comes up with a more hard-and-fast approach of locking users in Kiosk mode without a way of getting out. This could streamline a lot of processes and make the lives of corporate individuals a lot easier. Until then, you’ll have to make do with the solution discussed in the guide above. As always, Chrome Ready wishes you good luck!
