Chromebooks are known to be widely error-free for the most part. They don’t run your usual operating systems like Windows or macOS, both of which can get quite frustrating to fix in the wake of any tedious system-related issue. The thanks here goes to Chrome OS being built upon the founding principles of stability, speed, and—most important of all—security.
Sure, there are many ways of maximizing your Chromebook’s security, but there’s still no skipping past the well-established protective measures of Chrome OS. That is to address the overall impressions of the latter and not to highlight when something goes terribly wrong. This is because the operating system can still run into a couple of errors, including the “Chrome OS is missing or damaged” issue where the device won’t boot up and repeatedly show you this message.
Fortunately, there’s a relatively straightforward fix of the matter at hand where you have to follow a couple of steps, and you’ll be golden. We’re here to walk you through the process in easy-to-understand terms so that you can fix the “Chrome OS is missing or damaged” issue in due time. So, without any further chit-chat, let’s jump right into this guide.
Why does the “Chrome OS is missing or damaged” occur
As iterated earlier, Chromebooks are exempt from the constraints of complicated processes. The lesser the processes, the lesser the operating system’s chances of encountering an error. However, when it boils down to the “Chrome OS is missing or damaged” issue, we have the device itself to turn to.
Whenever the Chromebook runs into an issue in properly booting Chrome OS, you’re most likely going to see “Chrome OS is missing or damaged” on your screen. There is a possibility of this occurring due to a faulty system update that was either released from the developers’ side or your device downloaded it incorrectly.
You could be seeing this error on the start-up screen or outright randomly whenever you’re using the Chromebook. If it is the latter in your case, the fix might be a bit simpler, which we’re going to talk about in the next section. On the other hand, this issue is nothing to lose sleep over and requires a quick reinstall. Let’s get into all of that now.
How to fix “Chrome OS is missing or damaged.”
There are a couple of fixes of the “Chrome OS is missing or damaged” error. We’re going to talk about all of them below in the order of basic to advanced. Be sure to follow them as instructed for the best results.
Hard reset your Chromebook
Apart from the usual restarting a Chromebook, there’s a way to hard reset your Chromebook. This involves promptly shutting down the machine no matter what processes are running. Another benefit of performing a hard reset is that it refreshes the hardware section of your device as well, thereby giving it a proper reboot by all stretches of the imagination.
Therefore, you need to press the “Power” and the “Refresh” keys together to perform a reboot. The latter is shaped like a semi-circle with an arrow at its one end, similar to how the “Reload” button appears on the Chrome browser in the top-left corner of an opened tab. Check out the following screenshot to acknowledge what keys you have to press.
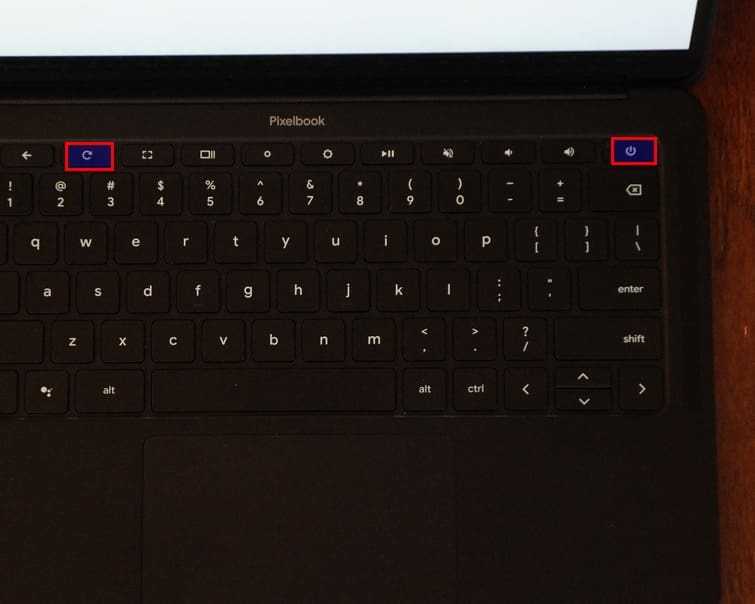
Key combination for a hard reset
After performing a hard reset, the Chromebook should quickly boot back up. It’ll be nothing but the moment of truth from there on out. If the “Chrome OS is missing or damaged” issue persists, you’ll see the error screen right after the device turns back on. If it doesn’t, you can now uninterruptedly carry on using your Chromebook.
Keep reading the following fixes if performing a hard reset didn’t solve your issue.
Powerwash your Chromebook
A “Powerwash” is Google’s way of terming a factory reset on Chrome OS. For those who don’t know, a factory reset erases all locally present files, deletes all set system settings, and restores the device’s originality to just how it was when you first bought it—software-wise. However, this is only possible if you can use your Chromebook. For some users, it’s not possible to go past the start-up screen, so this fix doesn’t apply to them.
For those who encounter this error while using the device, it’s worth performing a Powerwash to see if that solves the issue. To do this, you need to go into your “Settings” area, hover over to the “Advanced” section, and click on “Reset settings.” This should take you straight to the “Powerwash” feature. Click on it and follow the on-screen instructions to reset your Chromebook.
- It’s worth mentioning here that Powerwashing a Chromebook removes all locally stored files. So ensure you have a cloud-storage solution set up beforehand to avoid any potential mishaps.
We’ve covered the entire procedure of Powerwashing a Chromebook in one of our articles here, so do check that out if you’re after a more detailed explanation. On the flip side, if you cannot use your Chromebook to perform a Powerwash or even doing all this didn’t help solve the issue, then we’re afraid you’ve got only one option left. The good news is that this option is a definite fix for the “Chrome OS is missing or damaged” error.
Recover Chrome OS
If you’ve ruled out the basic troubleshooting steps that we’ve listed above, but none of them have come to fruition, it’s time to get into the real fix that this error warrants. First, you have to create a Chromebook Recovery image using a specialized tool to reflash your Chromebook’s firmware and make it just like new again. This is pretty much uncomplicated and gives some nicely detailed steps. You’ll have your device up and running in no time.
Before you get started, here are the items you will need for this process.
- A Windows PC
- A USB with at least 8 GB free space
The following is going to take it from here.
- Grab another PC, preferably a Windows 10 or 11 device, to download the Chromebook Recovery Utility from the Chrome Web Store. Use this link to get straight to the app page on the Web Store and download it on the PC.

Installing the Chromebook Recovery Utility extension
2. A prompt will appear asking you to confirm the installation. Click on “Add app” next and install the Chromebook Recovery Utility. Once you’ve got the extension on your PC, launch it to create the Chrome OS recovery image. Select “Get started” to get to the next step as soon as the extension fires up.
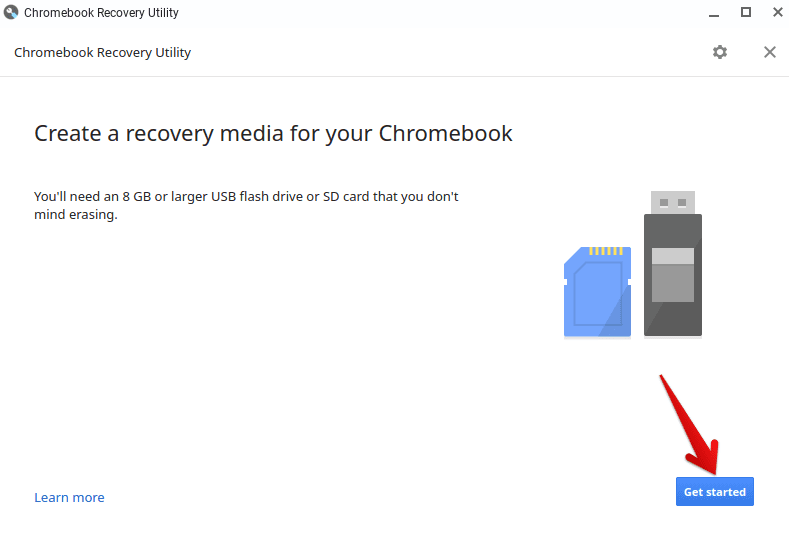
Getting started with Chromebook Recovery Utility
3. You’ll now have to enter the model number of your Chromebook in this step. Things could’ve been a lot easier if you were performing this on your Chromebook right now, as the system would’ve detected the model number automatically. Since that is not the case here, you’ll have to figure out this independently. Flip your Chromebook to see if it has the model number written somewhere. You can also look online for this parameter of your device. Once you’ve got it, enter the number carefully in this third step. The tool will take a moment to identify your device, and as soon as it does, you can click on “Continue” to move forward.
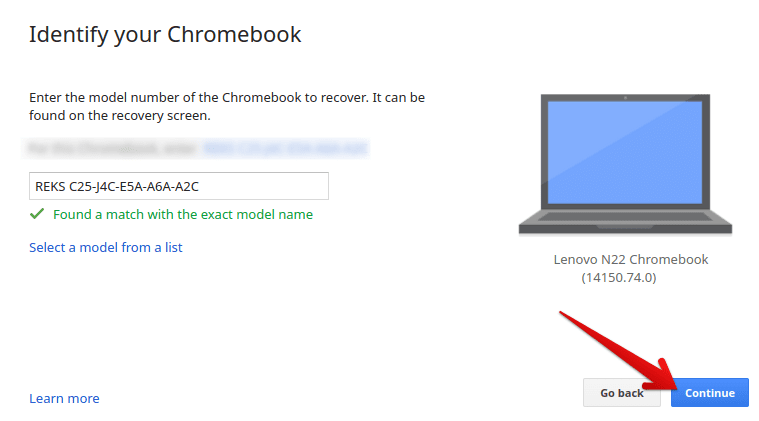
Entering the Chromebook model number
4. The next step is where you’ll have to insert an external USB drive into your PC so the system can detect it and further the process. Therefore, plug one right in, select it from the drop-down menu, and click “Continue” to get to the next step. Make sure that you’ve cleared this USB of any important file or document. Everything present on the drive will be erased when you’re finished here. In addition, there should be at least 8 GB of free space in the USB.
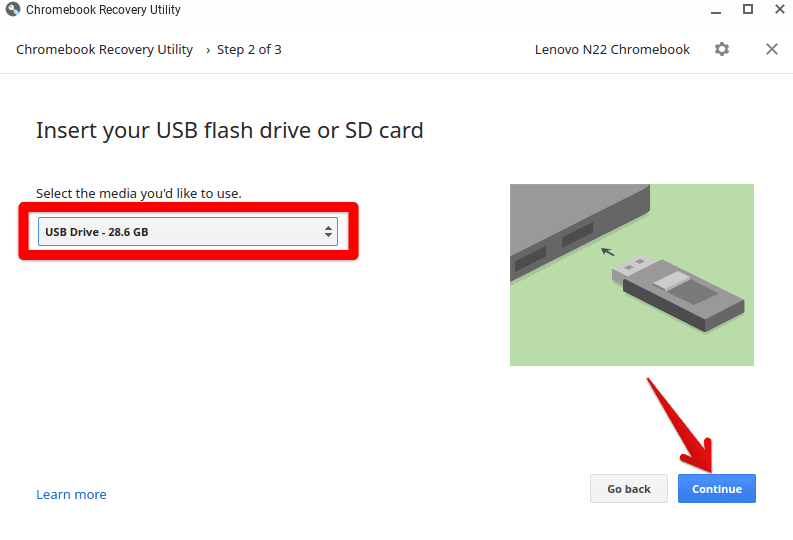
Inserting the USB drive
5. You’ll now create the recovery image of Chrome OS in this step. The page will also warn you that all data and partitions on the USB will be erased from here on out. Click on “Create now” to begin the recovery image creation process.
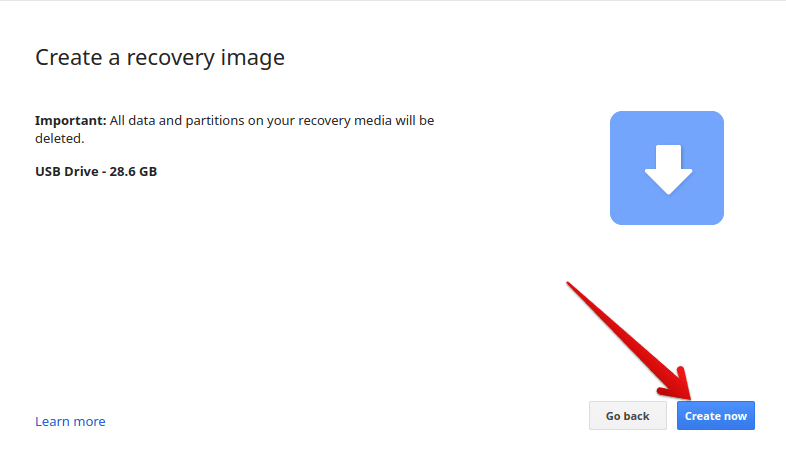
Creating a Recovery Image
6. The process will take a minute or two to complete. But, when it does, all you’ll have to do is click on “Done,” and your recovery media will be ready. You can now safely take out your USB drive.
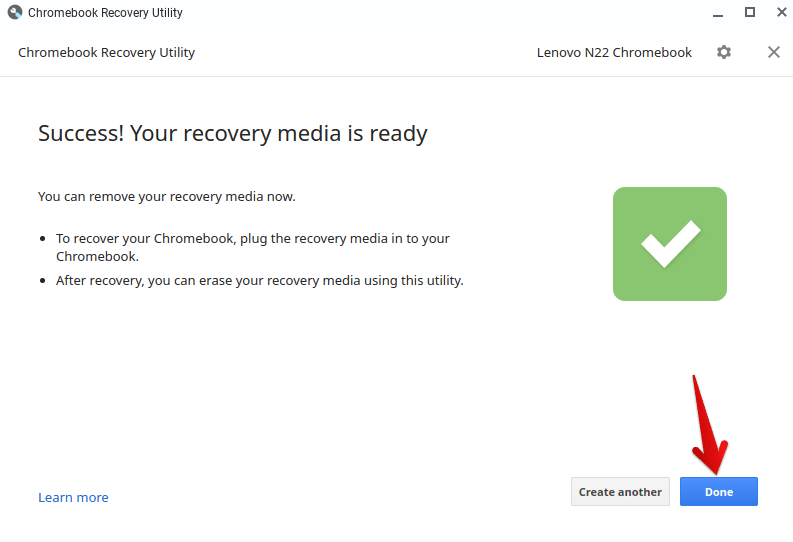
Recovery Media creation complete
7. With the recovery image at the ready on your USB, you now have to turn to your out-of-order Chromebook. Take the USB drive and insert it into the device to get to the next step. You can do this more preferably at the “Chrome OS is missing or damaged” screen.
8. You now have to press three keys to boot the device into Recovery Mode and begin installing Chrome OS on your Chromebook. Those three keys are “Esc,” “Refresh,” and “Power.” This key combination will lead your Chromebook to just where we want it to be.
9. As soon as the device boots up, you will see the recovery screen stating, “You are about to recover your device. First, please make sure it is plugged into a power source.” The process will occur on its own here, so you don’t have to do anything following this step.
10. Once the installation progresses and subsequently completes, the Chromebook will boot on its own and take you to the “Welcome” screen. This is where you will initialize the device, fill in the start-up credentials, and start using your Chromebook again.
That’s about fixing the “Chrome OS is missing or damaged” error. After that last step, you’re free to start using your Chromebook just like before again. If you’ve followed the steps as instructed, the chances of running into an issue are slim.
Conclusion
Chromebooks are top-tier when it comes to being stable. In addition, these devices dish out terrific performance levels on a reliable basis. So if you happen to have something like the ASUS Chromebook Flip CX9, you can bid farewell to days of bogged-down and lackluster productivity. That said, some users have had some spell of misfortune head their device’s way and cause the “Chrome OS is missing or damaged” error. This thereby renders the device useless, and a prompt fix is needed.
The good news is that the “Chrome OS is missing or damaged” error can be fixed in three ways. Two of them are pretty effortless to go with, but the third option, which uses the creation of a recovery image, is relatively time-taking but still not difficult. We’ve talked about everything there is to know about resolving the issue at hand and getting back to using your Chromebook effectively. Ensure that you follow everything as guided above to yield the best results.
Chrome Ready wishes you good luck!
