Chromebooks, Windows 10 PCs, and Macbooks are taken up by large-scale enterprises, businesses, and organizations to dominate the workspace and get ahead of rival competitors. Chrome OS, in specific, is a favorite in the education sector and is picked up by schools and other institutes for its reliability, performance, and stability in all facets of the computing world. However, things can go a little sideways if you buy a used device previously managed by an organization.
There is a possibility that it’s still under the control of its ex-administration, and you thereby have to make do with a partially functional laptop. The good news is that you can unenroll a school Chromebook in several easy steps and take off the stamp of being a “managed” device during the process. However, when the issue arises of a different nature, particularly in the Chrome browser, you have to approach a different game plan.
In this article, therefore, we’ll be jotting down everything you need to know about the “Managed by your organization” message in Google Chrome, including the process of its removal. In addition, we’ll be sure to include several different fixes to branch out the solution and deal with the issue once and for all. So, without any further chit-chat, let’s jump right into this descriptive guide.
Diagnosing and fixing the “Managed by your organization” issue
What is the “Managed by your organization” message?
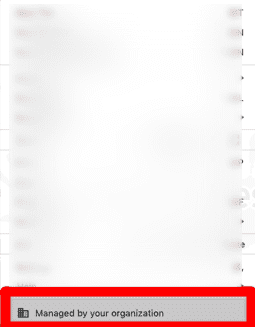
Managed by your organization message
As we mentioned earlier, it’s common practice for IT personnel to implement administration policies on devices to assert control and direction. This helps regulate the workforce and supply them with the controls they need rather than providing full-blown access that could possibly cause distractions and anything of the like.
Other than that, management authorities primarily intend to deploy specific permissions and different browser-based settings remotely, thereby eliminating the need for any physical absence. Therefore, whenever a device is managed by an organization and the administrators tweak the required settings through the Google Admin console, a message begins to appear in your Chrome browser, and we believe you’re already aware of that.
That said, it’s not impossible for the “Managed by your organization” label to manifest just because of the official, genuine reasons. It can also arise from a third-party website that’s trying to take control of your search engine. Furthermore, malicious software might also be trying to take over your browser by changing the default browser engine, your bookmarks, saved credentials, and other fields of significant importance.
Therefore, this is another sprawling reason that might make sense for you. Many users who purchase a second-hand Chromebook from someone would run into this message on their browser, even if the device were never used in an enterprise. In instances such as these, you should rule out all plausible causes and get down to business with the fixes of the problem at hand.
Now that you’re aware of the “Chrome managed by your organization” message, it’s time that you get into its removal part.
How to remove the “Chrome managed by your organization” message
The following is a whole host of solutions that you can try out in a step-by-step fashion. Be sure to follow each of them carefully for the best results. We’ll also be including fixes for Windows 10 PCs and Chrome OS laptops side by side. Let’s take a deep dive straight away.
Analyze what search engines you have
More often than now, we let a specific third-party software or a website latch onto the Chrome browser in the absence of our undivided attention. In cases like those, a search engine can be introduced in the system, thereby taking control of the browser and implementing its own set of features and policies. This unauthorized supervision pathway is something that you don’t plan on having, so you should go straight to the search engine area in your browser’s settings and check for anything suspicious there.
The following steps are going to explain this process to you.
- Launch the Chrome browser on your Chromebook and click on the “Customize and control Google Chrome” in the top-right corner of the screen. This will reveal several options for you, so subsequently, click on “Settings” to proceed. Alternatively, you can press the “Alt” and “E” keys together and then press the “S” key to do all of this quickly.
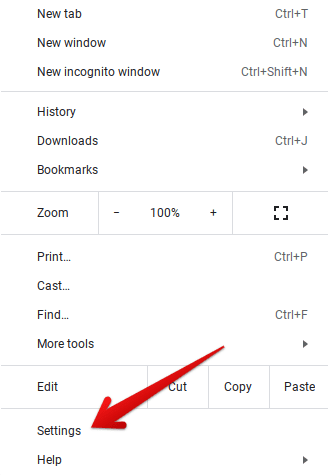
Clicking on Google Chrome’s “Settings”
2. The next step is to click on the “Search engine” tab in the left column of Google Chrome’s settings. Do this to proceed further.

Clicking on the “Search engine” section
3. Once done, you’ll see new contents popping up on the screen, right in the middle of the window. Here, you’ll have to click on “Manage search engines” to continue.

Clicking on “Manage search engines”
4. The next screen that you’ll get to see after clicking on “Manage search engines” is quite essential. It’ll be where all of your running or default search engines will be displayed. You need to do carefully in this regard to evaluate what search engines you recognize and which ones you don’t. Then, if you spot a suspicious search engine, click on the three vertical dots beside it for more options. In our case, we are going to take Ecoasia as an example.
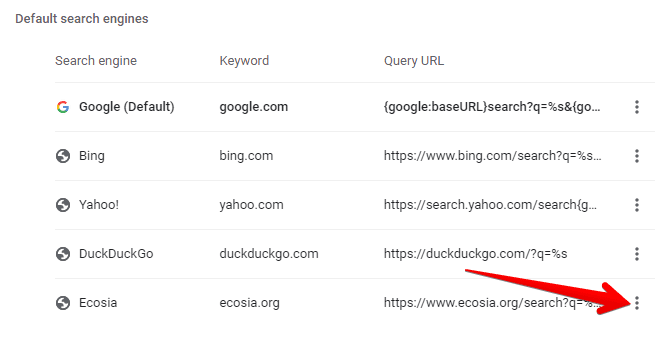
Removing an extra search engine
5. The funny part is that we don’t even remember downloading anything like that, as shown in the above image. The “Ecoasia” search engine must have been installed on Chrome OS during the installation of some other third-party software, so rest assured that you’ll find an error if it’s there. After clicking on the three vertical dots, click on “Remove from list” to proceed.

Removing the suspicious search engine from Chrome
You’ve now successfully also ruled out a potential issue with your system setup. Once you’ve removed the search engine from the list, restart your browser and give Chrome another shot. Check to see if the “Managed by your organization” message continues to exist. If it does not, time for an early celebration.
If it does, on the other hand, then you need to fret not. We’ve got a host of more fixes lined up just for you in this article to help you diagnose and fix the issue without breaking a sweat. Let’s continue to these right below.
Check your installed antivirus software on Chromebook
There’s little debate over the question of how safe and secure Chromebooks genuinely are. We’ve covered an entire guide that tells you why Chrome OS is one of the most stable and protected operating systems globally whose chances of contracting a virus online are as rare as an honest politician.
In a recent reveal by Google, it was shown that Chromebooks have never been hit by ransomware, which is a deadly malware that locks in private, confidential data until you give up the ransom fee. However, since we have the Google Play Store functionality, the world of Android applications is just a click or two away.
People skeptical of their machines tend to strengthen Chromebooks even more by installing antivirus software on them. Some popular options include Avast and Malwarebytes, but you can take a look at the top 5 free antivirus software on Chrome OS for a more detailed guide.
Now to the point, we’re trying to make. All of the included entries in the top 5 free antivirus software sport high-end features, and some of them may impose policies on the Chrome browser. This will regulate their function and prevent the web surfer from running into a website with malicious intent. In cases such as these, there’s a possibility that the “Managed by your organization” message appears because of this.
To confirm whether this is the case or not, uninstall your antivirus software. Don’t worry. You’ll be able to get it back within 2-3 minutes, so this is more of a temporary affair. Once you’ve done that using the easy-to-operate controls of Chrome OS, it’s time to restart the device.
When your restart concludes, relaunch the Chrome browser and check the “Customize and control Google Chrome” to see if the message has disappeared. If it has, you’re in great luck. You’ve managed to solve the issue with a mere uninstall. On the flip side, if you still see the “Managed by your organization” message, you need to try other fixes. We’ve got them laid out right below for your cause.
Give Google Chrome a fresh reset
Contrary to common belief, you can reset the Chrome browser similar to how you would do a number on whole operating systems. For instance, you perform a Powerwash on Chrome OS to wipe the system clean. Furthermore, the term “factory reset” goes for Windows 10 PCs and laptops. Whatever the terminology, let’s focus on the matter at hand now.
There exists an option within the Google Chrome browser that lets it go back to square one and remove any imposing policies or forced instructions. By doing that, you can automatically remove the “Managed by your organization” message from the browser and get back to using Chrome at full tilt.
The following steps are going to illustrate how to reset the Chrome browser. Remember that resetting is different from clearing the browsing history, cache, passwords, and other saved information such as credit cards, phone numbers, and addresses. While that is useful in its way, resetting the browser gives it a fresh start and is something to approach while aiming to resolve the issue at hand.
- The first step that you’ll have to do is click on the “Customize and control Google Chrome” button in the top-right corner of the screen.

Customizing Google Chrome
2. As a bevy of options appears before you now, click on the “Settings” one to get to the next step. As mentioned in the section above, you can also press the “Alt” and “E” keys together, followed by pressing the “S” key to complete Step 2.

Clicking on Google Chrome’s “Settings”
3. Once done and the settings area is launched, click on “Advanced” to get to the next step. When you click on the specified location, you’ll see more settings to tweak.

Selecting “Advanced” Chrome browser settings
4. What’s required next is to click on “Reset and clean up” out of all the options that are revealed after clicking on “Advanced.” This will take you to another page and display different content in the middle of the screen. Continue reading for the almost end of this fix.
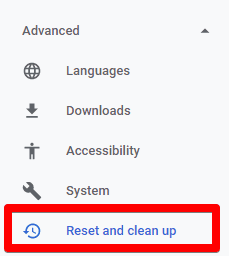
Selecting “Reset and clean up”
5. After clicking on “Reset and clean up,” you now need to make another click. This will be on the vividly apparent “Restore settings to their original defaults” button. Select it to make a prompt appear.

Restoring settings to their original defaults
6. After clicking on the arrow beside “Restore settings to their original articles,” a small-scale window will appear. This is where you’ll be confirming the decision to reset the Google Chrome browser easily. It’ll be iterated once again here that doing his process doesn’t rid the Chrome browser of its looked-up history, bookmarks, and even saved passwords. What will be done is a flat-out refresh of Chrome settings and shortcuts. In addition to that, all Chrome extensions will be disabled, not uninstalled, and temporary file data such as cookies will be deleted.
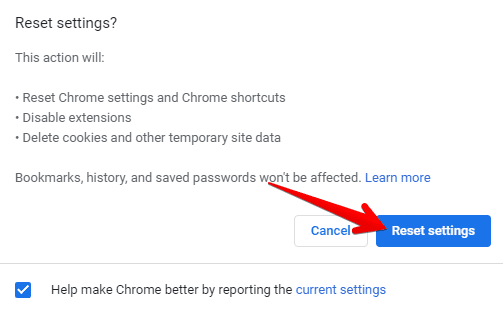
Resetting the Chrome browser
After clicking on “Reset settings,” the refresh process will begin. It will probably take no more than a couple of minutes, depending on the material accumulated by the browser over time. When you’ve been notified that the browser has been successfully reset, it’s time to give it another go and see if the “Managed by your organization” info message has taken the exit door.
If it has, then this is where you draw the line and go on about your Chrome OS experience happily. However, for those users who still haven’t been able to diagnose the problem, we’ve got more fixes coming right up.
Run an antivirus scan
The “Managed by your organization” message could be virus-induced as well, but we hope not. It’s possible that malware has affected your Chromebook and is causing the problem at hand to surge. For Chrome OS, this prospect is doubtful since we’re talking about an operating system here that has never been hit with ransomware in its 20 years of existence. Still, it’s better to be safe than sorry, and that is the approach we will follow here.
You can run an antivirus scan on your device to see if the doubt holds true or not. This article easily explains the process of doing that, but the gist is that you get yourself an antivirus from the Google Play Store, install it, and run as it instructs you to for a complete scan result. If any anomalies are detected, you’ll be prompted to fix them right away. If not, continue with the other fixes we have laid out below for you.
However, those users on Windows 10 PCs looking for a solution of the “Managed by your organization” prompt can also follow suit. They even have an advantage in this regard: they do not have to look toward third-party software or applications from the Microsoft Store to run a virus scan. Being an extensive operating system, Windows gives you the feature to use its in-built program called “Windows Security” and check for any pertinent threats. Let’s get into the process of doing that now.
How to run an antivirus scan on Windows 10
The following steps are going to walk you through the whole procedure in simple-to-understand terms.
- Go to the Windows Search bar and type in “Windows Security.” Once you see the application popping up, click on “Run” to get to the next step.
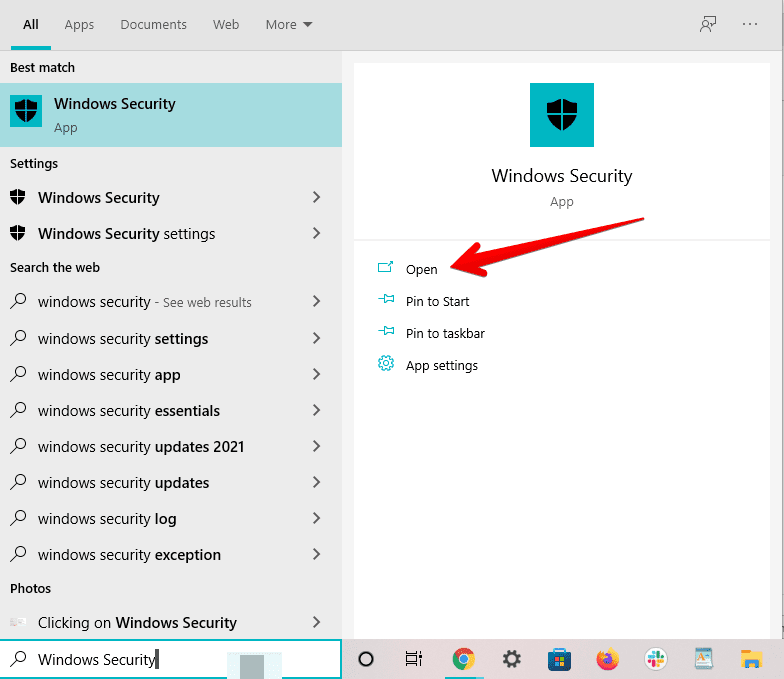
Opening “Windows Security”
2. click on “Virus and threat protection” in the subsequently opening window to continue.
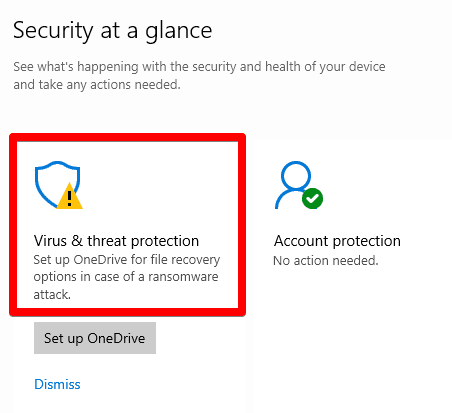
Clicking on “Virus and threat protection”
3. Doing so should take you to another page. Next, click on “Quick scan” on the screen to begin scanning the system for viruses and anything else that could be causing the issue in question.
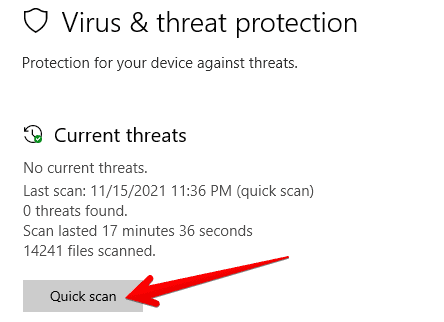
Running a quick scan
That’s about it! The scan should take a minute at best to conclude, and once it does, it’ll tell you whether any issues were detected or not. If they were, the system would continue to fix them immediately. With some luck, that’ll resolve the “Managed by your organization” prompt in the Chrome browser, but if it doesn’t, keep on reading for more fixes.
Remove registry keys from the system (Specific to Windows PCs)
We’ve covered multiple fixes for the “Managed by your organization” message on Chrome OS, but it’s time that we focus on another operating system where this issue can occur. If you sport a Windows 10 or a Windows 11 PC, this section is just for you.
It’s common practice for people to purchase used laptops and PCs. It saves money and can often give us top-tier value for a lot less than what’s anticipated. However, it could be that the device you’ve purchased was formerly under management by a specific organization. The person or the place you bought it from might have forgotten to mention this, and now you’re stuck with the issue you’re so desperately trying to resolve.
Not even a factory reset may have managed to wipe management policies from your Windows 10 device. However, we’ve got just the fix laid out for you in this case. You need to remove the registry keys of both Chrome and Chromium to eradicate this message right from the get-go. If the issue is of this nature, deleting the right registry keys will help fix the issue. Without any further ado then, let’s illustrate the process of getting this done.
How to delete the relevant registry keys on Windows
The following steps are going to take it from here.
- Click on the Windows Start menu and type in “Run.” This should make the program appear right in front of your screen. Alternatively, you can also press the “Windows” and “R” keys together as a shortcut and launch the Run application straight away. We’re going to go with the first option for illustrative purposes.
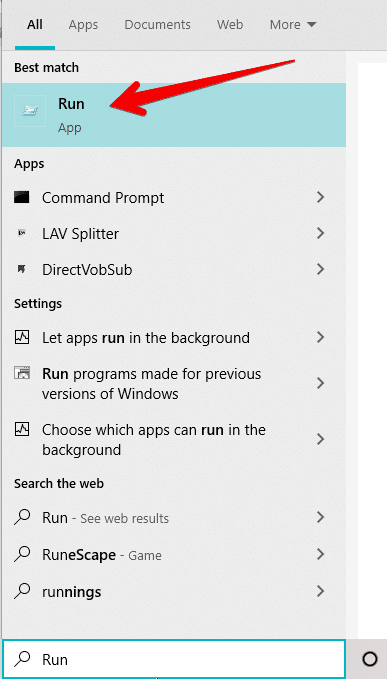
Launching the Run Application
2. Once you’ve got the application all fired up, type in “regedit” and press the “Enter” key. You can also click on “OK” to proceed. Doing so should open another window on your PC called “Registry Editor.” After you’ve done this, continue to the next step.
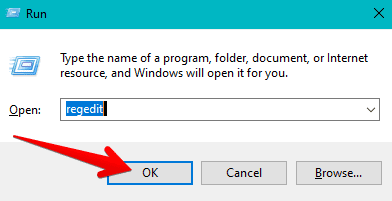
Opening the Registry Editor
3. Once you’ve pressed the “Enter” key or have clicked on “OK,” a confirmation prompt will appear while blacking out the rest of the screen. Select “Yes” here, and you should be golden. After that, it’s time to get into the Registry Editor application. Here, you have to focus on the left column since that’s basically where all the registry keys and policies are located. First off, click on the “HKEY_LOCAL_MACHINE” to get started.

Clicking on the required registry
4. Doing so should expand the list of underlying entries. The next step is to scroll down and click on “Software.” This will further expand the area for you.
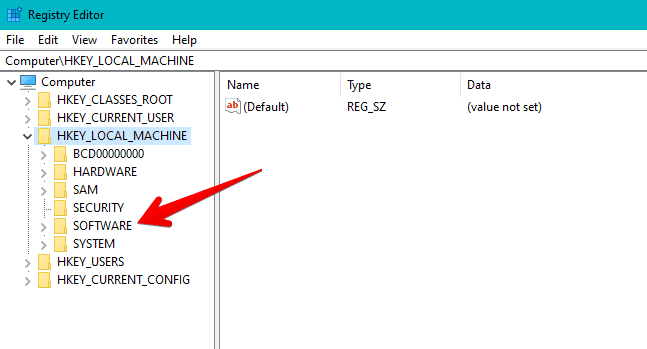
Clicking on the “Software” section
5. You’re almost at the end now. Clicking on “Software” should expand even more entries for you. The next step is to scroll down a little and select “Policies.”
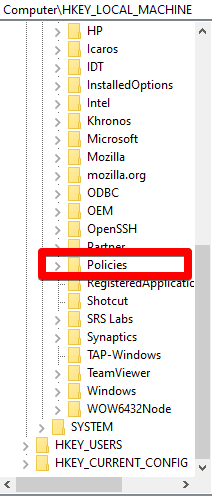
Opening up the device’s policies
6. You’ve now arrived at the most crucial step of the tutorial. Under the “Policies” section, you should be seeing “Google.” You need to click on this entry to expand the options and then right-click on “Chrome.” Once done, select “Delete,” and you should be good to roll. It’s advisable to do the same with “Chromium” if you see an entry popping up for it.
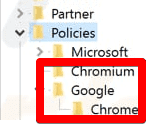
Deleting the Chromium and Chrome policies from Windows 10
7. When you’ve done all that’s required in the previous step, it’s important that you restart your Windows 10 PC to finalize the process. You can easily do this by clicking on the Windows Start button and selecting the “Power” button. The option to reboot will appear afterward, thereby allowing you to restart the device.
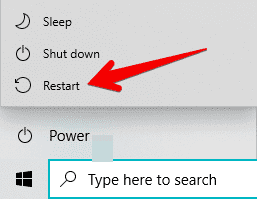
Restarting the Windows 10 PC
That’s about it for this tutorial. You’ve successfully removed the relevant policies displaying the “Managed by your organization” message on your Windows 10 PC. With some spell of fortune, you should now be browsing on your device without a management symbol.
Since we’re a Chrome OS-oriented website, that’s all about fixing the issue at hand for Windows 10 PCs. The fixes detailed ahead are going to be for Chromebooks primarily. Let’s get into them now.
Switch your profile
If you’ve let a friend or someone else sign into your Chromebook recently, then the “Managed by your organization” issue might be popping up because of this exact reason. What indeed went down is that the person who logged into your device had their account under management by either an educational institute or an enterprise.
- It’s instances like these that the Guest mode exists on Chrome OS. Please find out how to use it and makes others do too in this article here.
If no one has used your Chromebook, then it could be that your profile altogether has been put under a managed policy somehow. To ensure this is the case, all you need to do is sign out of your Chromebook and hop back in using another account. That’s easy to do.
Click on the “Status Tray” area on your Chromebook where the clock is shown, followed by clicking on the profile picture. This will confirm how many accounts are being used on your Chromebook. Go to your “Setting” and dive right into the “Accounts” section if you see more than one. Here, you’ll be able to remove any extra account affiliated with your device at that time.
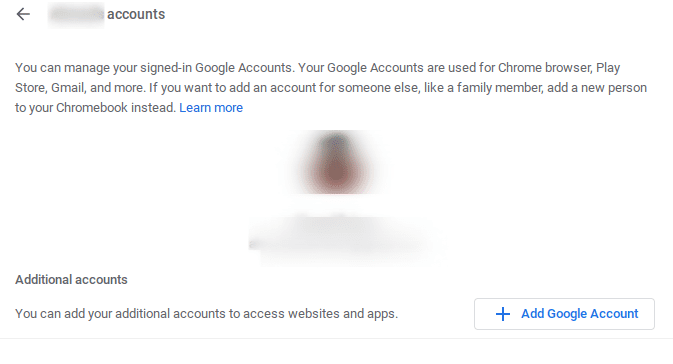
Account management on Chrome OS
Do that, restart your PC, and relaunch Chrome to see if the annoying message is still there.
If it is, continue reading to the other fixes below.
Check the device for suspicious applications
Another plausible reason you’re seeing the “Managed by your organization” prompt is that an application wrongly forces the system to think it’s being managed when it’s not. A word to the wise: it’s always the best of interests to download and install applications from trusted sources, such as the Google Play Store, Chrome Web Store, and Linux repositories.
However, even then, there’s a chance, although a slim one, that a malicious virus has somehow seeped into these trusted sources. In those cases, it pays off to have an antivirus installed on your Chromebook beforehand.
- Our top pick in this regard is the highly capable Avast Antivirus among other top-rated antivirus software.
This means that you might have installed an application that’s causing the Chromebook to assume it’s a managed device. The possibility of this happening isn’t that too fat but is still worth a shot as this could solve the problem we’re experiencing.
Fire up the Chromebook Launcher and carefully check each application apart from the factory-installed ones. Pay special attention to the apps you’ve installed most recently if the “Managed by your organization” prompt has also manifested in earlier times. The app you’ve just got on your device could correlate with this issue.
If you spot any application that looks suspicious, get rid of it from the system immediately. Furthermore, try uninstalling any app that you’ve installed in recent times. If you’ve installed more than one application, restart your Chromebook every time after uninstalling an app and check back with Chrome if the problem persists.
Hopefully, doing all this should sort the fix out for you.
Conclusion
With the final solution in the bag, you’ve reached the end of this guide. Here’s hoping that the “Manage by your organization” message ceases to appear in your Chrome browser after trying these fixes. Be sure to follow each of them as instructed for the best results. Chrome Ready wishes you good luck!
