Chromebooks are the modern-day solution for enterprises that require speed, stability, and security above all other qualities on a browsing system. The operating system that these sleek machines sport has a habit of getting constantly better than ever. It has been announced that Adobe Photoshop is coming to Chrome OS, which people have been waiting for years and years. From running 3D printer software to making WordPress run on Chromebooks, you can now get a lot done with these trusty speedsters by your side.
Furthermore, little do many people know, but Chrome OS laptops can be great hosts for Microsoft Windows. Of course, we’ve already covered how to install Windows on Chromebook and the recently-released Windows 11, but there’s another trick you can pull off for effectively securing your upgrade of this full-featured operating system. Doing so will allow you to get Windows 11 on your PC right from Chrome OS.
In this article, we’ll be jotting down a tutorial on creating a Windows 11 USB installer on Chromebook, so sit back, relax, and follow along with this guide to acquire the necessary information.
Creating a Windows 11 USB installer on Chromebook
To create a Windows 11 USB installer using your Chrome OS laptop, you’ll be needing the following two:
- A USB drive with at least 8 GB free storage
- balenaEther
Both of these will be necessary for you to create a Windows 11 USB installer on Chromebook. The USB drive will help retain the operating system files, while the balenaEtcher utility software will do all the handy work for us. With the initial requirements out of the way, let us get into the rest of the process step-by-step.
Step 1. Installing balenaEtcher on Chrome OS
Downloading and installing balenaEtcher on your Chromebook is entirely painless. However, it is pretty lengthy, so that we won’t be enlisting the guidelines for it in this guide. To best understand the installation of Etcher on Chrome OS, check out this link, where an in-depth tutorial awaits you, discussing the complete installation steps required to run balenaEtcher on your Chromebook.
Please download the software on your device from the instructions written in the interlinked guide to continue. You will use this software to create the Windows 11 USB installer as soon as you’ve done that. Right after that, proceed toward reading from the next section.
Step 2. Downloading the Windows 11 ISO on Chrome OS
To create the Windows 11 USB installer, we first have to grab the Windows 11 ISO online. An ISO is a disk image containing complete file information of a certain program. Thankfully, Microsoft has now made it possible to download the Windows 11 disk image directly from their website, so users don’t have to scour the internet for it. The following steps are going to take it from here.
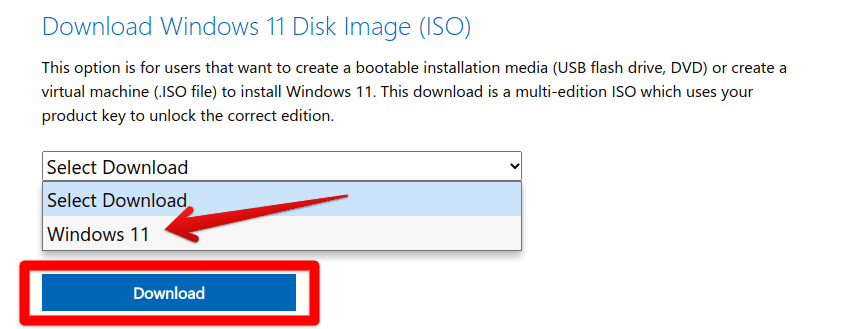
1) Click on this link to get straight to the official Microsoft website. When you’re there, scroll down a little to find the “Download Windows 11 Disk Image (ISO)” section and select your download. Unmistakably, we will choose Windows 11 and click on “Download.”

Selecting the Windows version for ISO download
2) As soon as you click on “Download,” the next step will be to choose the language you wish to install Windows 11 in. We will go with English, but you can choose any out of the listed options. Once done, click on “Confirm” to continue.

Confirming the Windows 11 interface language
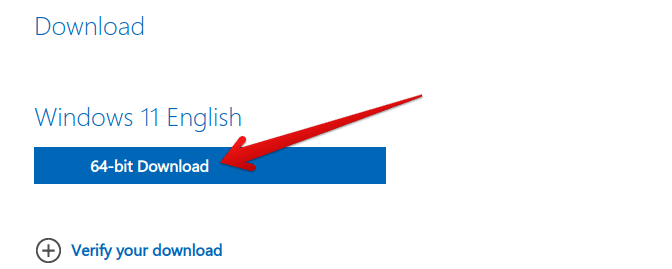
3) After choosing your preferred language, click on the “Download” button. This will begin the download process on your PC. Depending on your internet connection, it may take 10 minutes to 1 hour for the process to conclude.

Downloading Windows 11 ISO
After the download concludes, we will launch Etcher on your Chromebook in the next section. You’ve done your part up until now.
Step 3. Creating the Windows 11 USB installer with balenaEtcher
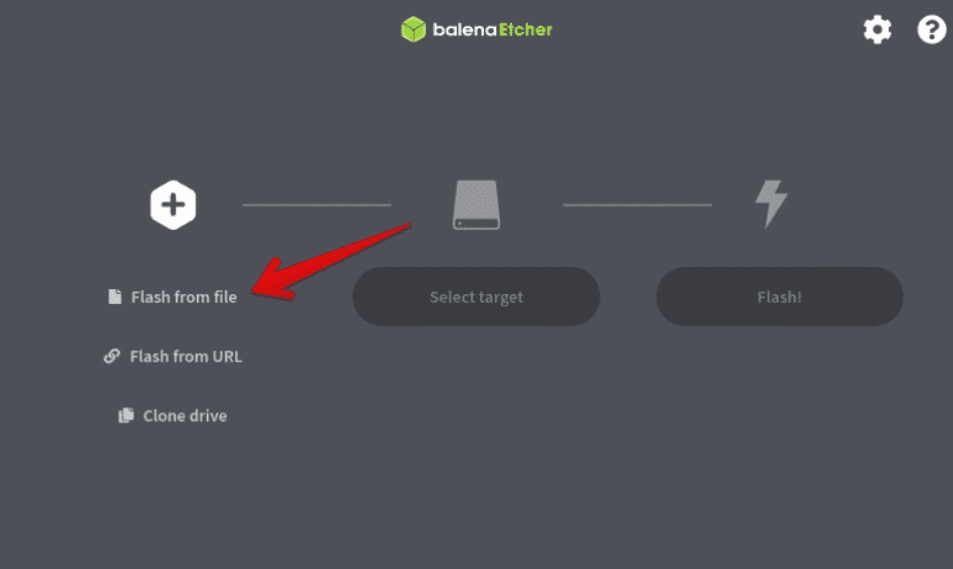
You now have to fire up Etcher on your Chromebook, given that you’ve learned how to install the software already. However, as soon as you enter the main user interface of balenaEtcher, you’ll see how it employs a three-step formula, making it easy to flash ISO images to a USB drive. The following steps will illustrate what you need to create a Windows 11 installer.
1. Click on “Flash from file” within the main balenaEtcher user interface. That will open the “Files” app on your Chromebook automatically. From there, select the Windows 11 ISO that you’ve just downloaded.

Selecting the Windows 11 ISO in Etcher
2. Right after that, you have to insert a USB drive that you’d like to flash the Windows 11 ISO to. Remember that whatever drive you’ll use here will be erased. If there’s anything important in it, be sure to back it up to avoid data loss.
- We recommend you check out pCloud for a robust cloud-based storage solution in this regard.
Click on “Select target” to select your USB drive. That should take you to the final step.

Selecting the USB drive
3. The final step is to click on the “Flash!” button, which will promptly begin the process on your end. When balenaEtcher has finished flashing the Windows 11 ISO to your USB drive, you will see a “Flash Complete!” screen, confirming that the operation has been a success.

Flashing process complete
That’s it! You can now effortlessly take out the USB drive and insert it into whatever device that needs to be flashed with Windows 11. The process was reasonably straightforward, although a bit time-consuming. We genuinely hope that the guidelines above are helpful.
Conclusion
Windows 11 is one of the hottest topics in modern-day technology. After all, this cutting-edge operating system will power our Windows-based desktop PCs for the next eight years, so this development hasn’t been something to sleep on. On the other hand, we have Chromebooks, which are seemingly getting more powerful as the days go by.
A portion of what Chrome OS can offer its users comes from the Linux subOS, opening up a world of functionality and providing access to powerful software.
This article shows you an easy-to-follow method of creating a Windows 11 USB installer, should you ever require one. We advise again to follow the steps carefully for achieving the best results. As always, Chrome Ready wishes you good luck!

2 comments
Which file do I run to get it going
I admit I know nothing about installing Linux , but this supposedly tutorial did nothing but confuse me . It seems to me all this page is doing is pushing more ads in my face as fast as possible. I managed to open developer mode and all it said was this page hasnt been visited in 4 years . Is that normal for what Iam looking at?