Android development has only been possible on Windows, macOS, and Linux computers for a long time. However, that narrative changed with the release of Chrome OS. This operating system brings the unique ability to build and run android applications. It is now possible to directly deploy the applications you are making and testing on your Chrome OS. Testing android applications on Chrome OS aids in correctly understanding UX (User Experience) and optimizing the experience of the applications.
Additionally, building android applications on Chrome OS is vital since the developer can deploy and test the application from the Chrome OS device to a tablet, phone, or other Chrome OS devices. Plus, not to forget the comfort of the whole day battery life you commonly get on most Chromebooks these days.
Installing Android Studio on a Chromebook
This article tutorial will illustrate how to install Android Studio on Chrome OS.
Requirements
- RAM: At least 8 GB
- Processor: Intel Core i5 or later
- ROM: Minimum of 4GB
- Display: 1280 x 800 resolution (Though resolution does not matter so much)
With the provided requirements, a user might have a little luxury depending on the project they are handling. For instance, minor projects require 4GB storage, while much-demanding projects require more than 4GB. Therefore, depending on the project you are running, the requirements might defer.
Now that we are acquainted with the necessities, let us proceed to the installation phase.
Downloading and installing Android Studio on Chrome OS
Before we dive into it, you should consider enabling the Developer Mode if you intend on directly debugging applications from your Chrome operating system. However, this process is painful since if you did not enable Developer Mode during installation, you would be required to wipe out your device entirely. Therefore, depending on how you want to use Android Studio, you can either consider enabling Developer mode or not.
Next, it is vital to understand that when writing this article, developers cannot debug applications on Android devices connected to Android Studio via USB. However, this does not mean that a solution will not be provided shortly since Google gave a green light stating that this feature will be made available soon. Until the feature is released, you will continue using the ADB debugging mode over Wi-Fi that is perceived as less secure than USB use.
Note: Ensure you run a compatible device before installing Android Studio since not all Chrome OSes support Linux applications.
It is crucial to establish that you have more than10 GB since 6.4GB will be used to install Android Studio and Linux applications on your Chrome application before the installation process.
Once you have met all the prerequisites, it is time to download and install Android Studio.
Follow the steps provided herein to install Android Studio on your Chromebook.
Step 1: Switching to Developer Mode
As already said earlier, this method depends on the user’s preference hence rendering it optional. The Developer Mode is primarily for developers who need to debug their Android applications directly from their Chrome OSes.
To switch to Developer Mode, follow the steps highlighted below:
- Switch off your Chrome OS
- While Powering on your Chrome OS, hold the Refresh and Escape Key. (These combinations will boot your Chrome OS in Recovery Mode)
- Once in Recovery Mode, Click Ctrl + D to enter Developer Mode.
- Confirm the prompt
Note: This process will erase your entire device; hence, be sure to back up your data before proceeding to confirm the prompt.
You have successfully switched to Developer Mode. However, every time you boot to your Chrome OS, you will be prompted by a message that your device is in Developer Mode. Do not freak out since this is normal. Press Ctrl + D to bypass the message and boot to your Chrome OS.
Step 2: Enabling Debugging
Before enabling ADB debugging, you should first set up your account again since the previous step wiped out the entire data, including account information. When done, proceed to enable ADB debugging.
Note: Just like the previous step, ADB debugging is also optional, and it is only required when you intend on debugging Android applications directly on your Chrome OS. Therefore, if this is not your plan, then you can skip to the next step.
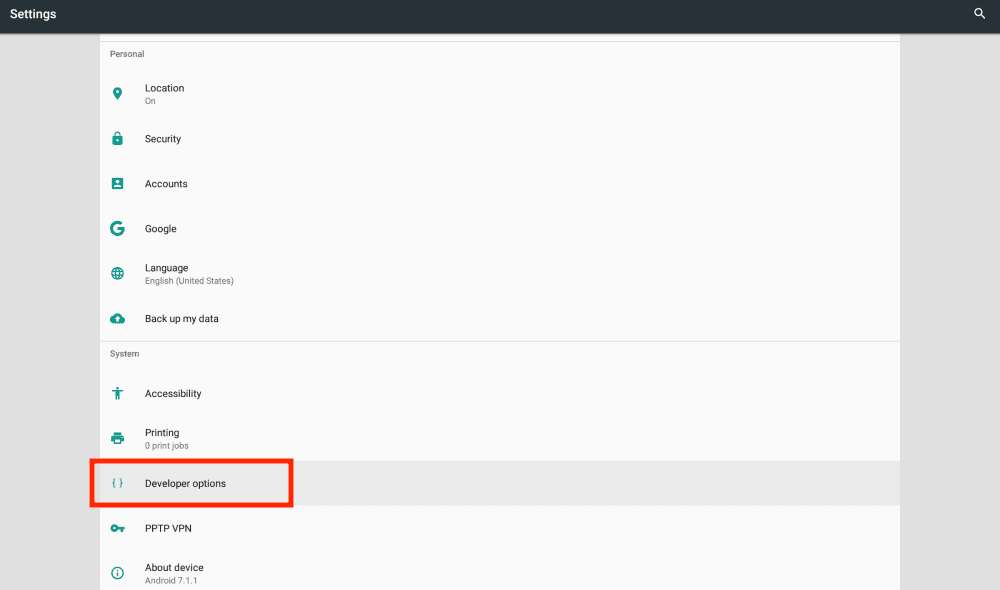
On your Chrome OS, open the Settings application and click on the Google Play Store option. Next, click on the “Manage Android Preferences” option to open the Android Settings application. Once in the Android Settings, scroll down and enable Developer Options.

Chrome OS Android Developer Options
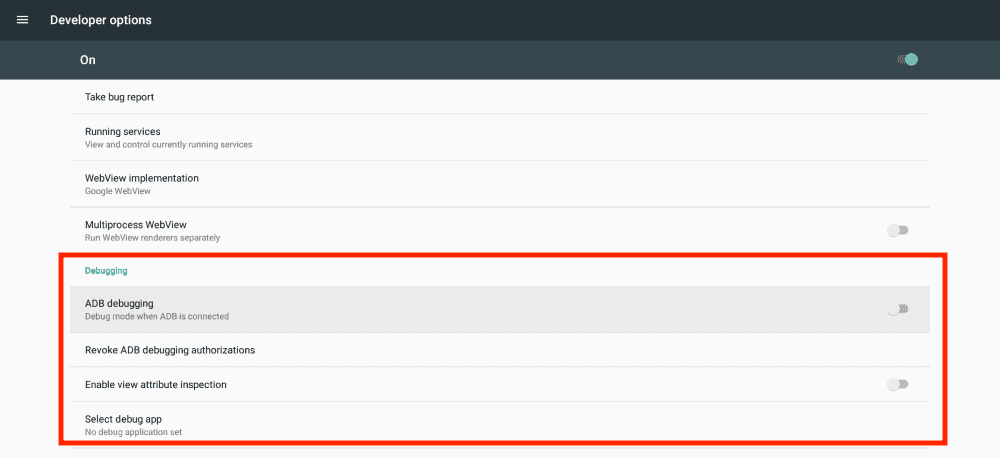
Now that we have Developer options enabled, proceed and enable ADB debugging. Once you are done enabling ADB debugging, proceed to step 3.

Chrome OS ADB Debugging
Step 3: Enabling Linux Applications
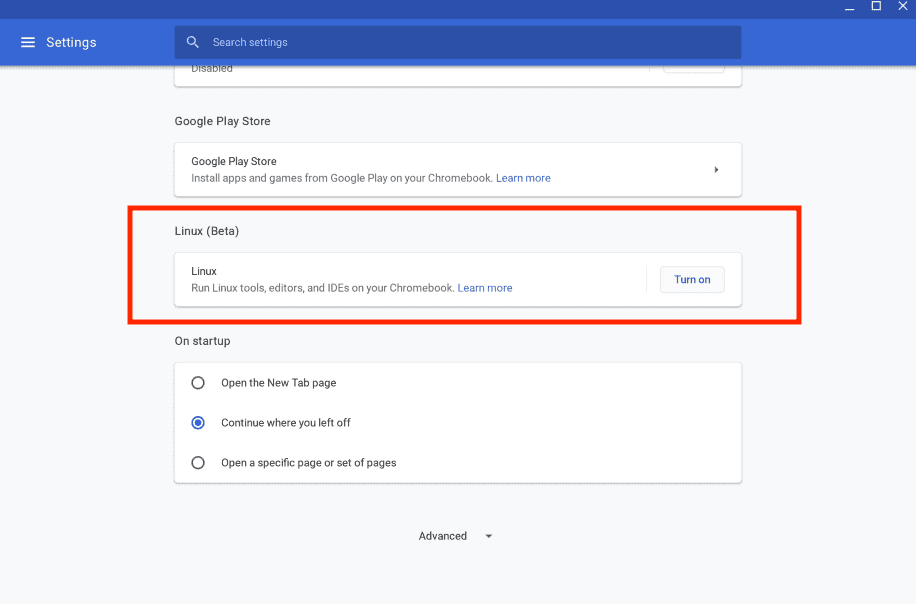
Launch the Chrome OS Settings application, locate “Linux Apps,” and click the “Turn On” option. Your Chrome OS will automatically download all Linux Apps that you require. Once the download process is complete, a new terminal window will pop up.

Chrome OS Linux Applications
Step 4: Downloading the Android Studio application
Now that we have downloaded the Linux applications, visit the official Android Studio download page to download the latest Linux package. Proceed and download, then open and move the downloaded files from the Downloads folder to the Linux Files. Occasionally, the file name ends in a .zip or .deb extension.

Chrome OS Android Studio Download
Step 5: Installing Android Studio application
After moving the downloaded Android Studio application to the Linux Files location, it is time to install it to our Chrome OS.

Chrome Android OS Download Files
Launch the terminal application and input the command below:
unzip android-studio-ide-173.4907809-linux.zip
Note: Replace the “android-studio-ide-173.4907809-linux.zip” with your file name. Also, ensure you type in the command and file name correctly to avoid falling into unnecessary errors.
The command executed above will extract the Android studio files. The entire process might vary, depending on the speed of your Chrome OS and computer. Once the process is complete, execute the command below:
./android-studio/bin/studio.sh
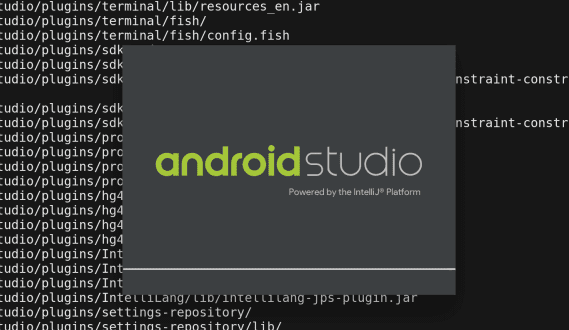
This command will launch the standard Android Studio setup assistant.

Chrome Android Os Install pop up.
Follow the televised prompts to download and install all the requirements into your Chrome OS.
Note: If you downloaded a .deb Android Studio file, the process is quite simple. Just double-click the installer file and follow the onscreen prompts to install it to your Chromebook.
Step 6: Adding a Launcher icon
Now that the installation process is successful, you will see the Android Studio welcome screen. Our Android Studio is ready to use. However, the major problem is that it lacks a launcher icon, and you must launch it using the terminal. This is not what most of us need. Hence, this step’s essence is to add a launcher icon to make it easier to access and launch.
Click the Configure button at the bottom right corner of the Android Studio welcome screen. Then, on the menu, choose the “Create Desktop Entry” and click “OK.” Now you will be able to access Android Studio on your launcher.
Chrome OS adds launcher Icon.
Congratulations, you have successfully downloaded and installed Android Studio on your Chrome OS. However, if you wish to explore more, you can check out the optional steps covered here.
Step 7: Enabling Wi-Fi debugging
This step is done by developers who plan on debugging their Android applications on their Android devices. Therefore, if this is not in your plans, you can skip this optional step.
Note: Google Chrome announced that they would introduce the USB debug feature in the future, which will see developers debug their Android applications on their Chrome OSes via USB.
It is also vital to consider the risks you are taking by using the wireless debugging mode that poses a significant security threat to your work.
However, if you still want to proceed with wireless debugging, you will require a secondary computer with Android Studio installed. Connect your Android device to the second device using the USB debugging mode and run the command below:
adb tcpip 5555
That’s all. You can now proceed and disconnect your device from the computer since, by now, wireless debugging should be enabled.
Note: If you are running ADB for the first time, you might be prompted to enable debugging. Don’t freak out. If prompted, enable debugging and rerun the command.
Step 8: Connecting Devices
If you want to connect your Android Studio for debugging on Chrome OS, this step should come in handy for you. In this step, we shall require the Ip address to connect.
For developers who debug directly on their Chrome OSes, ensure to follow step 2 to enable Developer Mode. The standard IP address is 100.115.92.2.
When using your Android device for debugging purposes, you must enable wireless debugging, as already shown above. Also, ensure that your Chrome OS and your Android device are connected to the same Wi-Fi network. Once you are connected to the same Wi-Fi network, you will need your Android’s IP address. To find it, click on the “Settings application > About Phone > Status.” Your IP address is listed under the “IP Address” section.
Now get back to Chrome OS and launch the Terminal application and execute the command line below using either of the Chrome OS Ip address we acquired earlier or the Android device IP address:
./Android/Sdk/platform-tools/adb connect 100.211.6.113

Chrome OS Android Wireless Debugging
Note: is it your first time running this command? don’t freak out if your get this message “Failed to authenticate.” Accept the debugging prompt on the Android device and ignore the prompted notice. You will see your Android device on your Android Studio application as a debugging device.
To verify that everything is working correctly, run the command below:
./Android/Sdk/platform-tools/adb devices
You are now set to pursue your Android coding journey.
Conclusion
This is an in-depth guide on installing Android Studio on Chrome OS. To get the best results, ensure you keenly follow the article. Chrome OS makes Android coding more fun and enjoyable. Therefore, don’t be left out since we have you covered. Stay tuned for more releases on Chrome OS. Also, give a thumbs up if you found the article helpful.
