Numerous software exists for preparing presentations. However, the two that stand out are Microsoft PowerPoint and Google Slides. Even though Google Slides is entirely located on the cloud, it still hosts many features and functionalities. Here, you will find the methods for opening and editing office files on Chromebook.
If you need to make presentations quite often, it can be beneficial to know some valuable tips for the platform you are creating these slides. After going through this list, you will go through Google Slides like a professional and make the most of its unique features. Let us briefly look at the top 10 Google Slides usage tips for Chromebook users.
Google Slide usage tips on your Chromebook
1. Browsing and inserting images
Presentations are only made pleasant and attractive through engaging images. Without high-quality pictures, you will not be able to give your slides the touch they so desperately need. When working on Google Slides, you can insert and use images as you do on PowerPoint. However, two more functions in Google Slides can completely revolutionize this presentation step.
Browsing and inserting images
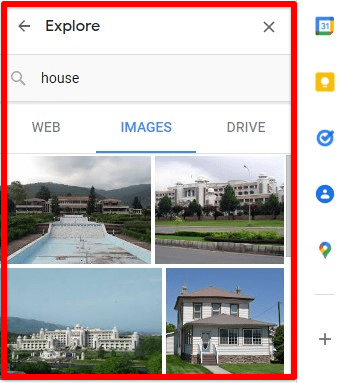
In Google Slides, Explore and Drive capabilities let you search for any picture on the internet. What’s fantastic is that you do not even have to leave the opened tab for this. Instead, all you need to do is click on the “Explore” button present in the bottom right corner of your screen. This will open a new window on the side where you can search for anything. All search results are divided into three main sections. You can open any link from the web section, drag & drop a picture from the images section, or access your Google Drive and import a picture from the cloud. All of this makes inserting new images in Google Slides genuinely easy.
2. Resizing text box automatically
There needs to be textual information in every presentation elaborating the pictorial content. For that, you need to insert text boxes. Unfortunately, more often than not, these boxes are sized irregularly and do not fit the text present inside. To get rid of this issue, Google Slides offers you a feature that can be employed to resize text boxes automatically. Doing this can save you a lot of effort, manually setting up the box dimensions from the layout tab.
Resizing textbox automatically
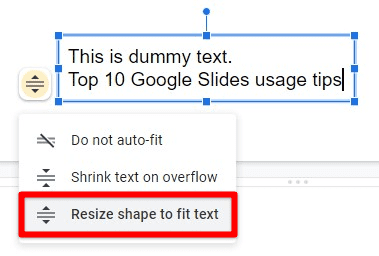
With this, you can insert a text box of any random size and start typing. You can edit the text box when you think the text is completed and looks good. You will notice a small button right next to the blue box. This button launches three different options. These include “Do not auto-fit,” “Shrink text on overflow,” and “Resize shape to fit the text.” If you want your text to keep formatting, you will select the third option of resizing the box. You do not have to keep selecting this option every time. Once you configure this button, it will automatically resize any more text boxes you insert in your presentation.
3. Using master slide function
If you have ever worked on PowerPoint or Google Slides, you might have used the master slide function. Recently, Google updated this function in Google Slides and completely loaded it with unique features. You can use this to update all slides in your presentation with a single click. This can end up saving a noticeable amount of time and effort. The master slide function is beneficial if more than 20 slides are in your presentation. In that case, it can be time-consuming and frustrating to update something on every single slide manually.
Using master slide function
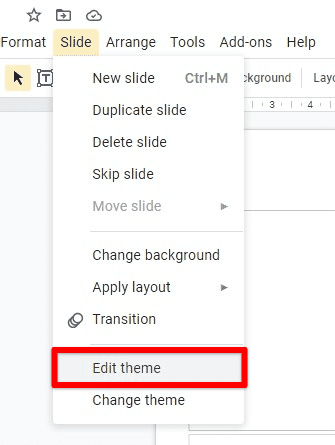
If you want to add a watermark or logo to all slides, you can copy the item inserted and go to the “Slide” tab in the taskbar. Then, click on the “Edit theme” option from the drop-down menu. This will open up the entire theme with all layouts. In the new master slide function, you can see which changes will be applied to which slides. This allows you to preview the content and change the settings preference for any underlying slide.
4. Sending slides in presentation mode
One of the reasons Google Slides has become increasingly famous among office users is its connectivity and sharing features. Like in Google Docs, multiple people can simultaneously work on the same presentation. In this article, you can find the top 10 helpful Google Docs usage tips. There are times when you need to send your work to someone else who does not have direct access to that Google Slides presentation. Instead of sending the slides in edit mode, you can use the presentation mode. This allows the receiver to click on the link and see the final result directly.

Sending slides in presentation mode
Moreover, this can also be useful if you want the receiver only to view and not edit the slides. For doing so, you will have to tweak the link you are sharing. First, you need to replace “edit” with “present.” Once this is done, the new link will always open the slides in presentation mode. It even allows the viewer to auto-play all slides. It is important to note that this feature only works if your sharing settings are set accordingly. Otherwise, the recipient will always see a page that directs them to ask for permission.
5. Reordering and skipping slides
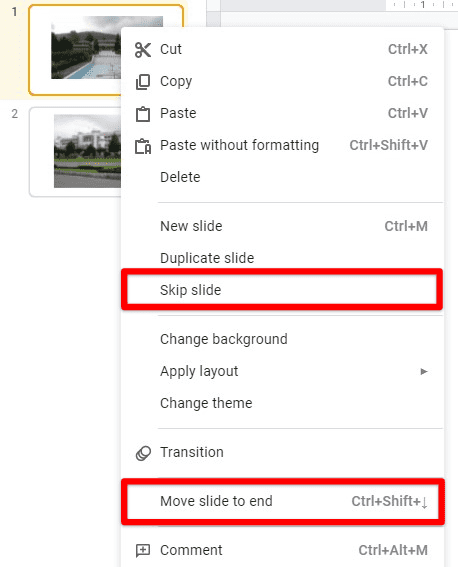
When working with presentations, you may need to reorder the slides. That can be done from the slide panel located on the left side of your screen. You need to drag the slide you want to move and drop it to whichever position you like. If you are working on a presentation that contains more than 20 or 30 slides, you can also directly move a slide to the end or the beginning. That can be done by right-clicking the particular slide and selecting the appropriate option.
Reordering and skipping slides
Apart from reordering slides, you can also hide/skip slides from your presentation. This is useful if you want to add extra information that is not necessarily displayed. This can also be done by opening slide options with the right-click. When you have skipped a slide, it will take over a less opaque color that is identifiable from the slide pane.
6. Cropping specific shapes
You might not know this, but you can crop your pictures into specific shapes that can be more engaging than square or rectangular images. More often than not, it would help if you did so when a picture needs to be incorporated in a specific presentation theme. In that case, you will not have to use a third-party tool to complete this procedure. Google Slides has a built-in feature that lets you trim the picture into whatever shape you may like.
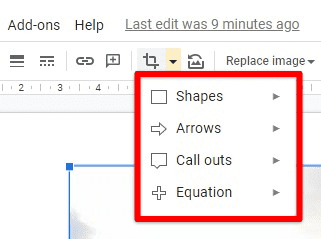
Cropping specific shapes
For doing so, you first need to select a picture. This will enable a set of options below the taskbar. Next, click on the down arrow located next to the crop icon. You will be able to see a list of options. Here, you can find more than 120 shapes and formats in which a picture can be cropped or shaped. Click on any shape you want, and that will automatically be applied to the image you selected in the beginning.
7. Utilizing format paintbrush
This is one of the most distinctive and advanced features in Google Slides. This lets you copy and paste a particular set of formatting from any item on your screen. This tool is right below the taskbar and has a paint roller icon. For applying an existing formatting rule to any other item on the slide, you will have to observe the following course of action. First, select the item from which you want to copy the format. Next, go ahead and click on the paint format icon. Finally, choose the item from which you wish to apply the format. This will automatically update the second item.
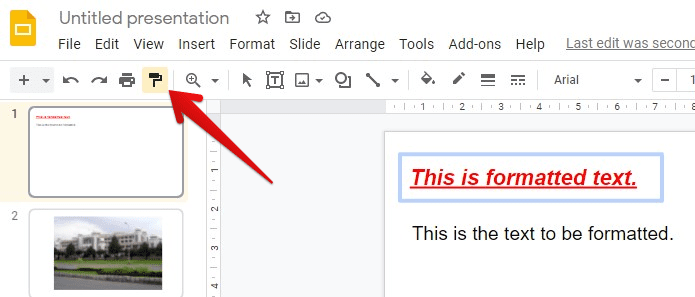
Utilizing format paintbrush
When you start applying the paint format feature of the Google Slides, you may want to know one more trick related to this. You will notice that as soon as you apply one format, the icon gets disabled. This requires you to enable it every time you paste it on any new item. The solution for this is double-clicking the paint roller icon. This will keep the feature enabled unless you press the Escape button to exit it.
8. Performing a targeted search for Google Slides files
Whenever you are working on multiple files simultaneously, it is possible to lose track. Many people find it difficult to search for the file they need once their drive gets cluttered. Google Drive holds all files from Google Docs, Google Slides, Google Sheets, Google Classroom, and more. This means that your storage can quickly turn into a mess from where it is tough to search for a specific document.
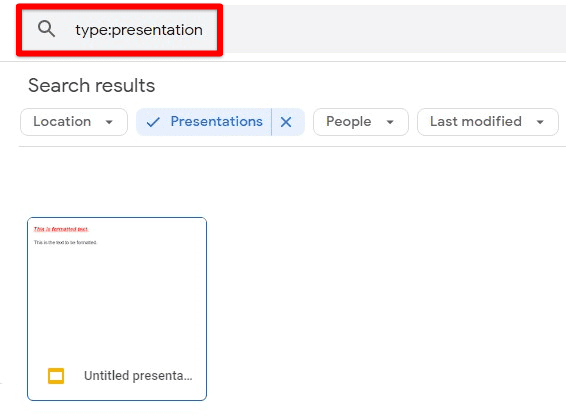
Performing targeted search for Google Slides files
For that reason, Google lets you narrow down the search field. When searching for a Google Slides file in Google Drive, you can set the drive to display relevant files only. This can be done by typing in “type:presentation” in the search bar. This will automatically set a search file that displays Google Slides only. You can also use it in combination with the name of that file. This can scale down the search results even more.
9. Copying slides without speaker notes
This is one of those most valuable features when working on a big presentation with more than a few slides. Usually, when you copy a slide and paste it to somewhere else, all speaker notes and comments get copied along with it. However, since you copy a slide to use it somewhere else, you do not need the same speaker notes. Thus, you must copy the slides without these notes to take care of this.
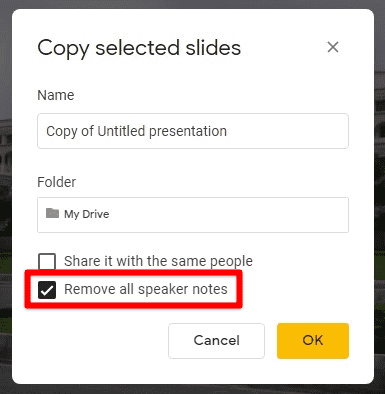
Copying slides without speaker notes
For doing so, you have to tick one more box while copying. First, select the slides you want to copy and then go to the “File” tab in the taskbar. Next, go to “Make a copy” from the drop-down menu and select the “Selected slides” option. This will pop up a new window on your screen. At the bottom, you will see a checkbox that reads, “Remove all speaker notes.” Once that is ticked, click on the “Ok” button. This will copy the selected slides without any speaker notes or comments.
10. Opening a specific slide during the presentation
Now that we have gone over many helpful tips while preparing the presentation let us discuss one employed while presenting. When displaying your file in presentation mode, you may need to skip over some slides that were not hidden previously. In other cases, you can also find yourself in a situation where you need to jump over to a particular slide. Instead of changing one slide at a time, the better option would be to open that slide directly.
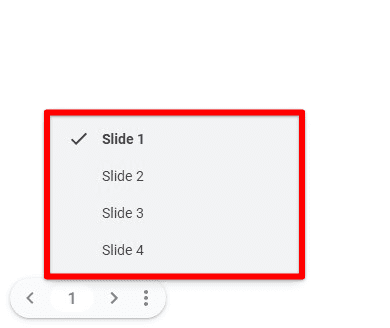
Opening a specific slide during the presentation
There are two methods for doing this. First, you can move your mouse to the bottom left corner of your screen. Here, you will see a short menu with the slide number. You can click on that number, and then a list will be opened with all slides in that presentation. Click on one, and this will take you directly to that slide. On the other hand, if you remember the exact slide number, you can type that number and then press the Enter key. This will be precisely the same as the previous method.
Conclusion
Google Slides is one of the most useful and productive Google services that compete on all levels with Microsoft PowerPoint. Nothing stops you from maximizing your presentation’s value once you realize the shortcuts, features, and tools available on this platform.
