Chrome OS is blessed with manifold accessibility features to enhance user experience and make life a lot easier. The top-rated Chromebooks of today offer a lot in terms of functionality when paired with the speed, simplicity, and security of this slick operating system – measuring up to nothing but a match made in heaven.
One such accessibility feature is an on-screen keyboard that makes it possible to type using your mouse. This comes in handy when the Chromebook keyboard stops working and you need a quick fix. However, many people are suited to a different keyboard layout that’s not available by default when you first enable the on-screen keyboard feature. It may seem confusing when it comes to that, but fret not, since Chrome Ready has got your back.
Therefore, in this article, we’ll be explaining how you can change the on-screen keyboard layout on your Chromebook. Without any further ado, let’s get started right away.
Changing the layout of your on-screen keyboard
Before you set out to change the layout of your on-screen keyboard, make sure that the keyboard itself is enabled in the first place. To do that, go to your Chromebook’s “Settings” and search for “On-screen keyboard” in the search bar. When you find it, check if it isn’t switched off. If it is, click on the toggle beside the option to enable the Chrome OS on-screen keyboard. The option should appear in the “Keyboard and input” section in “Accessibility features.”
After making sure that your on-screen keyboard is enabled, follow the instructions in the steps below to change its layout as per your preference.
1) In the first step, you have to open your Chromebook’s “Settings.”
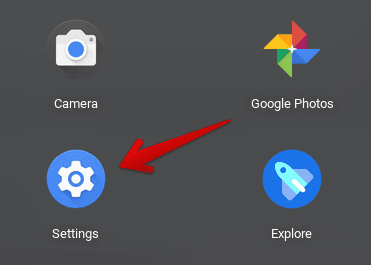
Opening “Settings”
2) After having the “Settings” window opened, find “Advanced” on the left column and click on the drop-down arrow beside it to reveal more options. Once done, click on “Languages and input” to continue.
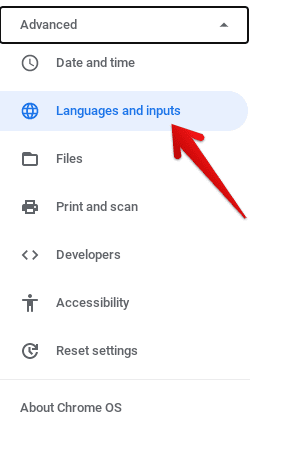
Clicking on “Languages and input”
3) Next, you’ll be directed to the relevant settings on the right of the window. Click on the arrow beside “Inputs” to continue.

Clicking on “Inputs”
4) After opening the “Inputs” section, you’ll be seeing a section called “Input methods.” Here, you’ll be able to change the layout of your Chromebook’s keyboard easily. Click on “Add input methods” to begin.
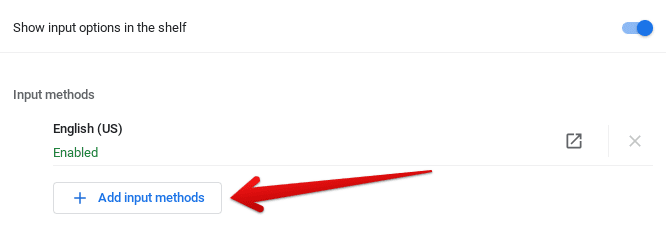
Adding input methods
5) After clicking on “Add input methods,” a small-scale window will pop up containing all the different keyboard layouts and languages that Chrome OS actively supports. Browse the section to find the layout that suits you and click on it. When done, confirm your selection by clicking on “Add.”
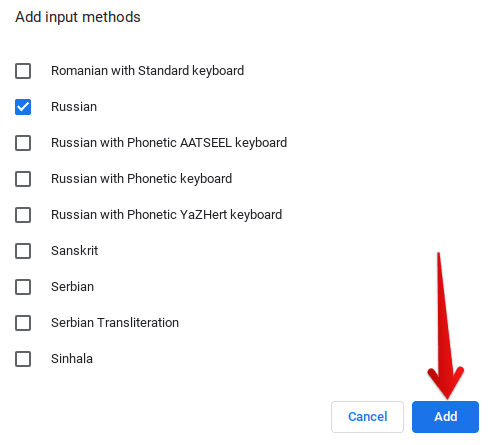
Confirming the new input method
6) That’s it! You’ve picked a new layout for your Chromebook’s on-screen keyboard. You can select as many as you like at any given time. You’ll also be able to switch between all your layouts comfortably. To do that, you first have to make the on-screen keyboard come up and then click on the current input method to access all the layouts you’ve chosen for your device. We’ve selected Russian, so we’re going to use this as an example in the following screenshot.

Changing the layout of the on-screen keyboard
Alternatively, you can also click on the icon of the input method on your Chromebook’s shelf right beside the Status Tray. This will also allow you to access all selected keyboard layouts and switch between them effortlessly.
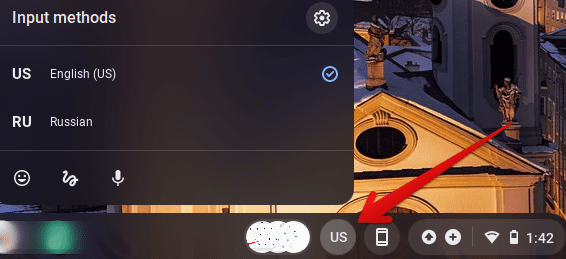
An alternative method of accessing Input methods
That’s all there is to know about changing the layout of your on-screen keyboard on a Chromebook. We hope that this guide has proved to be useful for your cause. Chrome Ready wishes you good luck!
