If you’ve ever found yourself scrolling through web pages and documents feeling a bit out of sync, you’re not alone. I’ve been there, and it took me a while to realize that what I needed was a simple tweak in my Chromebook’s settings.
Today, I’m diving deep into the world of Australian or natural scrolling on Chromebooks. This guide is crafted to make your scrolling experience more intuitive and enjoyable.
What is Australian or natural scrolling?
First things first, let’s clarify what we mean by Australian or natural scrolling. This term might sound like it’s tailored for folks Down Under, but it’s actually a universal concept that has gained popularity across various operating systems and devices.
In the traditional scroll setting, when you swipe up on a touchpad or a mouse wheel, the content on your screen moves down. Conversely, Australian or natural scrolling flips this interaction; swiping up moves the content up, mimicking the natural movement as if you were touching the screen directly.
Why switch to natural scrolling?
I must admit, when I first switched to natural scrolling, it felt a bit like writing with my non-dominant hand. But, just like any new habit, it gradually became second nature. The logic behind natural scrolling aligns with how we interact with touch-screen devices like smartphones and tablets. By making the switch on your Chromebook, you create a consistent experience across all your devices, which can significantly reduce the cognitive dissonance that comes from switching between different scrolling methods.
How to enable natural scrolling on your Chromebook
Enabling natural scrolling on a Chromebook is straightforward. Here’s a step-by-step guide to get you started:
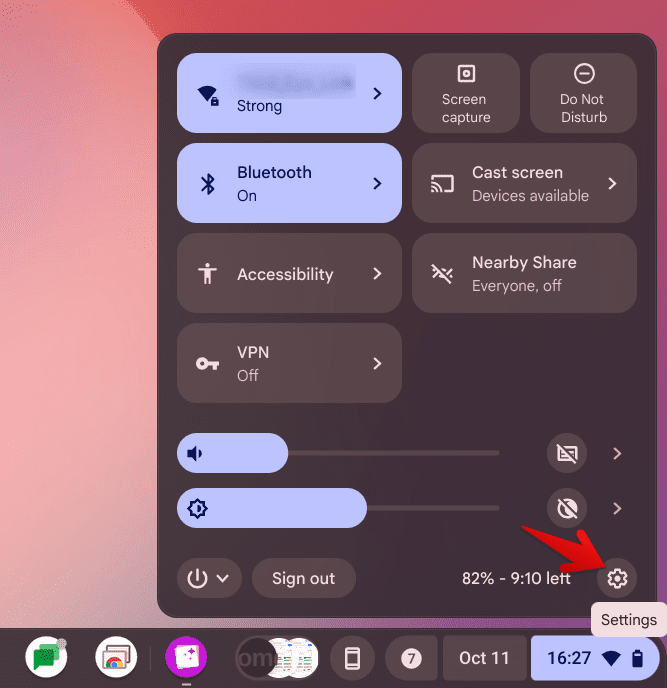
- Access your Chromebook’s settings: Click on the time in the bottom right corner of your screen to open the system tray and status area. Then, click on the gear icon to open the Settings menu.

Accessing ChromeOS settings
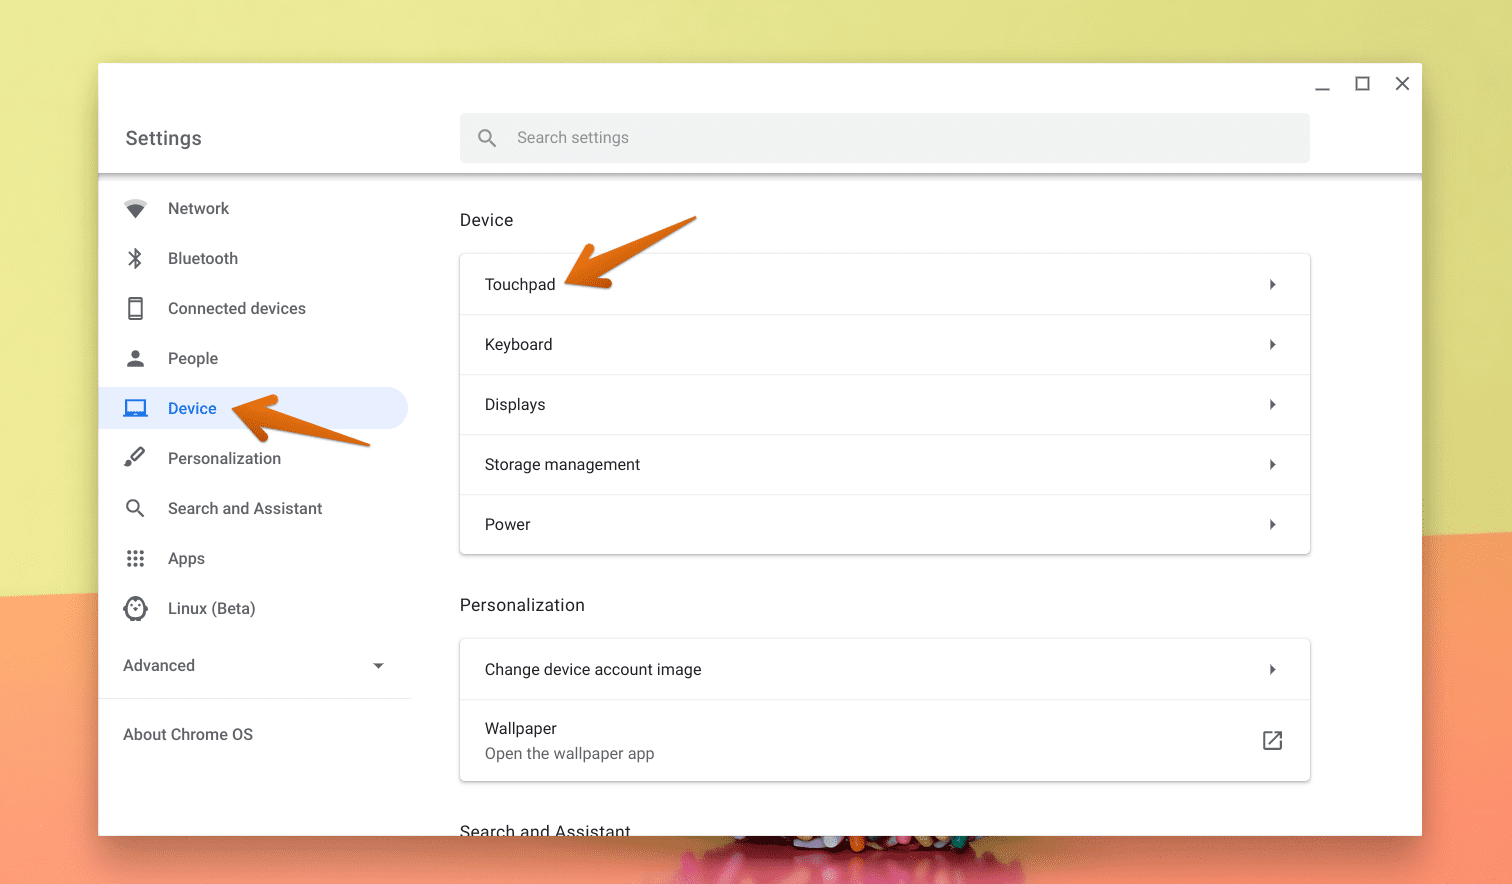
- Navigate to device settings: In the Settings menu, look for the “Device” section and click on it. This will bring up options related to your Chromebook’s hardware.

Devices Setting
- Adjust touchpad settings: Find the “Touchpad” option within the Device settings. Here, you’ll see various customization options for your touchpad.
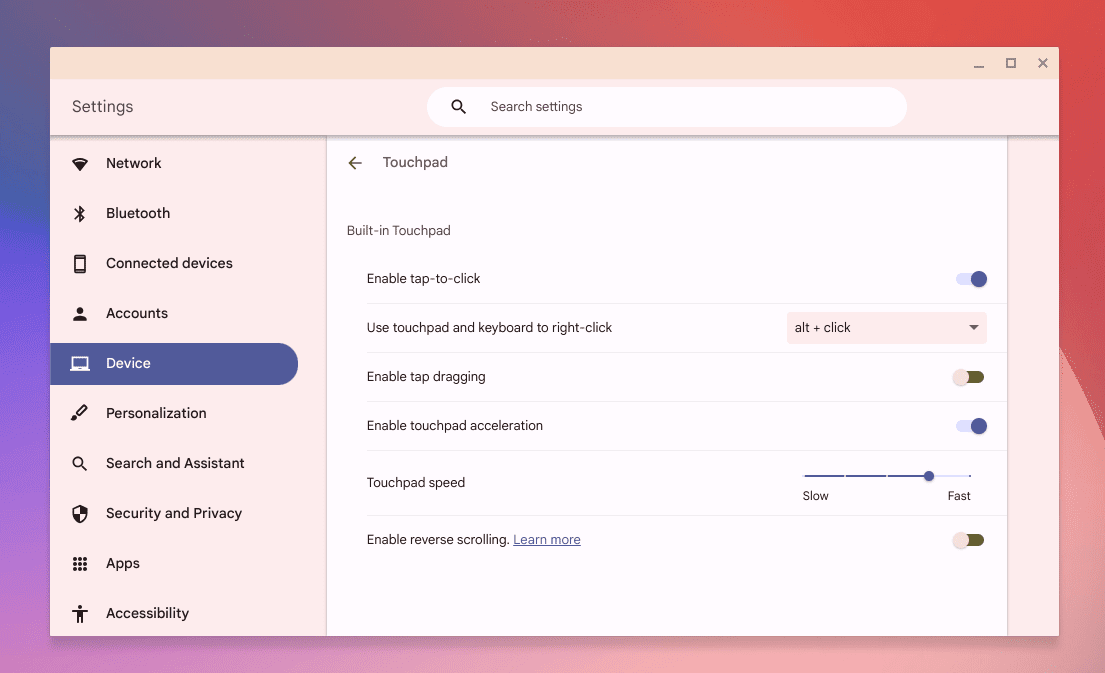
- Switch scrolling direction: Look for a setting labeled “Enable reverse scrolling”. Toggle it to ON.

ChromeOS Touchpad Settings
Great! You should now be able to use natural scrolling on your touchpad. It should activate immediately.
Adapting to the change
The first few days after making the switch might be a bit challenging. Your muscle memory from years of traditional scrolling might protest, but I encourage you to stick with it. I found that practicing by reading long articles or navigating through lengthy web pages helped me adapt more quickly.
Personal tips
As someone who juggles between a Chromebook, a smartphone, and occasionally a tablet, having a unified scrolling direction has been a game-changer. It’s simplified my workflow and reduced those jarring moments when I switch devices. If you’re on the fence about making the switch, I recommend giving it a try for at least a week. You might be surprised at how quickly your brain and fingers adjust to the new setup.
Conclusion
Switching to Australian or natural scrolling on your Chromebook can feel like a small change, but it’s one that has a significant impact on your daily interaction with your device. It makes the transition between touch and non-touch devices more seamless and can enhance your overall browsing and reading experience. As with any new habit, give yourself some grace during the adjustment period. Happy scrolling, and may your navigation be as smooth and intuitive as the Australian breeze!


1 comment
I do this, but every couple of days, the chrome book resets itself to reverse scrolling. Is there a way to change the default or to permanently disable it?