Taking a screenshot is convenient and useful in a comprehensive variety of situations. On Windows-based laptops and PCs, the process is ubiquitous and well-known to everyone, but since there aren’t many dedicated keys on Chrome OS, especially the Function ones, beginners might find it confusing when trying to get a screenshot of their Chromebook’s screen. However, we promptly discussed in a previous article how rather simple it is to nab that screenshot using a single key combination. Still, if it is an entire web page that interests you, we’re well on our way to cover this tutorial as well.
Taking a Full-Sized Screenshot using Monosnap
In this article, therefore, we’ll show you how to install a Chrome extension that’ll help you take screenshots of full web pages on Chrome OS. Additionally, we’ll also write down an advanced method to do this, but it does come with a catch. Anyhow, let’s jump right in without any further ado.
Monosnap – The Multi-Purpose Screenshot Extension
Monosnap is your one-stop shop for all screenshot-oriented requirements on every computer, let alone a Chromebook. It’s much popular, has around a million monthly users, and is exceedingly lightweight as well. One of the best reasons to get this extension for Chrome OS is the multi-faceted functionality that allows it to become the complete package for taking screenshots. Let’s take a glance at what Monosnap is comfortably capable of.
Monosnap Features
One-Click Capture
Monosnap allows you to take screenshots on the fly with just a single click. The extension resting beside the address bar promptly captures your screen with pixel-perfect accuracy and makes it possible to record videos and GIFs. Furthermore, you can assign hotkeys to take screenshots directly from your keyboard when you’re on web pages. This adds extra convenience to your Monosnap experience as you no longer have to get to its interface to capture your screen. This extension’s functionality makes you more productive by saving your time and offers you multiple ways to take a screenshot. The variety, of course, includes taking a full-sized screenshot that captures your entire web page.
Annotations
Quite possibly, one of the best features of Monosnap is its ability to edit and add annotations in your screenshot. You can draw arrows, circles, rectangles, and even lines to illustrate your image and incorporate meaning into it. However, that’s not all that this master application has to brag about. There’s a highly specialized blur tool that removes the focus from unwanted or unnecessary contents of your screenshot. As versatile as that utilitarian is, you can also draw using your own highlighter and crop your screenshot to your heart’s content. A feature that allows you to resize your screenshot is also available in Monosnap. All the more reason to get it right now.
Sharability
When you’re done tweaking your screenshot using a host of Monosnap’s tools, you can share it to different channels without a hint of hassle. Monosnap, apart from being compatible with Google Drive, also integrates directly with AWS Amazon S3, DigitalOcean Spaces, and Dropbox effortlessly. Not to mention that you can import and export data by creating an account for this application. The possibilities are seemingly endless.
Installing Monosnap
Getting Monosnap on Chrome OS is nothing short of a breeze. The following steps will explain how.
1) Begin by clicking on this link and getting to the official Monosnap install page. When you’re there, click on “Add to Chrome” to continue.

Adding Monosnap to Chrome
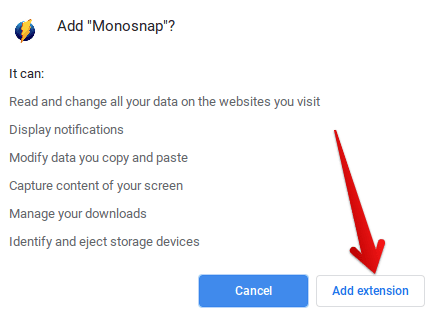
2) As soon as you do that, the system will check your device for compatibility and soon ask for confirmation. When the prompt appears from the top of the screen, click on “Add extension” to finalize the process.

Confirming the Install
3) Since the download size isn’t much, Monosnap will be added to your browser in just a bit. When the installation completes, you’ll be notified and shown that the extension has been added to Chrome. Click on its icon in the extensions bar to give it a go.

Monosnap Installed
Capturing a Complete Web Page Through Monosnap
Monosnap is quick to take a screenshot, no matter what type of it you’re looking for. The following steps will elucidate how to capture a full-sized screenshot with ease.
1) The first step is to go to the web page you wish to capture entirely. Make sure to steer clear of “special pages” like any of the secure in-built Google Chrome page since Monosnap won’t capture that.
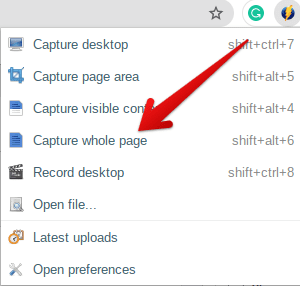
2) When you’re there, click on Monosnap’s icon in the extensions bar to expand. As more options are revealed, click on “Capture whole page.” Alternatively, you can also assign a hotkey to do this much quicker. The default one is “Shift + Alt + 6.”

Capturing the Entire Web Page With Monosnap
3) As soon as you click on that option, Monosnap will take control of your web page, scroll it down to the end, and capture it for your cause. That’s pretty much it. After it snaps the screen, an editor will open up in a new window, allowing you to customize your screenshot by adding annotations. When you’re done, click on the “Save” button in the top right to continue.

Saving the Screenshot
That’s about it! You’ve now successfully captured the entire web page and saved it to your Chromebook for local use. We recommend that you use Monosnap for all your screenshot-related endeavors from now on, but just in case, we’ve got an additional method lined up for you as well.
Taking a Full-Sized Screenshot Through Developer Tools
Not many are aware of this, but there is a set of “Developer Tools” incorporated right into your Chrome browser. A wide array of functions can be performed using these, but for now, let’s focus on taking screenshots. The following steps will explain the process.
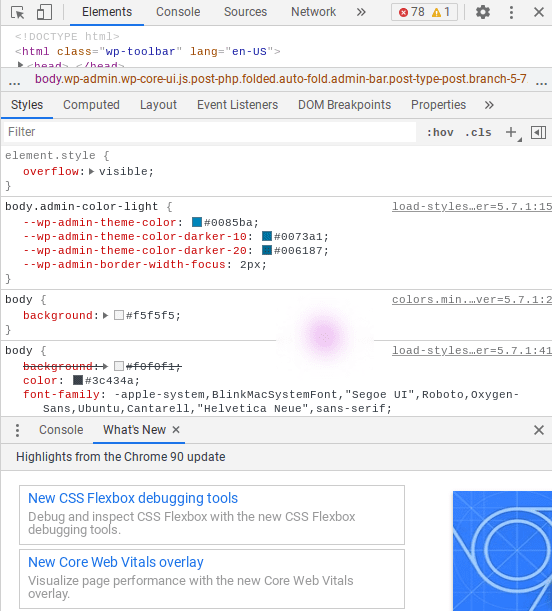
1) Press “CTRL + Shift + I” on your keyboard to bring up Developer Tools. This section will pop up from the right side of your screen, similar to the screenshot below.

Accessing Developer Tools
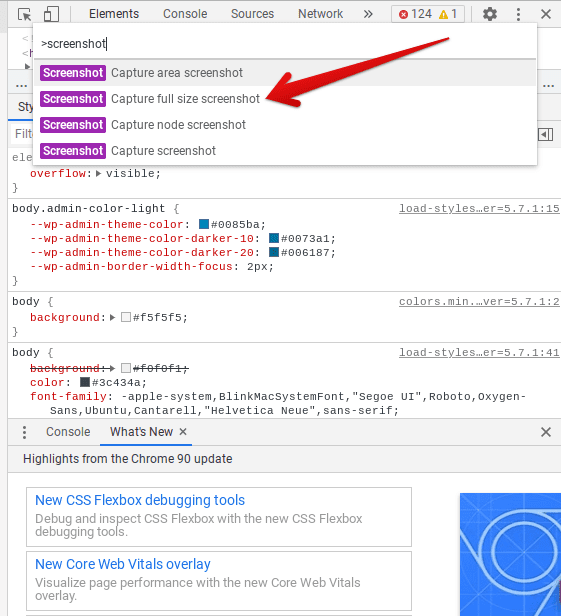
2) Next, press “CTRL + Shift + P” together to search for specifics in the Developer Tools. As space clears up for you to write, search for “screenshot.” A bevy of options will appear before you now. Out of all those, click on “capture full-size screenshot” to snap your screen away.

Capturing Full-Size Screenshot Through Developer Tools
As soon as you make the click, your screenshot will be captured. It was as easy as that. However, as we mentioned before, there is a catch with this method, which relates to the overall picture quality and resolution.
You won’t be able to zoom in much using a Chromebook’s built-in photo editor, and even if you do, the quality won’t be the same. This is why you’ll have to use Google Drive to tweak your screenshot before using it. Drive has a better editing tool that retains the quality and zooms in as much as you want.
Conclusion
Taking a screenshot is something that we’re all familiar with at some level. However, when it boils down to capturing full-sized screenshots and entire web pages, some extra digging is indeed required. However, no need to fret because we’ve already done that for you and given you two options you can use to take screenshots of complete pages. Out of these two, Monosnap is what we highly recommend to make your daily driver since the other one isn’t as convenient as the one in question. Nevertheless, if Monosnap doesn’t work, you always have a second yet more tedious alternative at your disposal.
