Considering the adverse effects of the Coronavirus and how the education sector has resorted to remote learning, Google has come up with features that’ll allow Chromebooks to get an “education refresh.” The tech tycoon announced in a blog post that Chrome OS is about to receive multiple tools in the form of updates to help ameliorate the experience of teachers and students alike.
One such tool is a built-in screen recorder that you can enable on your Chromebook right now since the update has already rolled out in March. Google aims to assist the classroom matters in this difficult time, and by doing so, Chrome OS is about to get a lot better.
In this article, we’ll show you how you can enable “Screen capture” on your Chromebook and use it effortlessly to record your screen. Let’s begin.
Enabling Screen Capture on Chrome OS
The following steps will explain the process conveniently. However, before you begin, make sure that you’re using the “Beta” channel in your Chrome OS. This will especially come in handy if you’re unable to enable the “Screen capture” tool on your device.
1) Open a Chrome tab and type in the following in your browser. You can also copy and paste it.
chrome://flags/#screen-capture
2) After that, you will be redirected to the “Experiments” page, and the “Screen capture test” tool will be noticeably apparent in yellow highlighting. Right alongside it will lay a toggle. Click on it to reveal more options. Lastly, click on “Enable.”

Enabling Screen Capture Test
3) When you’re done with that, a prompt will appear from below the screen, and you will be asked to reboot your device for the changes to take effect. Click on “Restart” to continue.

Restarting the Device
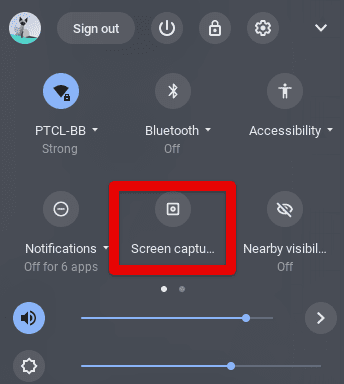
4) You should be all done by now. Check your “Status Tray” by clicking on the clock and battery icon in the bottom-right corner of your screen when your device boots up to check for the screen recording tool. It should be similar to the one in the screenshot below.

Screen Capture Enabled on Chrome OS
That’s about it. Let’s talk about its functioning so you can get to grips with this tool better.
Screen Capture Tool’s Working
When you click on the screen capture tool in your “Status Tray,” the screen will dim down a bit, and the tool’s interface will appear on your screen. We cannot take a screenshot of that to illustrate more profoundly, but it’s still easy to understand nonetheless.
This tool comprises 2-in-1 functionality. You can take a screenshot just as well you can record the screen. In terms of recording, you have two options available as well. The first one is “Record fullscreen,” which starts taking a video of everything you do on your Chromebook, and the other is “Record partial screen,” where you will be able to crop out an area of the screen and focus on what’s important. You can also use the “Record window” feature. That will only record the specific video you have opened and pause when you exit the window. To stop recording at any time, click on the “Stop screen recording” button that’ll pop up right beside the Tote feature on the shelf of your Chromebook.
You can go ahead and give this productive tool a go right now. We hope that this guide has been of help. Good luck out there!
