Looking at the interface of a modern-day Chromebook, it’s easily noticeable how there’s nothing on a Chrome OS desktop that can be accessed or used. That is, of course, excluding the trusty “Shelf” that’s with you on your Chromebook at all times. The Shelf is like the go-to shortcut area for all applications and web pages that you need to be readily available. Without the Shelf, it would’ve been outright tedious for one to go to the Launcher every time the need arose to access an app.
There’s a variety of shortcuts that you can add to your Shelf to speed up your browsing. If you wanted to know how you can add websites to the Shelf of your Chromebook, you’ve definitely come to the right place. This article will show you the method of doing just that quickly and easily. Let’s begin.
Adding Websites to the Chromebook Shelf
Adding websites to the Shelf of your Chromebook might seem lengthy, but rest assured, it is simple and straightforward. Here’s what you need to do.
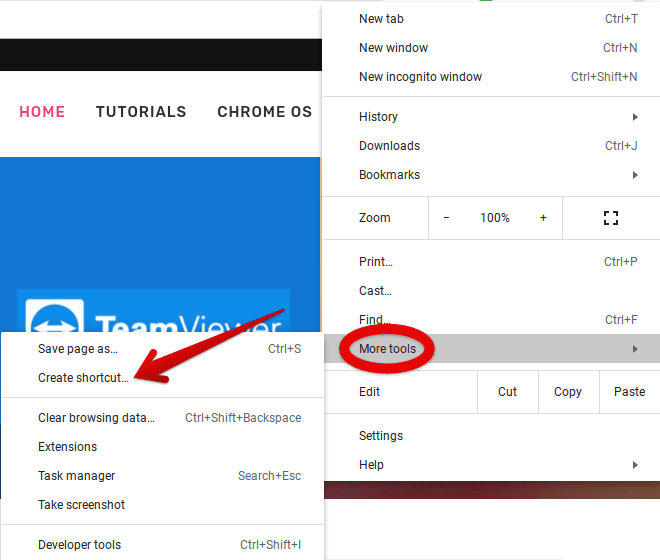
1) The first thing you’ll have to do is go to the website you want to add to your Chromebook Shelf. When you’re there, click on the “Customize and control Google Chrome” button in the top-right corner of your window.

Customizing Google Chrome
2) Doing that will reveal a host of new options for you. If you pay attention to the bottom half of that section, you’ll see “More tools.” Click on the option to expand the settings further. After that, you’ll have to click on “Create a shortcut” in the menu that appears subsequently. The following screenshot illustrates how.

Creating a Web Page Shortcut
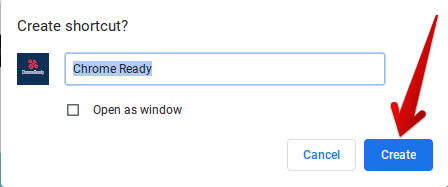
3) So far, so good! After clicking on that option, the Chrome browser will ask whether you truly wish to create a shortcut for the web page. In this step, you’ll also have the convenience of renaming your shortcut to whatever you want. After you’re done, click on “Create” to continue.
- There’s also a checkbox for “Open as a window.” Enabling this feature would always open your web page shortcut in a separate window and in the Google Chrome browser.

Chrome Ready Shortcut Creation
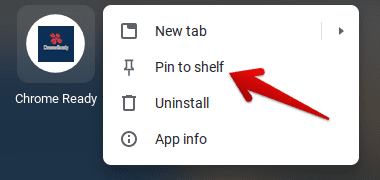
4) When you’re done with the step above, please continue by going to your Chromebook Launcher, where all the applications can be accessed from. Here, you’ll see that your shortcut will already be present. Now for the key part. To add it to your Shelf, double-tap on the shortcut icon and click on “Pin to shelf.” That’s going to do the trick, we believe.

Pinning Chrome Ready Shortcut to the Shelf
5) Great going! If you’ve reached till here, you’ve successfully learned how to create shortcuts for web pages and add them to your Chromebook Shelf. Since we took the Chrome Ready website as an example for this article, you can see how it has been added to our Shelf in the screenshot below.
Chrome Ready Shortcut Added
Now that you’ve added a website to your Chromebook Shelf, clicking on it will immediately launch the web page and make browsing much faster for you. Chrome Ready wishes you good luck!
