Oftentimes we end up searching for something that we’d like to keep entirely to ourselves. This is where deleting your browsing history comes in, and knowing how to do that can be useful for several other reasons as well. For instance, getting rid of your history means you’re removing cached data from your browser and monitoring how you use your internet.
In this article, we’ll guide you in deleting browser history on your Chromebook. The process is easy and simple, so stick around and keep reading for this tutorial to take effect. Let’s begin.
Deleting all of Your Browsing History
The following steps will show you how to get to the part of your browser when you can access all history-related settings. Let’s dive right in.
1) Having a Chrome tab opened, click on the “Customize and control Google Chrome” button in the top-right corner just beside your extensions bar.

Customizing Google Chrome
2) After doing that, multiple more options will be revealed, out of which “History” will also be present. Click on it to continue.
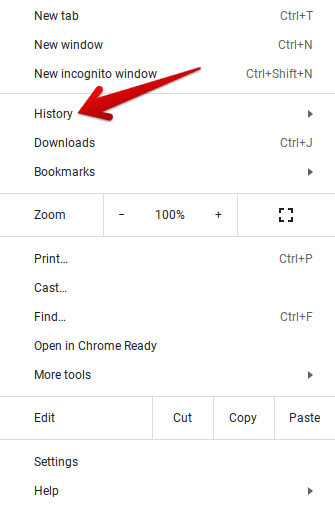
Clicking on “History”
3) The options will further expand after the previous step. Now, you’ll have to click on “History” again to get to the full-blown settings related to this part of your Chrome browser. As you can observe, there’s also a keyboard shortcut that you can input to directly open the “History” settings without doing any of the first two steps above. The shortcut is “CTRL + H.”
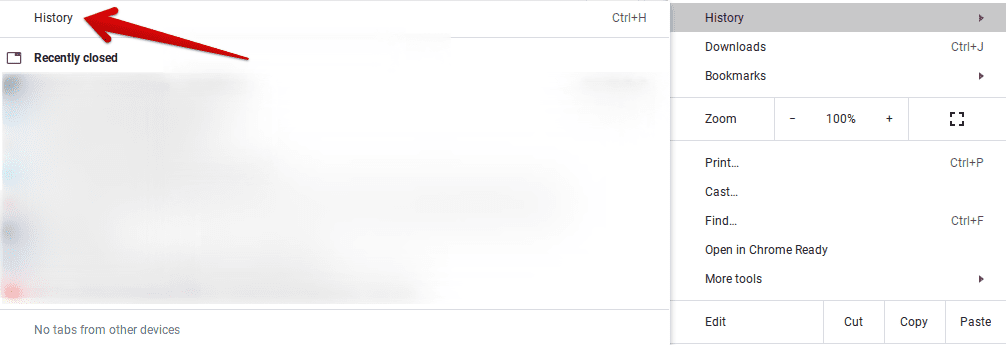
Getting to the “History” Settings
4) On the page that opens, there’s going to be an option of “Clear browsing data” in the left column. Click on it to continue.
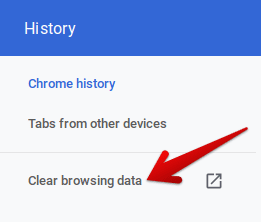
Clearing Browsing Data
5) After that, a new page will open up for you. This will contain the process for deleting your browser history. As the page finishes loading, a smaller window will appear in the middle of your screen where you can proceed. Here, you’ll be able to delete your history as per your liking. You’ll be given multiple options that will range from deciding the time range for removing past searches to removing cached images, cookies, and other site data. There’s also a “Basic” and “Advanced” tab that you can check out to see what they could remove from your Chromebook and what not. When you’re done, click on “Clear data.” A prompt will appear afterward to confirm whether you’d like to proceed. Do take care of that momentarily.
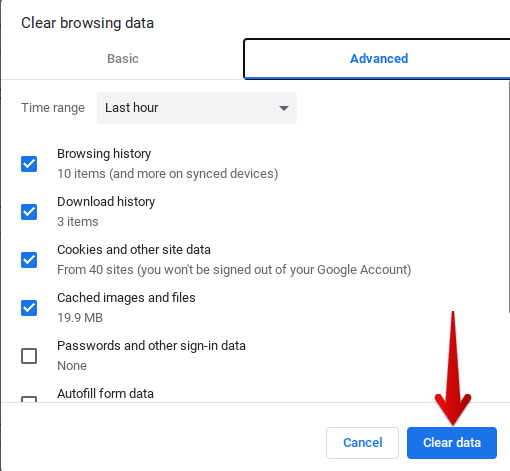
Deleting History
That’s about it! After you click on “Clear Data,” you’ll see that your browsing history has been removed from your Chromebook. However, if you’d like to keep most of your history stored and would like to remove individual websites as well, there’s a possibility for that as well. Let’s take a look at it below.
Deleting Individual Websites From Your Chromebook
The following steps will take it from here.
1) Use the “History” keyboard shortcut “CTRL + H” to get to the page quickly.
2) When you’re there, you’ll observe all of your last visited websites in order. Alongside each website will be a checkbox that you can mark. Marking it will allow you to delete it. Take a look at this screenshot below.
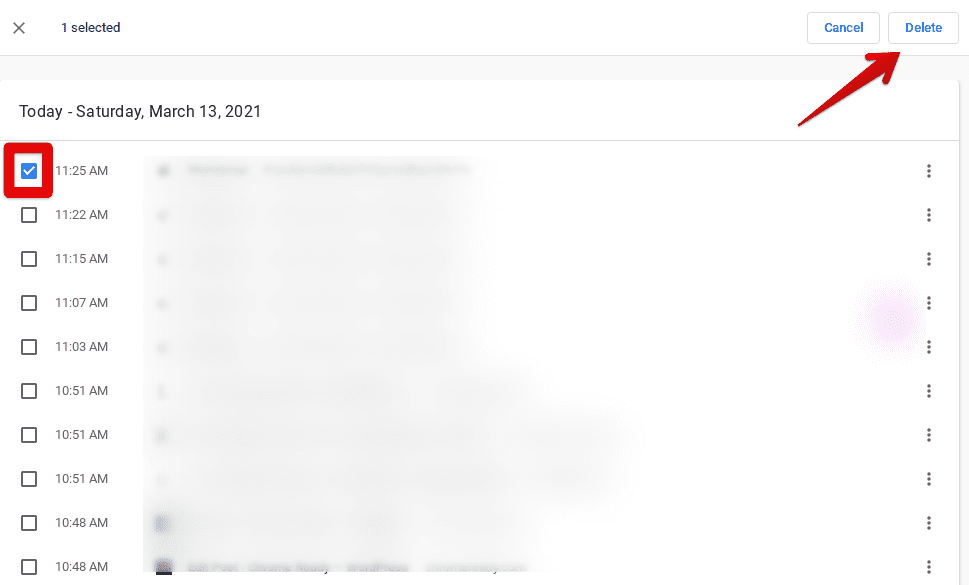
Deleting Individual Websites From the Chrome Browser
3) Whenever you mark an item, an option to delete it will appear in the upper-right corner. This process will remain the same no matter how many websites you choose to delete. Be sure to confirm it when the prompt asks you for finalization after clicking on the “Delete” button.

Removing Selected Items
That’s about it for this tutorial! We hope that this guide helped get your history deleted on time.
