Adorned with minimalism, Chromebooks are built with a buoyant aesthetic appeal. They have a nice, simple interface that’s popularly known for its ease of use. The OS has been sized down to offer rapid boot times, fast browsing speeds, and getting stuff done on the go.
One notable difference you’ll observe between a full-fledged Windows laptop and a Chromebook is that there is practically nothing that you can pin to the latter’s desktop. For some reason, Google saw it fit to leave a Chromebook’s home-page constant and unvarying, except for changing wallpapers, of course. However, Chrome OS has a trustworthy shelf in its interface, which serves as a sanguine replacement of a modifiable desktop.
This article will explain how you can add different icons to the shelf of your Chromebook and make your desktop more productive. We’ll also mention a web app as an extra alternative,, so stick around for a detailed guide.
How to add icons to Chromebook’s shelf
At your screen’s bottom resides a crucial component of a Chromebook’s interface: the shelf. You can customize it by adding apps, games, and even web pages to this swift shortcut area. The following steps will explain how you can do this.
1) Pick any application in your Launcher and double-tap on it to reveal more options.
2) Depending on what type of app you’re tapping on, you’ll see multiple options. Click on “Pin to the shelf.”

Pinning Apps to the Shelf
3) When you click on “Pin to shelf,” your selected app will now begin to appear on your shelf so you can access it quickly without having to go to the Launcher. As you can see in the screenshot below, Netflix has been pinned to the far-right.
Netflix Pinned to the Shelf
At any given moment, you can pin as many applications as you’d like to your Chromebook’s shelf. There’s no limit to that.
Adding Web Pages to Chromebook Shelf
If some website has caught your interest and you’d like to visit it frequently, you can create a shortcut and pin that to your shelf as well. Here’s how to do it.
1) Go to the website of your choice and click on the “Customize and control Google Chrome” button in the top-right corner of your window.

Customizing Google Chrome
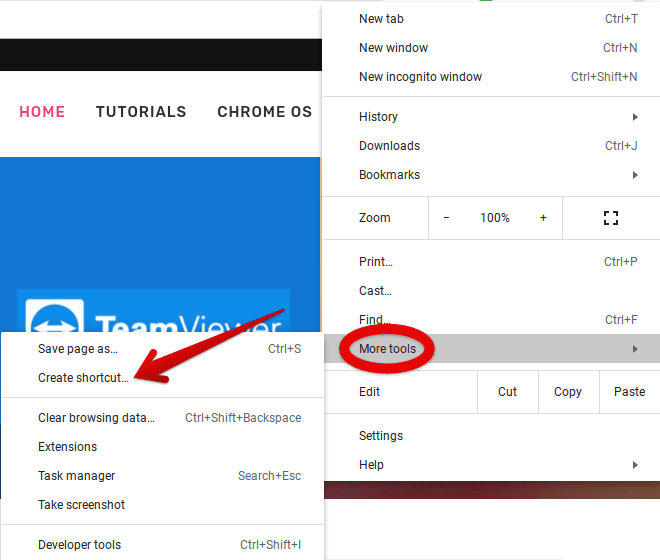
2) When more options appear after the click, go down a little and click on “More tools.” After that, you will have to click on “Create shortcut.”

Creating a Web Page Shortcut
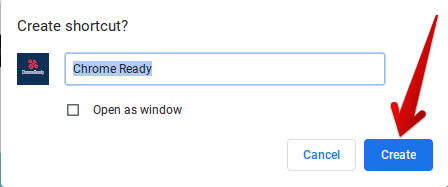
3) After this, Chrome will ask you to confirm the shortcut creation. Click on “Create” when the pop-up appears to continue.

Chrome Ready Shortcut Creation
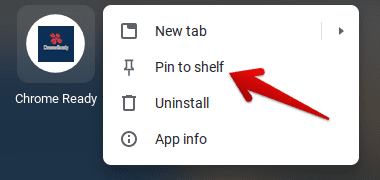
4) The shortcut will be created by now. Go to your Launcher, find the shortcut, and repeat what you did above. Double-tap on the icon and click on “Pin to shelf.”

Pinning Chrome Ready Shortcut to the Shelf
5) The same as Netflix, Chrome Ready’s shortcut will now appear on your shelf.
Chrome Ready Shortcut Added
That’s about it for the most basic method of customizing your Chromebook’s shelf. Let’s move forward and take a look at another alternative that you can use to your avail.
- You can also drag and rearrange the icons on your shelf by clicking and holding to move them with your cursor.
Symbaloo

Symbaloo
Symabloo is a web application that can allow Chromebook users to create shortcuts to desirable websites. You will have to open this program in a Chrome tab; however, many would argue that would defeat the purpose of having this functionality on a desktop. Nevertheless, being a Chromebook user, this is as far as you’re going to get for having desktop-like features, so we thought it better to include Symbaloo in this article.
To access this web app, click on this link. You will first have to register for a free account to get things going for you. After that, you can start customizing your Symbaloo homepage with any website you want to. You can click on the empty tiles in its interface and insert the URLs of the locations you’d like to visit routinely.
We suggest creating a Symbaloo shortcut and pinning it to your shelf. This would serve as a pretty satisfactory workaround to a full-blown desktop.

1 comment
there is a flag setting for a new luncher that add icons like the start menu of win11