If you’ve ever found yourself puzzled over typing various symbols on your Chromebook, you’re not alone. Today, I’m getting deep into the world of Chromebook keyboard shortcuts, symbol inputs, and a few personal tricks I’ve learned along the way. Whether you need to insert special characters, mathematical symbols, or currency signs, knowing how to type these symbols can be incredibly useful. So, let’s get started!
Understanding the Chromebook keyboard
First off, it’s essential to recognize that the Chromebook keyboard might look a tad different from what you’re used to on other laptops. One of the first things I had to adjust to was the absence of some traditional keys and the addition of some ChromeOS-specific ones. Don’t worry, though; once you get the hang of it, you might just find yourself loving the simplicity and efficiency it offers.
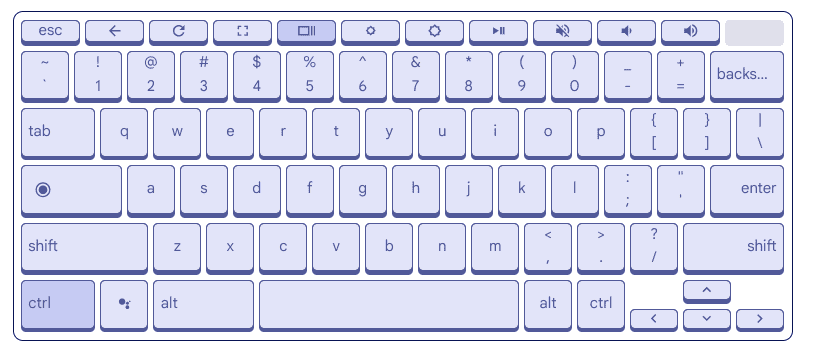
A Typical Chromebook Keyboard
Key differences
- No dedicated number pad: Most Chromebooks do not come with a dedicated number pad on the right side of the keyboard. This was a bit of a bummer for me initially, as I was used to quickly typing in numbers without looking.
- Unique keys: You’ll notice a search key and a row of keys at the top that control everything from volume to screen brightness, which are quite handy.
Typing symbols on a Chromebook
Typing symbols might seem daunting at first, but with a few tips, you’ll be typing like a pro in no time.
Option #1. Use the Shift key
A Chromebook’s keyboard works similar to other desktop PCs for the most part. This means that you’re able to do almost everything on a Chromebook as you would on a keyboard of a Windows PC. Now that we know this information, it’s time to implement the age-old method of typing symbols on ChromeOS.
To type symbols on a Chromebook, press and hold “Shift” and press the relevant key representing the symbol that you need to input. For instance, the number row on your keyboard represents a diversity of different symbols, starting with the exclamation mark and ending with the plus sign right before the “backspace” key.
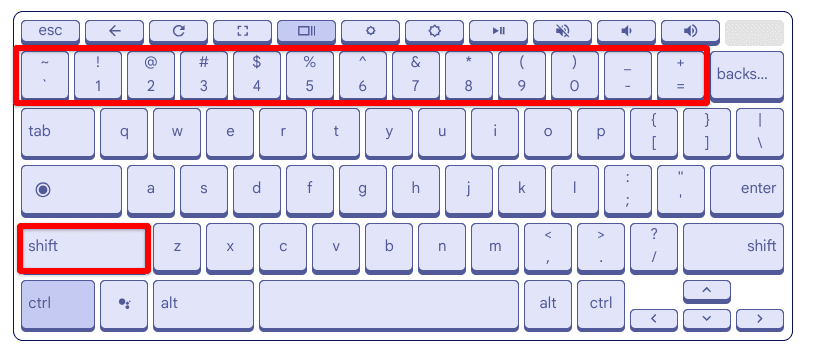
Chromebook Shift Key Usage
To type the $ sign symbol, hold “Shift” and press the “4” key. That should do it quickly. Now, what you should do here is take a close, hard look at your Chromebook’s keyboard and acknowledge what keys can be used for typing symbols. As we iterated earlier, the number row is all about symbols, but the right side of the keyboard is also filled with special characters that you can type.
The following is a round-up of some of the most famous symbols that people usually type and how you can implement them on your Chromebook.
- Shift + `: ~
- Shift + 1: !
- Shift + 2: @
- Shift + 3: #
- Shift + 4: $
- Shift + 5: %
- Shift + 6: ^
- Shift + 7: &
- Shift + 8: *
- Shift + 9: (
- Shift + 0: )
- Shift + -: _
- Shift +=: +
Lastly, you can combine Shift with characters like underscore, plus, and the different types of parentheses on your Chromebook’s keyboard to get the relevant symbols.
This is all about the first option for typing symbols on a Chromebook easily. It’s recommended to use these special characters this way, but if you want to know another option, look at the following section.
Option #2. Unicode for Symbol Input
Unicode has become a standard for modern-day keyboard inputs and represents a broad spectrum of characters. For every character, Unicode comprises a set of digits. All inputs have been predetermined, and the system Unicode proposes is unequivocally adopted by everyone across the globe.
Using this method, you can start typing symbols, emojis, and other special characters comfortably on your Chromebook’s keyboard. We’ll explain how in the next subtitle.
How to use Unicode on Chromebook
Fortunately, Unicode comprises zero complexity. All you have to do is follow the steps listed below to start getting the hang of it. We recommend this method if your Chromebook’s keyboard does not work and you’d like a temporary replacement with the help of your mouse.
1) Press and hold “CTRL + Shift,” followed by a prompt press of the “U” key on your keyboard. This will make a certain “u” appear but with a distinct underline.
2) Right after that, you will type in a set of digits and letters representing a character. Let’s take the example of the character “Division sign” for now. To input this symbol, type in “00f7” beside the Unicode “u.” When you’re done, press the “Enter” key.
3) If you’ve followed the steps correctly, this division”÷” symbol should appear on your screen.
Unicode is probably the most effective method of typing symbols on Chromebooks or any desktop device, for that matter. To make it even more productive and useful for users, its website has drafted an entire table that consists of all the special characters one could incorporate more or less. Check this table out by clicking on this link. Also, Wikipedia has done the same thing in its fashion.
To give you a brief overview of Unicode’s website, if you see a character that catches your attention and you’d like to use it somewhere, hover over it and give it a click. The character would enlarge and give you an option to copy its Unicode number with just a tap.
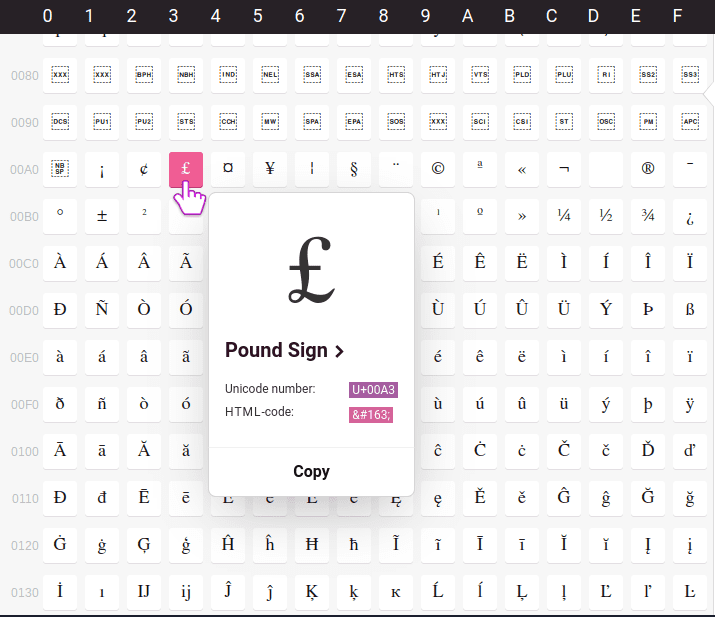
Unicode Symbols Table
In the illustrative screenshot above, we highlighted the symbol of the British currency, “Pound.” As you can see, the Unicode number is visible and can be entered manually. All it would take is to follow the steps that we wrote above, which would lead to successful symbol inputs, just like this – £.
A point to ponder, each symbol has a different and unique Unicode number. Therefore, it might take you a few inputs to memorize the Unicode numbers of your desired symbols. Rest assured, the process is easy, and you can even copy and paste, too, if you like.
Option #3: Special characters and accents
While there’s no dedicated character map in Chromebook, the below method offer easy access to a wide range of special characters on your Chromebook.
You can press the Alt key and the letter you wish to accent, for example, to type é, á, or ü, but with US International Keyboard enabled. Let me show how:
Step 1: Enabling English (US International) keyboard:
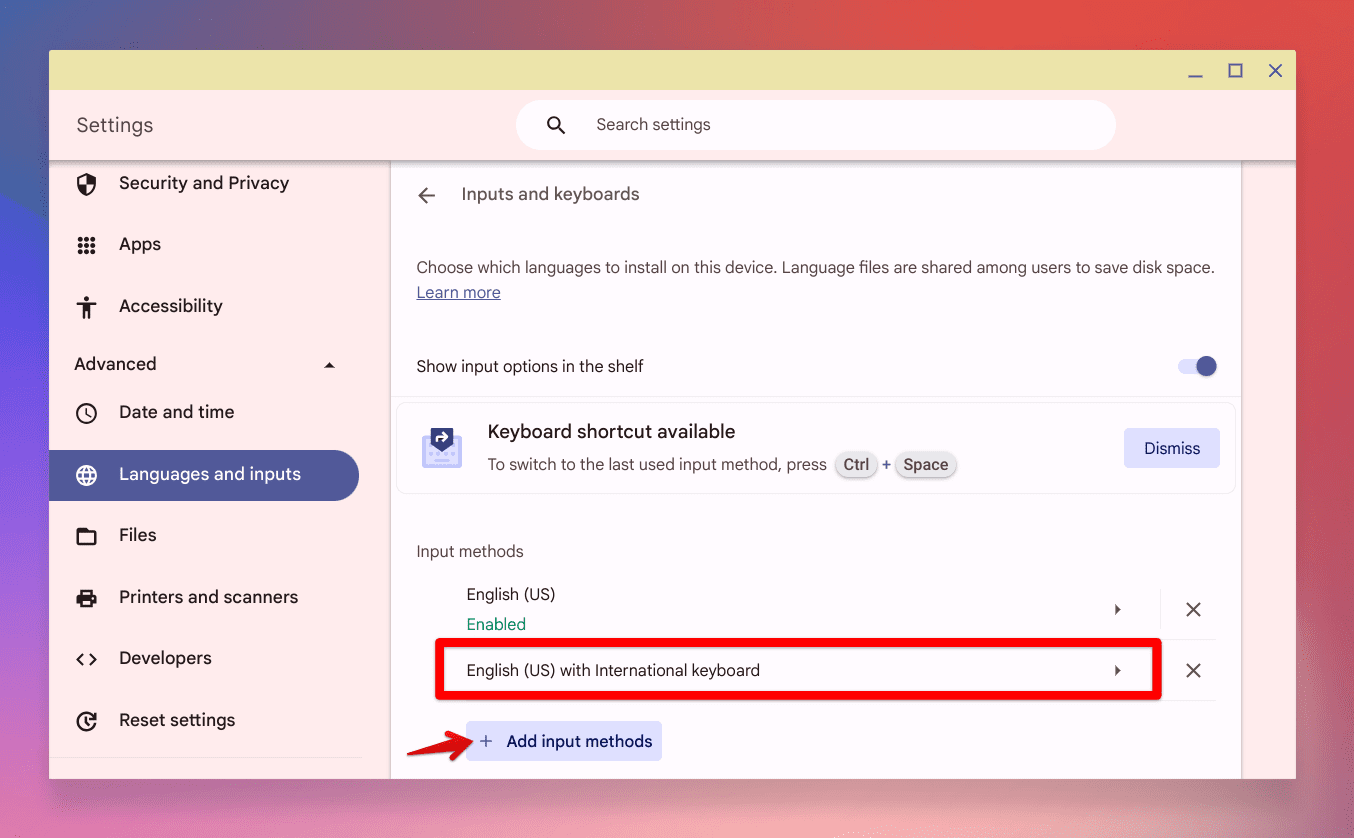
Adding US English International Keyboard
- Go to “Settings” (the gear icon in the bottom right corner).
- Select “Advanced” (if needed, scroll down to see it).
- Select “Languages and input.”
- Under “Input methods”, click “Add languages.”
- Choose English (US International) and click “Add.”
Step 2: Switch keyboard from the status bar:

Selecting International Keyboard from ChromeOS Status Bar
Step 3: Use the keyboard shortcuts:
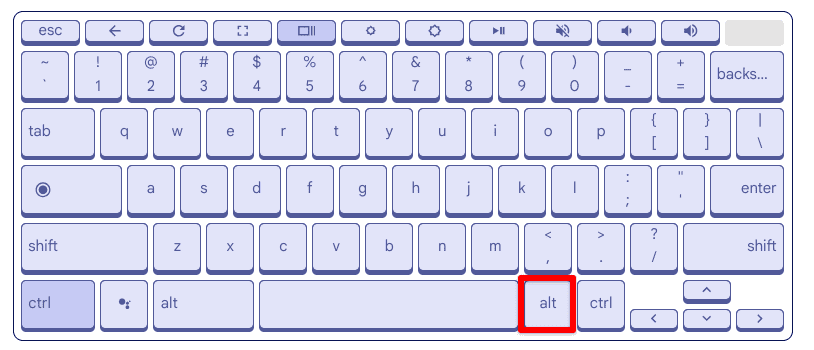
Chromebook Right Alt Key Usage
Many accents can be typed with the right Alt key (located next to the spacebar) combined with the desired letter.
For example, AltGr + e gives you “é” and AltGr + a gives you “á”.
Other accents use the ` key (the key with the tilde ~ symbol) or the ‘ key (apostrophe) followed by the letter.
For example, + e** (or **’ + e**) gives you “è” and **Shift + + n gives you “Ñ”.
Conclusion
While it may seem a bit challenging at first, especially if you’re transitioning from a different operating system, the learning curve is well worth it. I’ve grown to appreciate the efficiency and simplicity of the Chromebook keyboard, and with a bit of practice, I’m confident you will too.

19 comments
total gibberish to an 80 year old. all i wanted was how to get the @ symbol on my keyboard on my Dell chromebook 11, still I suppose your happy in your own little world, you poor thing
to get the @ symbol on your chromebook you press the shift key (it says shift) and then the number 2 which should also have the @ symbol displayed above the number. hope that made sense!
HOLD THE SHIFT KEY AND PRESS NUMBER 2 and it should make: “@”
to do a @ symbol hold the button that says shift while holding shift press 2 or the button that has @ above it then release all buttons.
Hey I think it’s
Shift + 2
I fine it difficult typing the “@” symbol on my chromebook 514 keyboard
press ctrl-shift u and then press space you should have a Ԕ now
i mean press ctrl-shift u and then you press 514 then you should got ԕ
here’s a bunch of sh** for you CTRL + SHIFT + U and …
Character
Name
2013
–
En dash
2014
—
Em dash
2015
―
Horizontal bar
2017
‗
Double low line
2018
‘
Left single quotation mark
2019
’
Right single quotation mark
201A
‚
Single low-9 quotation
mark
201B
‛
Single high-reversed-9 quotation mark
201C
“
Left double quotation mark
201D
”
Right double quotation mark
201E
„
Double low-9 quotation mark
2020
†
Dagger
2021
‡
Double dagger
2022
•
Bullet
2026
…
Horizontal ellipsis
2030
‰
Per mille sign
2032
′
Prime
2033
″
Double prime
2039
‹
Single left-pointing angle quotation mark
203A
›
Single right-pointing angle quotation mark
203C
‼
Double exclamation mark
203E
‾
Overline
2044
⁄
Fraction slash
204A
⁊
Tironian et sign
Typing Symbols in Unicode
CTRL + SHIFT + U and …
Character
Name
00A0
Non-breaking space
00A1
¡
Inverted Exclamation Mark
00A2
¢
Cent sign
00A3
£
Pound sign
00A4
¤
Currency sign
00A5
¥
Yen sign
00A6
¦
Broken bar
00A7
§
Section sign
00A8
¨
Diaeresis (Umlaut)
00A9
©
Copyright sign
00AB
«
Left-pointing double angle quotation mark
00AC
¬
Not sign
00AD
Soft hyphen
00AE
®
Registered sign
00AF
¯
Macron
00B0
°
Degree symbol
00B1
±
Plus-minus sign
00B2
²
Superscript two
00B3
³
Superscript three
00B4
´
Acute accent
00B5
µ
Micro sign
00B6
¶
Pilcrow sign
00B7
·
Middle dot
00B8
¸
Cedilla
00B9
¹
Superscript one
00BA
º
Masculine ordinal indicator
00BB
»
Right-pointing double angle quotation mark
00BC
¼
Vulgar fraction one quarter
00BD
½
Vulgar fraction one half
00D7
×
Multiplication sign
00F7
÷
Division sign
00BC
¼
Vulgar fraction one quarter
00BD
½
Vulgar fraction one half
00BE
¾
Vulgar fraction three quarters
00BF
¿
Inverted Question Mark
Typing Accents in Unicode
CTRL + SHIFT + U and…
Character
Name
00C0
À
Latin Capital Letter A with grave
00C1
Á
Latin Capital letter A with acute
00C2
Latin Capital letter A with circumflex
00C3
Ã
Latin Capital letter A with tilde
00C4
Ä
Latin Capital letter A with diaeresis
00C5
Å
Latin Capital letter A with ring above
00C6
Æ
Latin Capital letter Æ
00C7
Ç
Latin Capital letter C with cedilla
00C8
È
Latin Capital letter E with grave
00C9
É
Latin Capital letter E with acute
00CA
Ê
Latin Capital letter E with circumflex
00CB
Ë
Latin Capital letter E with diaeresis
00CC
Ì
Latin Capital letter I with grave
00CD
Í
Latin Capital letter I with acute
00CE
Î
Latin Capital letter I with circumflex
00CF
Ï
Latin Capital letter I with diaeresis
00D0
Ð
Latin Capital letter Eth
00D1
Ñ
Latin Capital letter N with tilde
00D2
Ò
Latin Capital letter O with grave
00D3
Ó
Latin Capital letter O with acute
00D4
Ô
Latin Capital letter O with circumflex
00D5
Õ
Latin Capital letter O with tilde
00D6
Ö
Latin Capital letter O with diaeresis
00D8
Ø
Latin Capital letter O with stroke
00D9
Ù
Latin Capital letter U with grave
00DA
Ú
Latin Capital letter U with acute
00DB
Û
Latin Capital Letter U with circumflex
00DC
Ü
Latin Capital Letter U with diaeresis
00DD
Ý
Latin Capital Letter Y with acute
00DE
Þ
Latin Capital Letter Thorn
00DF
ß
Latin Small Letter Sharp S
00E0
à
Latin Small Letter A with grave
00E1
á
Latin Small Letter A with acute
00E2
â
Latin Small Letter A with circumflex
00E3
ã
Latin Small Letter A with tilde
00E4
ä
Latin Small Letter A with diaeresis
00E5
å
Latin Small Letter A with ring above
00E6
æ
Latin Small Letter Æ
00E7
ç
Latin Small Letter C with cedilla
00E8
è
Latin Small Letter E with grave
00E9
é
Latin Small Letter E with acute
00EA
ê
Latin Small Letter E with circumflex
00EB
ë
Latin Small Letter E with diaeresis
00EC
ì
Latin Small Letter I with grave
00ED
í
Latin Small Letter I with acute
00EE
î
Latin Small Letter I with circumflex
00EF
ï
Latin Small Letter I with diaeresis
00F0
ð
Latin Small Letter Eth
00F1
ñ
Latin Small Letter N with tilde
00F2
ò
Latin Small Letter O with grave
00F3
ó
Latin Small Letter O with acute
00F4
ô
Latin Small Letter O with circumflex
00F5
õ
Latin Small Letter O with tilde
00F6
ö
Latin Small Letter O with diaeresis
00F8
ø
Latin Small Letter O with stroke
00F9
ù
Latin Small Letter U with grave
00FA
ú
Latin Small Letter U with acute
00FB
û
Latin Small Letter U with circumflex
00FC
ü
Latin Small Letter U with diaeresis
00FD
ý
Latin Small Letter Y with acute
00FE
þ
Latin Small Letter Thorn
00FF
ÿ
Latin Small Letter Y with diaeresis
your welcome
i hope it works
+_+
it worked
This seems unnecessarily complicated for a simple £. My old laptop had £ and € and $ on the keyboard and it made typing much quicker.
Shift + 2 does not work to give the @ symbol. It gives “
Quite stupid to not be able to get a simple symbol. Very poorly designed computer
if shift +2 doesn’t work
try shift + ‘
if shift +2 doesn’t work
try shift + ‘
If you want the @ sign on Chromebook just press and hold the “alt gr” key on the keyboard then press where you have the at sign shown on the keyboard
how to do Square root symbol