Google is always looking to revamp Chrome OS in multiple possible ways whenever the opportunity arises. In doing so, they’ve improved the overall speed, interface, general accessibility, and much more with ample tweaks and improvements over time. Earlier, at the beginning of September this year, Chromebooks received a fundamental update that had a handful of new features added to these Chrome-powered devices.
One of them was a slider for controlling the mic input volume effortlessly, which you can read more about here, and the other was the introduction of Wi-Fi Sync, which brings us to today’s topic.
In this article, we’ll be covering this relatively new enhancement on Chrome OS, so stick around for everything you need to know about Wi-Fi Sync.
Wi-Fi Sync Explained
Google has its vision focused on shareability when it comes to Chromebooks. A single Gmail account will get you back to the latest no matter how many devices you switch or you have to use other people’s devices every once in a while. If you’ve got a Google account, you’re all covered.
This is because of sync – a word that actually stands for synchronizing. What Google basically does is save your valuable and useful information associated with your account and store it in the cloud, so all your credentials and saved settings, and other data are instantly provided back to you if you change your device or are using a borrowed one for instance.
Just like this, sync has been around for quite a while now and is no amazement to today’s generation. However, Google has recently stepped up its game and introduced “Wi-Fi Sync” with the latest update. This is a convenience that allows you to store the password of your Wi-Fi networks with your account.
Therefore, every time you log-in to another Chromebook with your account, you’ll automatically get access to your Wi-Fi without having to go through the hassle of entering those long, arbitrary passwords written on the back of your router again.
As Google likes to coin it, the Wi-Fi passwords you’ve once entered using your personal profile on Chrome OS become a part of your account’s keychain. Thus, you can forget about repeating this tedious action of re-entering passwords again and again.
Come to think of it, and this new update will come in very handy in households with two-three Chromebooks. Wi-Fi sync has essentially made managing Wi-Fi a whole lot easier now.
Now that you’ve understood the concept let’s get to the part where we show you how to enable this setting. Let’s dive straight in.
Setting up Wi-Fi Sync on Chromebook
With the update, Wi-Fi Sync falls under the “Sync” settings on your device. Moreover, this has been enabled by default, so you don’t have much to do in this regard. However, we will have to make sure of this. The following steps will guide how you can do that.
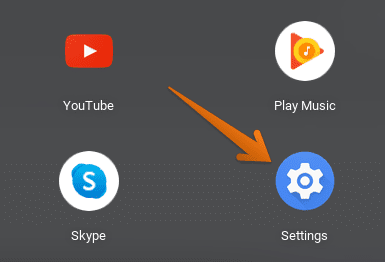
1) Go to the “Settings” on your device by either using the Launcher or taking a shortcut through the Chrome OS’s status bar.

Going to “Settings”
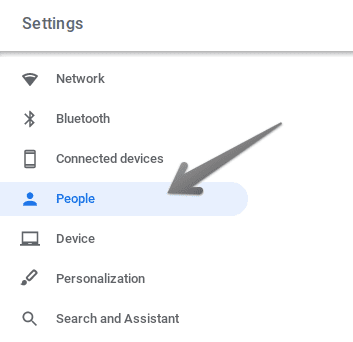
2) Next, head over to the “People” section in the left column.

Accessing “People” Settings
3) Once you do that, click on the arrow beside “Sync your settings” to reveal more.

Sync Settings
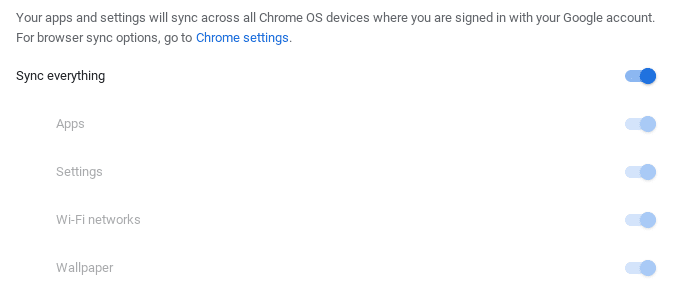
4) Now, you’ll be seeing a new page open up. This is where all the settings related to “sync” can be accessed. As you can see in the screenshot below, the default setting “Sync everything” has been enabled. If you see it disabled, click on the toggle to get it sorted immediately. Also, you’ll notice down below “Wi-Fi networks.” This is actually the Wi-Fi Sync setting that we’re concerned about.

Enabling Wi-Fi Sync
That’s about it for the guide! Note: You can also disable “Sync everything” and choose what you’d like to be synchronized with your account. Google made sure to keep your options flexible regarding this, as some may not want their data to be synced for some reason.
Anyhow, this is what your Wi-Fi network displays when you log-in with your account and use Wi-Fi sync to establish a connection.

Wi-Fi Sync
