The Night Light Filter Explained
To grasp this phenomenon better, you need to understand the science behind it. The spectrum of light visible to us human beings contains blue, orange, green, yellow, and red light rays. While the former part may have longer wavelengths, blue light definitely has more energy. Subsequently, this means that blue rays also have a shorter wavelength.
Therefore, blue light falls in the category of HEV light rays, where the acronym stands for high-energy visible. All this explained physics background leads to one straightforward conclusion – this blue light is known to do a number on one’s health by causing eye strain and damage to the retina.
Phones, laptops, computers, and Chromebooks emit blue light in the short-wave form. The International Agency for Research on Cancer says that constant and prolonged exposure to blue light can permanently harm your eyes apart from retinal damage.
Also, then there’s the prospect of sleep cycle disturbances in the wake of said blue light. I think we need not mention the sprawling concerns revolving around lack of sleep.
Fortunately for all of us hooked to our mobiles and personal computers, blue light or night light filters have made their way into our lives, diminishing the detrimental effects and providing a safe passageway for continued usage. On Chromebooks, these make our viewing experience easier by shifting the color tone and changing the high-energy visible (HEV) blue light into a blend of red, orange, and yellow.
Truth be told, night light filters might not be effective 100% of the time, but they’re still recommended to use. Symptoms like headaches, blurry vision, the notorious computer-vision syndrome are sure to be drastically reduced if nothing else.
Enabling Night Light on Chromebook
Every Chromebook as a night light filter preinstalled. Enabling it is nothing uncomplicated, and the following steps will explain the process with more precision.
1) Begin by clicking on the bottom-right corner, which is basically the Chromebook’s status bar.
Clicking on the Status Bar
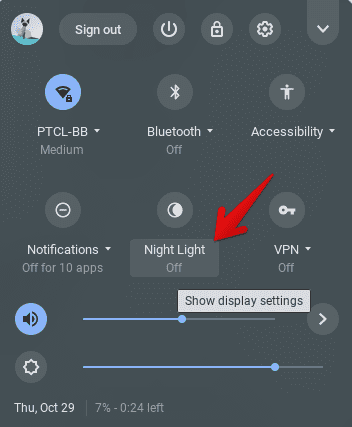
2) Next, you’re going to see Night Light in the mini window that’s going to pop up. You can click on the feature’s icon in the center to enable the filter right away, but we’re going to go deeper than that and let you know more adjustable filter settings. Therefore, click on the area below the Night Light icon.

Clicking on Night Light Settings
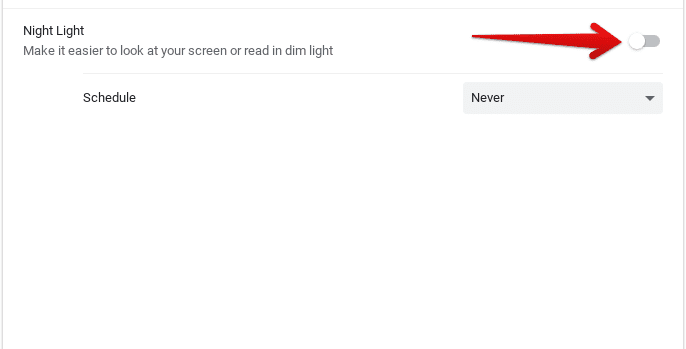
3) A new window should open by now where you can see a whole section dedicated to Night Light. Click on the button, as shown below, to enable the filter and reveal more options.

Enabling Night Light
Apart from the Schedule option, as soon as you enable Night Light, you’re going to notice another adjustable setting appear – Temperature. The Night Light feature of the Chromebook allows you to configure the blue light filter’s temperature as per your requirement. If you’d like your screen to leave more of an orange hue impression, you can always push the scale towards the warmer end.
If you’d like to keep the temperature configuration more leaned towards the true screen color, going towards cool might be the way for you. Additionally, in this section, there’s a possibility to form a Night Light schedule as well. This would mean that the filter will be automatically enabled if you prompt it from sunset to sunrise. Moreover, there’s a custom option where you can choose the timings of your choice and let the filter do its job accordingly.
