Here are the Chromebook tricks that will make your day to day interaction with the Chrome OS much more comfortable.
Chromebook Tips and Tricks
1. Change shelf position
By default, the Chromebooks shelf is always along the bottom of your screen. However, you can change it if you wish. It gives you an option to change the self-position to the right, left, bottom, or enable the autohide feature. To do that, right-click and then choose the shelf position setting. To enable auto-hide, right-click on the shelf and then select the auto-hide option.

Shelf Position
2. Continue browsing from your phone
While you use your android to unlock your Chromebook, it’s also possible to sync open tabs between the Chromebook and Android. To get started, ensure you log in using the same Gmail account on your Chromebook and in your Chrome browser on your phone. Next, open the Chrome app on your Android phone and tap on the ‘More options tab’ -> Settings ->Your Name. Tap on Sync to turn it on. Now, when you search for something like ‘Chromeready’ on your phone when you open the Chromebook and type ‘Chro’ on the browser, you will see the ‘Chromeready’ suggestion. Additionally, with the ‘Sync‘ feature turned ON, you can also access your bookmarks, history, passwords, etc., on any of the two devices.
3. Run windows software
Just as we can run Linux on Chromebook, we can use a Linux app called Wine to run windows app on the Chromebook. You can easily install an app like Adobe Photoshop, which is not available for Linux. While windows apps will be working on Linux and Linux working on chrome OS in a virtual box setup, these apps will work great only on Chromebooks. Wine will only work on the intel based and not on ARM_based Chromebooks. Wine is also available as an android app; thus can be installed on any Chromebook. However, with the Android app, you only install Windows RT (Run Time) apps.
4. Use an android phone to unlock Chromebook
Currently, most Chromebooks support tablet mode as they are already touch-enabled. Although typing the password in tablet mode is not easy, we need to use a virtual keyboard. But we can change that to PIN when using it in tablet mode. Open the system settings, and in the ‘you and google’ section, click on the ‘screen lock and sign in’ option. Change the option to ‘PIN and Password’ and get the pin to press the PIN to unlock each time you are using the Chromebook in tablet mode. You can also connect your android phone from the connected devices section and open your Chromebook when your android phone is near it.
5. Adjust your keyboard back-light
Some keyboards come with a back-light for their keyboards while others do not. Those with keyboard back-lights use the shortcut Ctrl + Shift + Brightness keys to increase/decrease the keyboard brightness.
6. See all your keyboard shortcuts
The Chromebook is full of handy shortcuts. They are too many that it becomes almost impossible to master all of them. Press Ctrl + Alt + ? then you will see an overlay of the keyboard with all key functions and shortcuts.
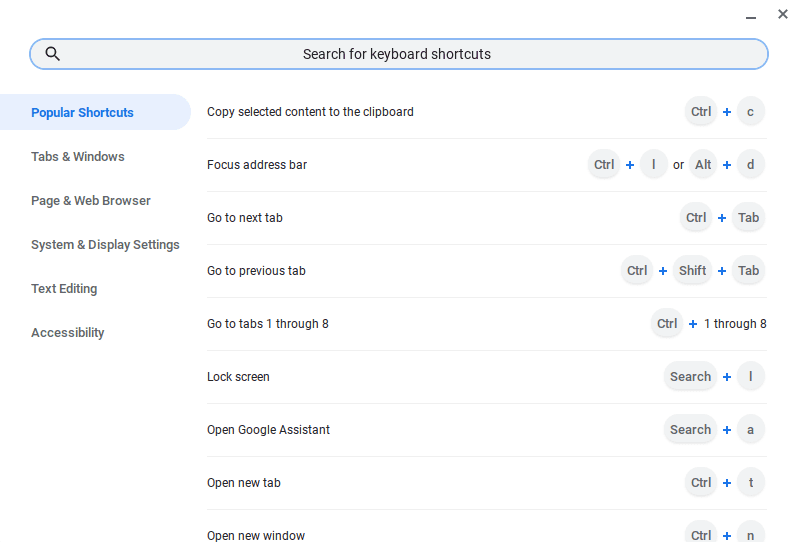
Keyboard shortcuts
7. Change downloads location
By default, all your downloads go to the download folder, and there is no other folder on the Chrome OS. But it’s possible to change that. Open browser settings -> Downloads and change location by clicking on the change button and create a new folder from there. The good news is that all files downloaded always stay simultaneously, making it more organized.

Downloads folder
8. Open apps with a shortcut
You can easily open apps on the shelf through simple shortcuts. Just press Alt +1 to open the app on the shelf from the left. Similarly, Alt + 2 for the second app and so on. For instance, if you have placed chrome as your number one app, then you will always press Alt + 1 to open it all the time.
9. Take a screenshot
Normally, while taking screenshots, we press the Ctrl + Overview button, which has an icon with a rectangle with two lines and in place of F5. However, there is another option to take a partial screenshot of just a certain portion of your screen. Press Ctrl + Shift + Overview button; the screen will get a little darker; select the part of the screen you need to get the screenshot.
10. Show hidden files and folders
The file manager always hides folders and files that start with a dot, for instance (.Filename), and you normally cannot see them. Usually, these are files you don’t want to edit unless you are sure about doing so. If you’re going to see the hidden files, then open the file manager and press Ctrl + .(period), then the file will appear along with the rest of the files and folders.
11. Enable caps lock
On Chromebooks, the caps lock button is replaced with the search button. However, we can still access the caps by pressing the Alt + Search shortcut to get it from settings. Go to Settings and click on the keyboard in the device section. In front of the search button, you can remap the key to different functions. Alternatively, hold the Shift key when pressing any letter to write it in caps.
12. Dual screen mode
The Chrome OS has an option to access the dual-screen mode with a simple shortcut. Press Alt + ] on any app makes the app align to the screen’s left side, and Alt + [ for another app to align to the right side. Similarly, we can also press Alt + = (sign) to maximize any app and press it again to get back to its previous position.
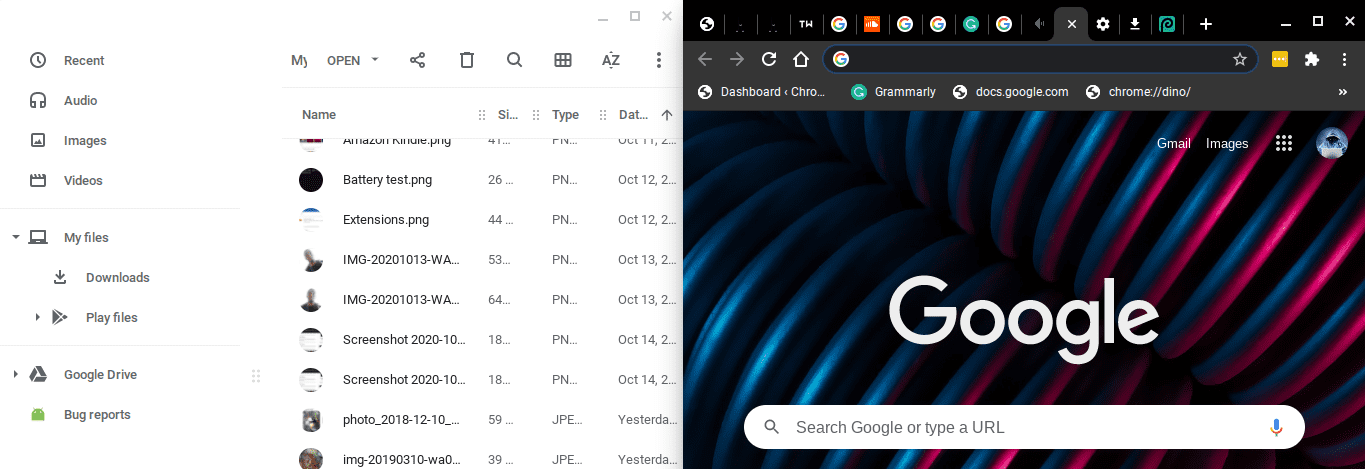
Dual Screen mode
13. Change audio output and input
Chromebooks can change the audio output and input by opening the quick setting panel and selecting the option beside the audio controls. That will show all the options, including Bluetooth. You can switch between audio devices without connecting and disconnecting every time.
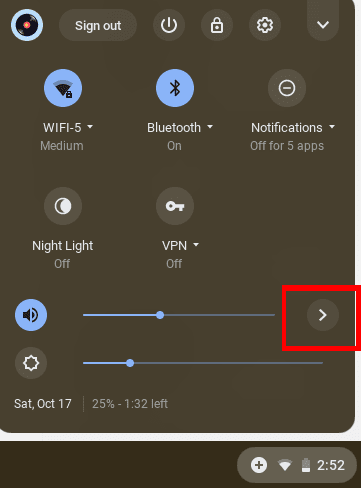
Change audio settings
14. Kill the apps using task manager
If an app freezes, always use the shortcut Search + Esc to open the task manager, and we can end the process through the task manager. It’s similar to pressing Ctrl + Alt + Delete in windows.
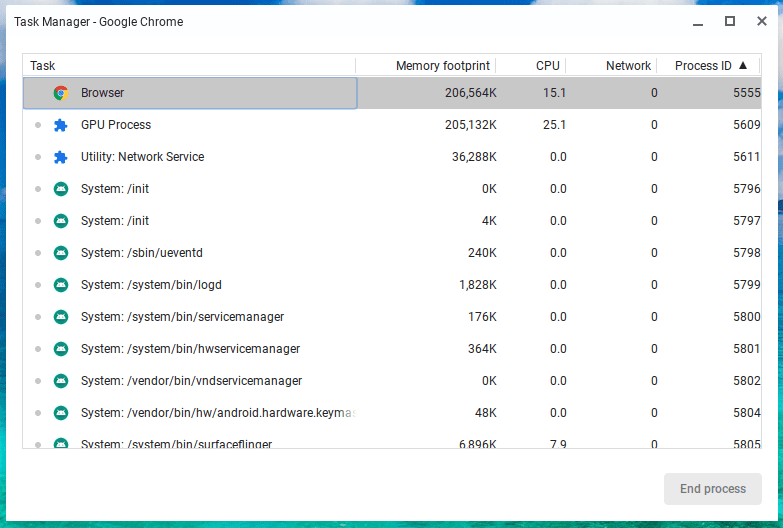
Chromebook Task manager
15. Control notification for individual app
Like you can always block all the notifications by activating, do not disturb mode; this might also block other important notifications. Luckily enough, Chromebook allows you to control notifications for each app, just like on the phone. Open the quick settings panel on the bottom left of your screen and click notifications. You can enable or disable notifications for every single app easily from there.
16. Run Linux apps on Chromebook
Chrome OS developers have added support for Linux applications in Chromebooks. Even though not all Chromebooks support this feature, most of the recent Chromebooks releases do support. If you are a developer, you can now install your favorite Linux IDE on Chromebook and write your programs. Other than developers, regular users can also install other Linux applications with ease. To get started with Linux apps on Chromebooks, please read our post on How to install and configure Linux Apps on Chrome OS.
17. Get app-store for Linux apps
From our point above, we know it’s possible to run Linux applications on Chrome OS. Unfortunately, installing some of these apps via the command-line can be quite hectic, especially if you are not well versed in Linux systems. Lucky for you, you can also install the Linux app store (specifically gnome-software) on your Chromebook. this will guide you on installing applications graphically.
To get started, execute the command below to install the Gnome Software store.
sudo apt-get install gnome-software gnome-packagekit
Once done, launch the app from the Linux apps section on the applications menu. In case you don’t see any apps available on the store, run the commands below on the Terminal.
sudo apt-get update

sudo apt-get dist upgrade
18. Add Dropbox or One Drive in the File Manager
Generally, the Chromebook is designed to perform most of its computing in the cloud. Much of its data is stored online. Thus the reason most Chromebooks with an SSD with only a few GBs of space. The Chrome OS allows you to easily integrate online storage tools in your file manager to compensate for this. Google Drive is available by default. To get additional tools like Dropbox and One Drive, click on the three buttons at the top-right corner of the file manager select ‘Add new service’ -> ‘Install new service.’ A window will open where you can easily download and install these tools.
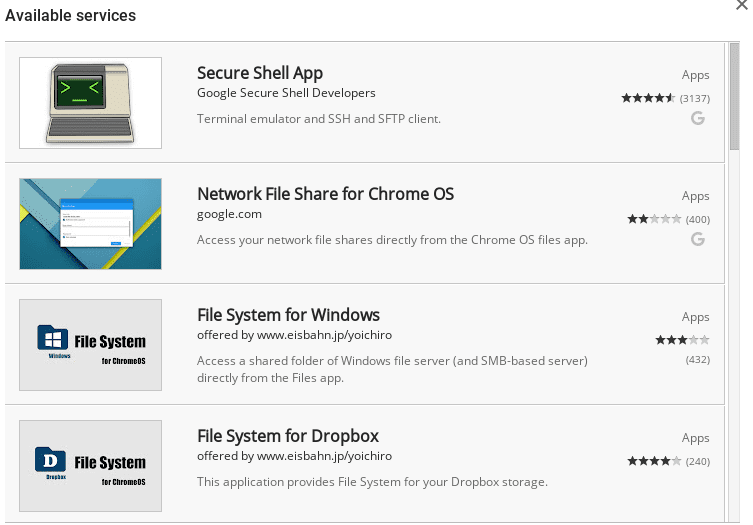
Add One Drive and Dropbox
19. Navigate between Chrome Tabs much faster
Generally, we know you can easily navigate between open Chrome tabs using Ctrl + Tab keys. With the Chromebook, it is much easy. Just swipe three fingers on the touchpad, either left or right, to switch between tabs.
20. Disable creating an account from the Login screen
The Chrome OS supports multiple users by creating several accounts. Even though you can easily do this in the Settings window, you can also create an account from the Login screen. The latter can be quite risky since one can create an account and gain full access to your Chromebook. They can even Powerwash the device, thus erasing all the local data and other accounts.
To manage this, open the Settings window, select People -> manage other people. Turn on the feature ‘restrict sign-in to the following users.’ You can select some users whom you want to use your Chromebook if you want. You can also disable Guest login from this screen.

Manage accounts
Conclusion
Chromebooks have come to be quite a success with their large number of users driven by its simplicity. With now added support for Android and Linux applications, what you can do with these devices is unimaginable. Make sure you test out each of the tips discussed above and leave a comment if you have any challenges. If you have an additional trick/tip/shortcut for our readers, hit the comments below.

1 comment
“Chromebooks are becoming more and more popular in the market. For most users, transitioning from their usual Windows, Linux, or macOS PC to a Chromebook is relatively easy.”
That’s cool but it won’t fit worldwide. Here in Europe especially in Germany nearly no one knows about Chromebooks and you can’t but them in local stores. You have to import those machines. chromeOS is nearly completely unknown. Also when it comes to younger people from around 19 – 25 years.
I can proof that as fakt, because I had a chromeOS-community on Google+ for years and a chromeOS-collection also in Google+. I was a top contibutor at the Google Forums for Chrome, Pixel and Chromebook Central.