Just like finding and removing duplicates in Sheets while also being able to employ the IMPORTXML function, there exists another feature in the world-renowned spreadsheet creator that lets you lock cells for good. That way, you can tread on care-free and stay safe from accidental edits from either you or fellow co-workers whom you assign access to your Sheets file. And the best part is, the whole process is pretty easy to follow through with.
Read ahead for a detailed guide that goes over the working steps of how to lock cells in Google Sheets. In the meantime, though, make sure to take a quick look at our thorough Google Workspace guide to be in the know of other office-oriented applications other than just Sheets. For now, though, let’s get started right away.
Locking cells in Sheets — Why you should try this feature
Primarily, the cells locking feature in Google Sheets is used for security and privacy concerns as to prevent accidents from taking place and inadvertently wiping all your hard work. This includes being able to edit a cell or delete it, so the functionality is fairly involved here. It is possible to apply the cell-locking tool in various instances, such as when you’re creating a budget spreadsheet, pinning all your financial information in one place, and more.
Additional features to benefit from
Fortunately, locking cells in Google Sheets hasn’t been kept barebones at all; there are added measures you can take to ensure the safety of your document, along with exhibiting control over the rest of the members who have taken part in working on your sheet. That way, important data where you have made several calculations can be kept safe, and you can breathe easily while understanding that the info you’ve put out is under protection.
A great tool for collaborative environments
That way, in situations where there is a group project where everyone has been assigned certain roles to work toward a mutual goal, you can seemingly safeguard your end of the deal by locking cells, so no other participant can alter your data even if they tried. It’s certainly worth mentioning that members of several organizations and companies around the world employ this feature for the level of convenience it brings to the table, and starting from now, you should too.
The dos and don’ts of locking cells – What the feature doesn’t protect against
With all of the above being said and done, you have to know the limitations of locking cells in Google Sheets as well, so your expectations are aligned correctly. First off, when you lock a cell containing any data, you are only keeping your information safe in that space. It is still possible for someone to copy your data, and import and export the whole sheet if they want to, so you have to be wary of the latter moving forward.
Employ sheet protection when locking cells isn’t enough
Just so you know, protecting a sheet from unknown personnel is a completely different topic, and more so pertains to the privacy controls of your Sheets document. To handle things on that front, you will need to turn to the “Share” button in the top-right corner of Sheet’s UI, click on it, and then manage your sharability settings right there. Your options range between setting the general access and allowing the relevant permission for the type of access provided to participants.
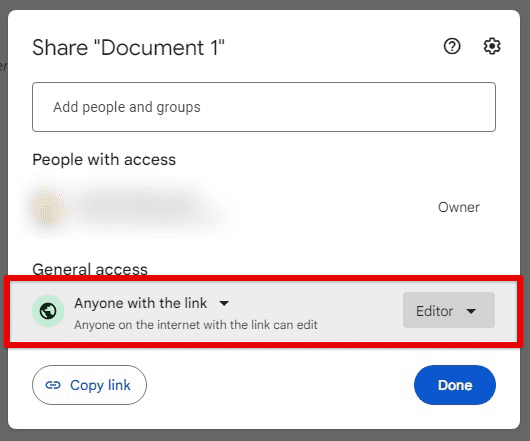
Sharing permissions
Make sure to convert files before getting started
Now, there is one thing that Google recommends to users prior to utilizing the cells-locking feature. If you attempt to lock your cells in Sheets, but the pertinent option just doesn’t appear for you, it’s highly likely that you’re editing a document that’s in the format of Microsoft Office.
Don’t fret, though! Conversions are easy
So, this is a big no when it comes down to employing the functionality at hand. That’s why I really recommend reading up on this guide that illustrates how to convert Microsoft Excel files into a Google Sheets file which contains step-by-step instructions to help you have the best results.
Now that we’re all set up and ready to go, let’s get right to the heart of the article, which is teaching you how to lock cells in Google Sheets easily.
How to lock a cell in Sheets
Locking cells in any Google Sheets document is a straightforward task; all you need is the right know-how and you’ll be good to go. Begin by having the sheet of your preference opened up and ready to be edited. (Tip: If you’d like to create a new Google Sheets file without having to head to the Sheets front page first, type in “sheets.new” in the Chrome omnibox and you’ll be all set.) Oh, and by the way, this feature is only available on desktops, no mobile support is available at present.
Select the cells that you wish to lock
Use your cursor to select the cells that you want to lock on your Sheets file. Click and hold the left-click to select multiple cells. If it’s just one, right-click on the cell to get to the next step.

Selecting the cells in Sheets
Right-click the selected cell(s)
When you right-click the selected cells, multiple options should appear on the screen. Your task now is to hover your cursor over the “View more cell actions area,” which should automatically bring up more features on the screen for you. From there, please click on the “Protect range” button to proceed.
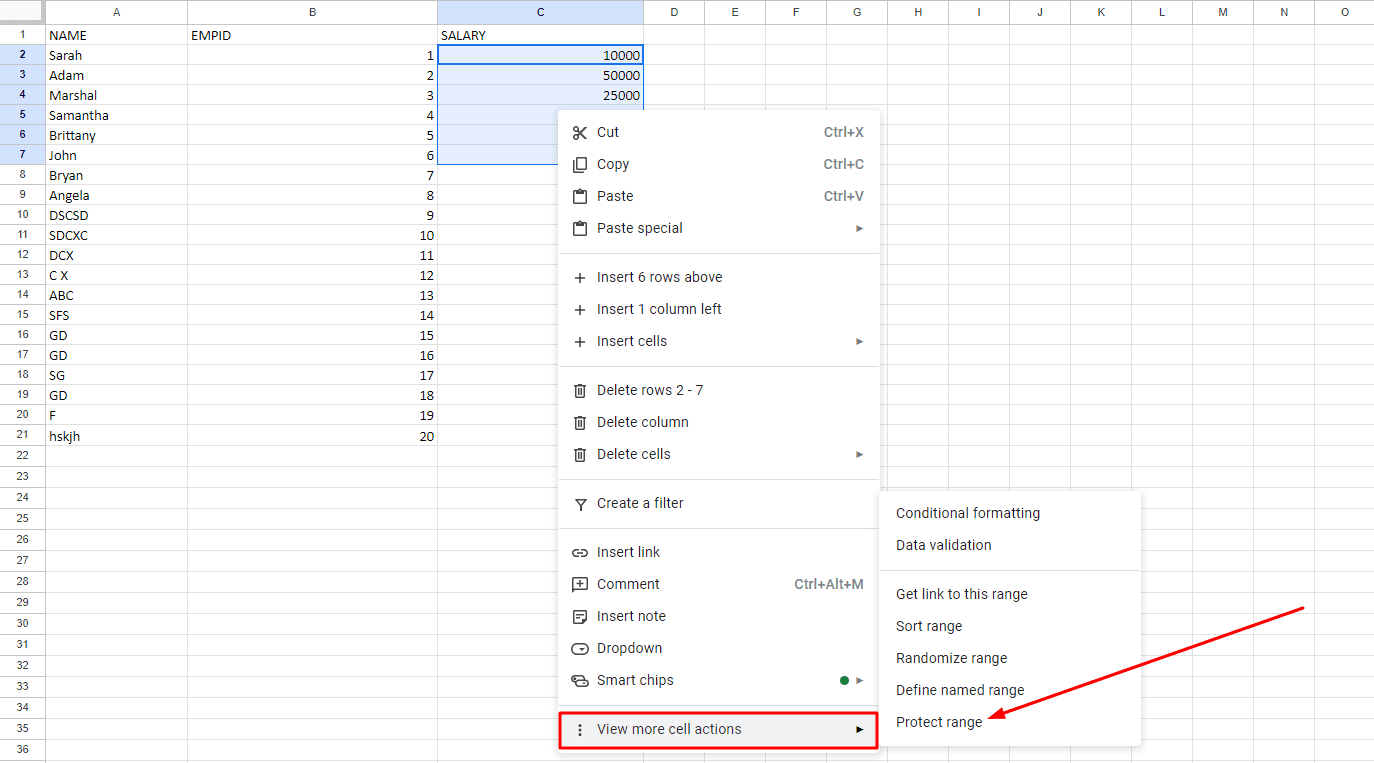
Entering the “Protect range” section
Setting permissions
Clicking on the “Protect range” button is going to launch a side panel on the left side of the screen. Here, you’ll first have to focus on the “Range” tab. Feel free to write down a description as well for what you’re doing here; it can often help keep track of things, especially when you have to protect multiple sheets. After confirming the range of cells that you wish to lock using the bar provided, click on the “Set permissions” button to move forward.
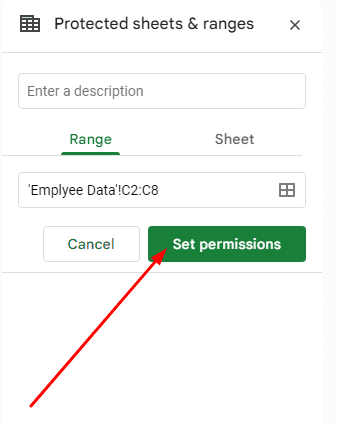
Clicking on “Set permissions”
Restricting access to the cells
As you click on the “Set permissions” button, you’ll observe a prompt appearing at the center of the screen, dimming out the background while doing so. Here, you’ve got two options to choose from, namely, “Show a warning when editing this range” and “Restrict who can edit this range.” For now, we’ll go with the latter. After checking the box of that option, click on the bar where it says “Only you.”
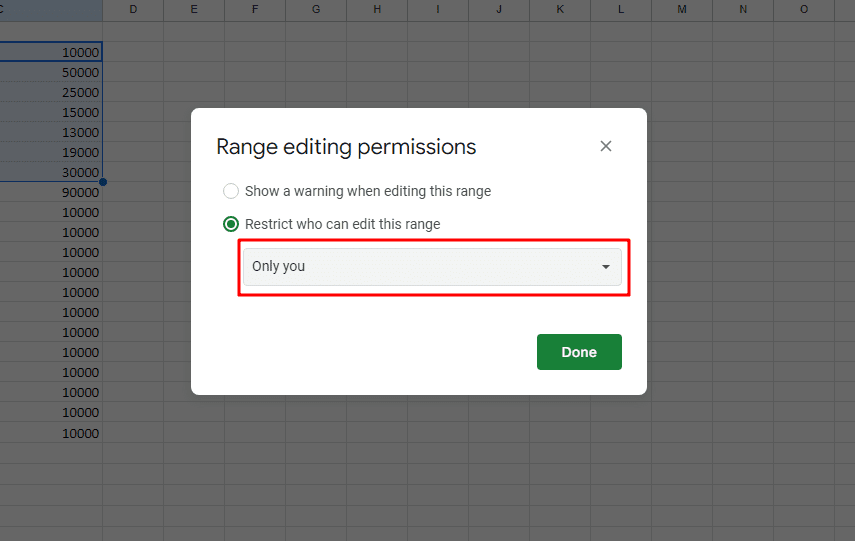
Restricing access to cells
Opting for customized access
That should be your cue to select the “Custom” option after selecting the “Only you” bar. Now, you are at complete liberty to choose the people who can access your locked cells. Right under the “Add editors” subsection, feel free to add whatever email addresses or names of people you trust with cell access. As soon as you’re done here, select “Done” and that should be the end of it.
On a side note, it’s perfectly okay if you set the permission access to “Only you.” That way, you can always expect 100% safety of your cells, since no one else will be able to access them.
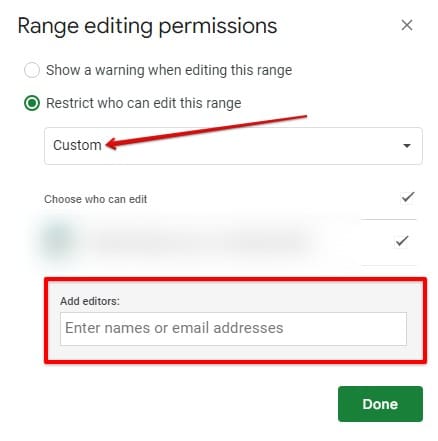
Choosing custom access
Selecting another sheet to restrict access in
Coming back to the primary “Protected sheets and range” side panel that appears after you click on “Protect range,” the other tab that we didn’t expand on earlier is “Sheet.” Here, you have the option to apply editorial and access-centric restrictions on multiple sheets and not just one. Simply select the tab in question, followed by choosing the type of sheet you’d like to focus on using the drop-down bar. Select “Set permissions” afterward and repeat the steps outlined above for favorable results.
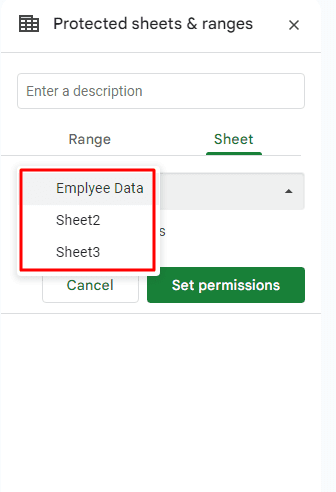
Selecting different sheets in Google Sheets
Conclusion
Google’s flagship productivity suite comprises a variety of different applications for people around the world, and one of them happens to be Google Sheets—a specialized program for formulating spreadsheets with a customer base that’s in millions. Over at Chrome Ready, we’ve discovered a diversity of different Sheets functions over time that can come in handy to you, such as creating error bars, making a budget spreadsheet, and even developing a pie chart for better presentations.
Make sure to check that all out if you intend to nurture your ability to Google Sheets skills. As for the article in question, we’ve focused on locking cells in Sheets for this write-up, given the usefulness of the feature involved. A locked or protected cell cannot be edited unless you exercise special access, thereby preventing accidental editing and everything of the sort. Do let us know in the comments ahead if you found the guide useful on your end.
Thanks for reading!
