Chromebooks are some of the most frequently updated devices on the planet. This is why they are highly regarded. After a long wait, Google has finally released ChromeOS 120 to the stable channel. The last update was released in November. The new update adds some useful features to the device, which are worth discussing.
In this article, we’ll shed light on all the latest additions to Chromebooks that have arrived in the wake of ChromeOS 120. For reference, ChromeOS 119 — the last stable update — was pretty big on features as well, introducing official Steam support to compatible Chromebooks, among other novel tricks.
Let’s get started with the topic at hand with no further ado.
Best new features of ChromeOS 120
Here’s a summary of the latest features introduced in ChromeOS. To get the best results, make sure you read each subsection carefully. Some features may require you to enable a ChromeOS flag before using them.
1. Addition of a dedicated button for virtual desks
Virtual desks on ChromeOS are a boon for productivity enthusiasts who like to multitask like a pro. The feature makes it possible to create different desktops on your Chromebook, so you can divide work and fun or entertainment and maintain a proper flow of things.
Accessibility enhanced
Starting with ChromeOS 120, you won’t have to go through the Overview mode to switch between desks. Google has added a button on the ChromeOS shelf, a quick access bar at the bottom of your Chromebook’s user interface. This will allow you to switch between desks quickly and conveniently.

Quick access to virtual desks
Available right off the bat with facilitating shortcuts
The good news is that you don’t need to enable any ChromeOS flag to access this feature. It comes by default when you update your Chromebook to ChromeOS 120. In addition, the developers included more keyboard shortcuts to help you navigate between virtual desks.
Press and hold the “Shift” and “Search” keys, then press the number on your keyboard corresponding to the desk you wish to switch to. For instance, if you’ve got three virtual desks fired up on the device, pressing the “Shift,” “Search,” and “3” keys would instantly have you go from your current desk to the third one. Easy peasy.
2. Improved Nearby Share functionality
Nearby Share is one of the most convenient features on a Chromebook that makes it possible to seamlessly move files from one place to another. If you’re not in the know of what this functionality is, our dedicated guide on Nearby Share’s practicality should be a great start.
Self Share is in the house
So what ChromeOS 120 has brought to the mix is an accompanying feature called Self Share. With this functionality in the house, Chromebook users will be able to carry out even more effortless data transfers, even if the device that you’re sending the data to is powered off. No follow-up prompts need be entertained from here on out. Pretty handy if I should say so myself.
Enabling Self Share with a flag
The only prerequisite to utilizing Self Share is that you need to have the same Google account signed into the devices that you wish to transfer data between—that’s it. Oh, and the Self Share tool is currently locked behind a ChromeOS flag, so you’ll need to tend to that too unfortunately to get it up and running.
Type the following URL into your Chrome’s omnibox and press the “Enter” key. You should be taken straight to the flag in question, provided that you’ve updated your Chromebook to the latest available version. Enable the flag using the dropdown menu given there and restart the device to apply the changes.
chrome://flags/#nearby-sharing-self-share

Enabling Self Share on ChromeOS
Setting up Nearby Share
To set the whole thing up after you’ve done the latter, head to the “Settings” app on your Chromebook, followed by entering the “Connected devices” section and then selecting “Nearby Share.” Follow the on-screen instructions from there on out and you should be good to go.

Nearby Share enabled
3. New “App details” info for installed apps
Moving ahead, another key feature of ChromeOS 120 that adds a quality-of-life touch to the operating system is a more detailed section of app information. Previously, you couldn’t make out the source of any application on your device, as in where it was downloaded from, given how Chromebooks work with multiple storefronts on a regular basis.
Head to the Apps section
The new functionality can now be seen in the “Apps” section on your Chromebook. To be more specific, head to this area on the device by first opening the “Settings” program. Once you’re there, click on the “Manage your apps” menu to move to the next step.
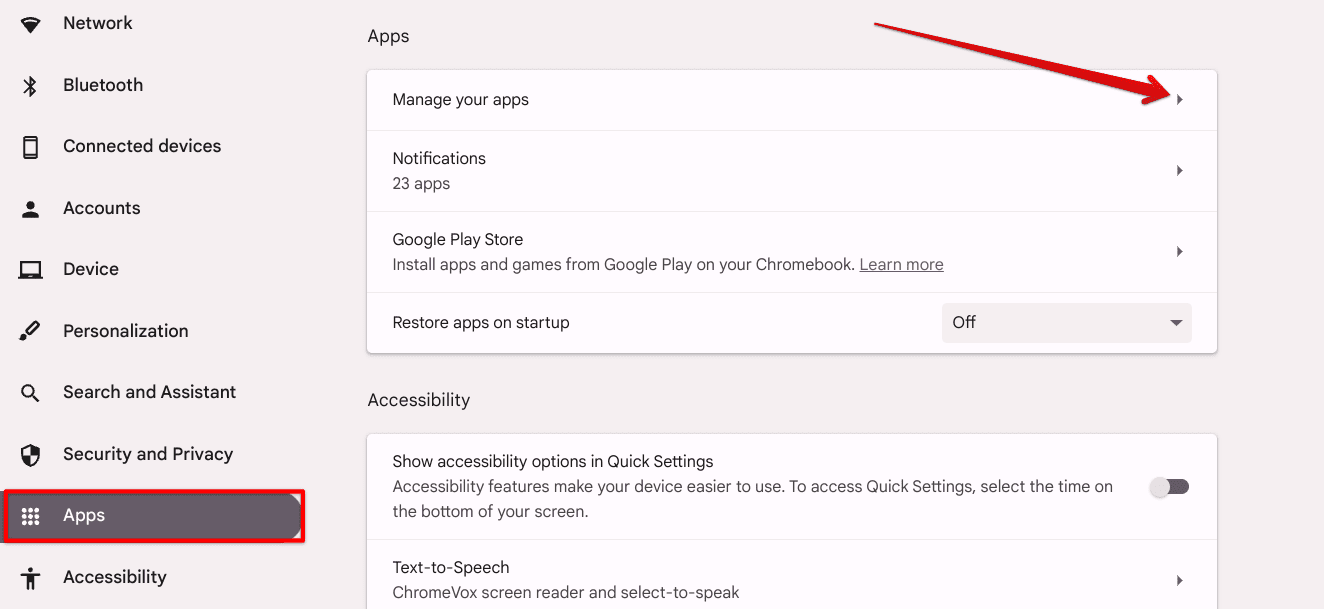
Entering the “Manage your apps” section
Choosing an application
Next, simply select an application on the follow-up page to be able to view its details. You’re obviously not going to get much out of the system-installed apps here, given that they’ve been on the device since the beginning, so it’s worth going after another type of application.
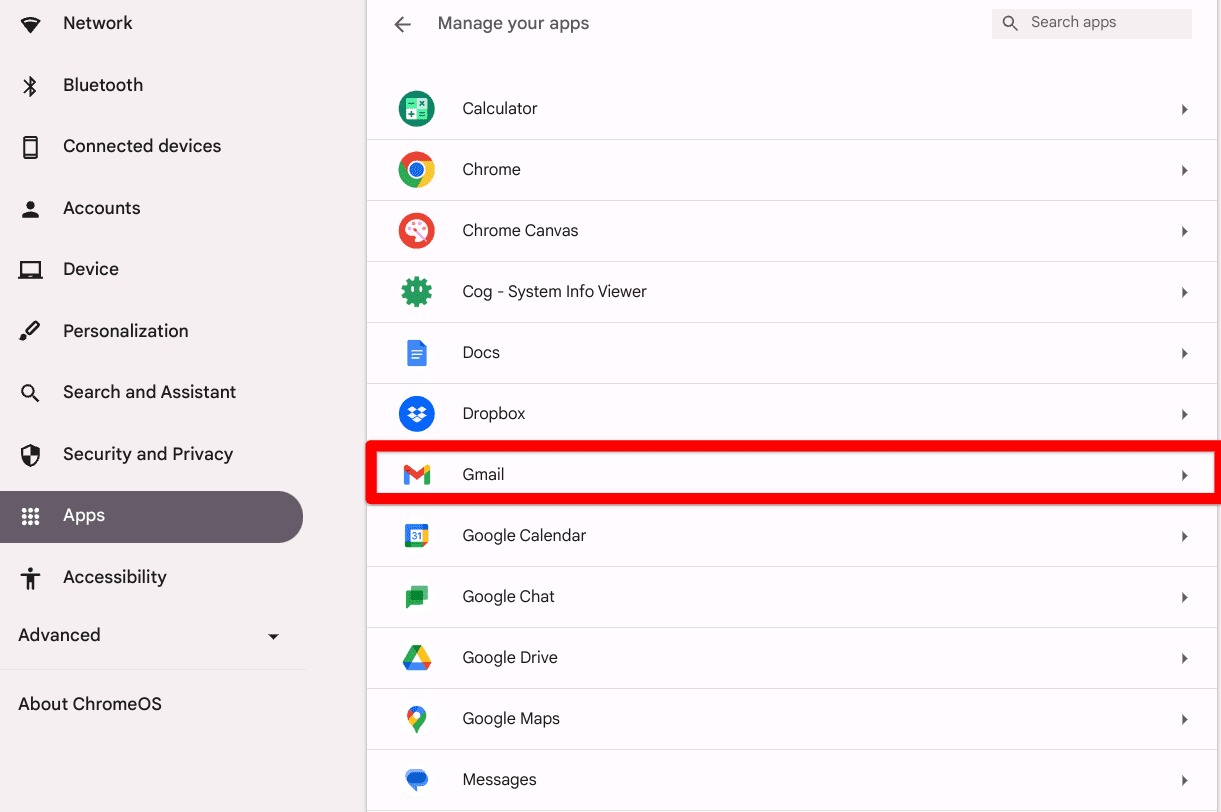
Picking an app to view
Viewing app details
Once you’ve chosen the app that you wish to know more about, look for the section at the bottom of the subsequently appearing page. There, you are subject to find “App details,” which comprises quick info at a glance related to the program you’ve highlighted, such as its installation source, data stored, and app data itself. Fairly useful.
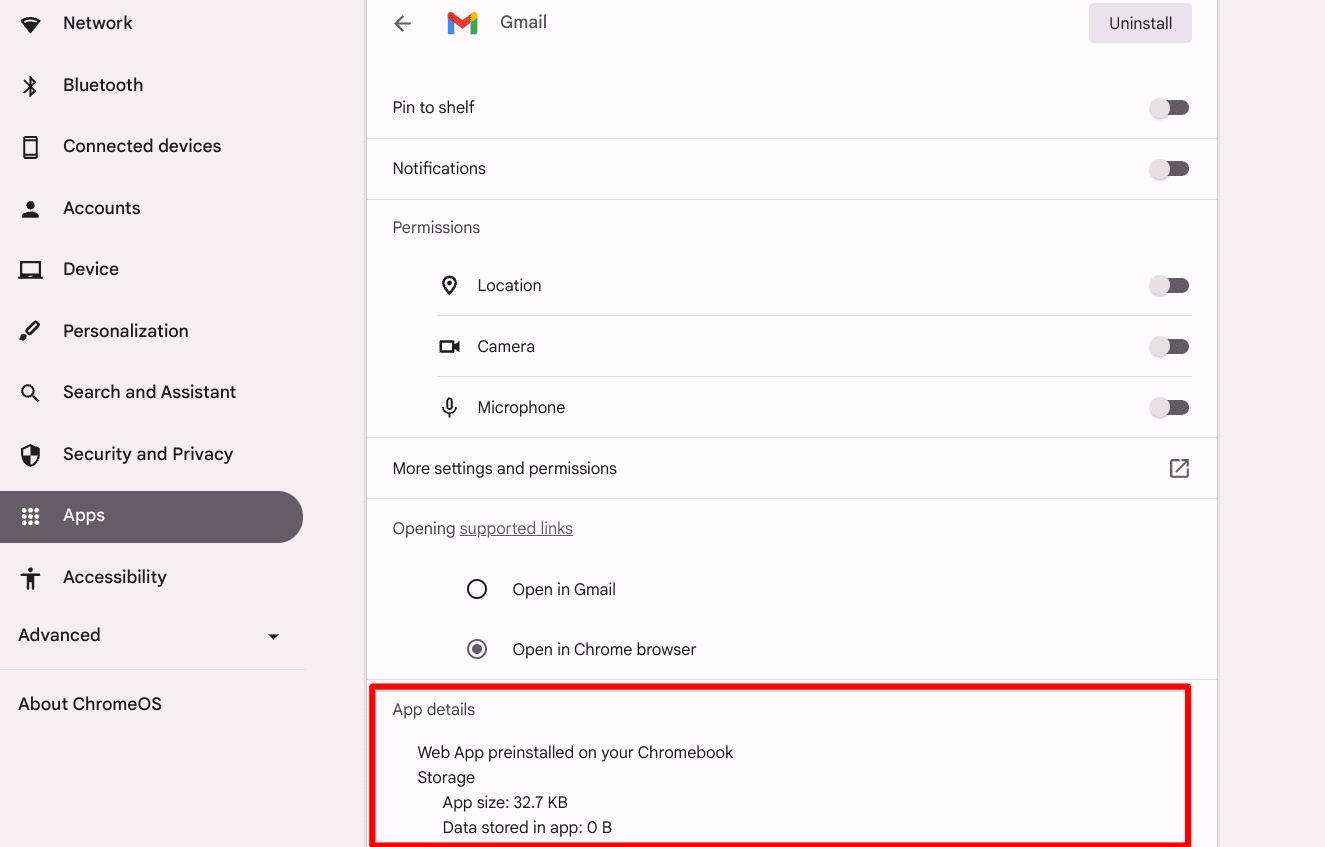
The newly added “App details” section
4. Keyboard key customization
ChromeOS 120 has treated the keyboard aspect to some love and attention as well, and now that I’m getting to put this new feature in action, I realize how drastic of a change this truly is. With the onset of ChromeOS 120, Google has made it possible to remap some of the major keys of your keyboard to the inputs of your preference. Let me explain how.
Entering the keyboard section in the “Settings” app
First, you have to make your way to the “Settings” app on your Chromebook, followed by choosing the “Device” menu from the side panel and then selecting “Keyboard” afterward. Once done, the option to click on “Customize keyboard keys” will now be available, unlike prior to ChromeOS 120. Thankfully, there’s no requirement to turn on an experimental flag for this one.

Customizing keyboard keys on ChromeOS
Clicking on the “Customize keyboard keys” button will lead you to a different page, where a swath of keys will be laid out for you to modify, including “Search,” “Ctrl,” “Alt,” “Escape,” and “Backspace.” In addition to that, the separate “Select a shortcut for each action” section goes over other inputs that you can modify for your convenience.
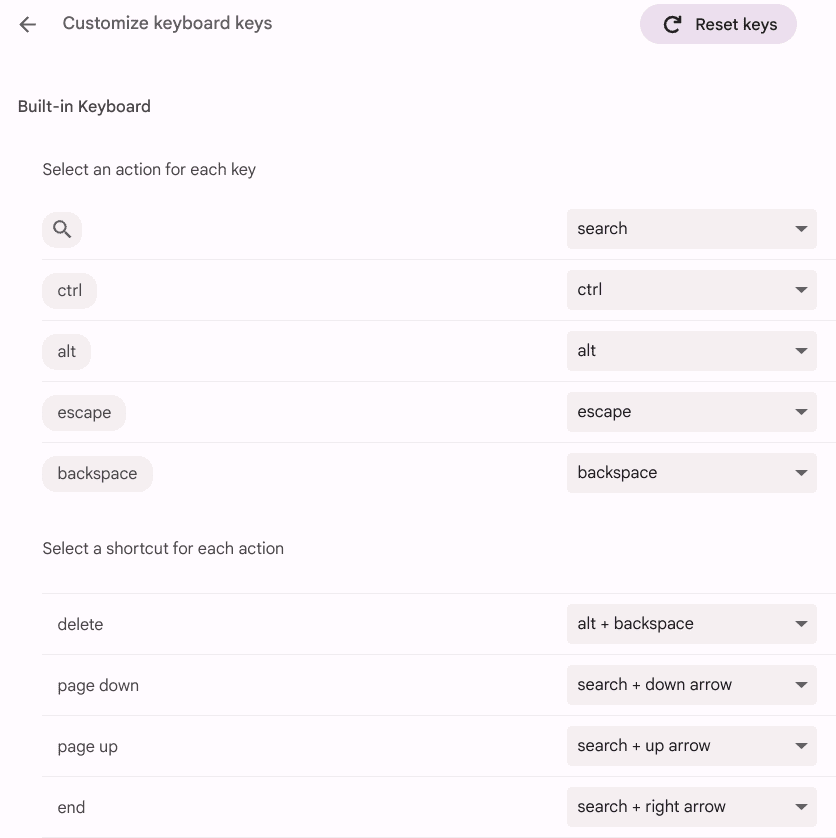
Remapping keys to different inputs on ChromeOS
5. Fancy new media controls widget
Next up, we’ve got another ChromeOS 120 feature that although comes to life with experimental flags, paves the way to a new experience for Chromebook users. The functionality in question directly targets the media controls on your device and offers people a widget popping up from the shelf area to help control playback.
The flags need some attention first

New media controls widget on ChromeOS
You read that subtitle right. Before we can go ahead and start tinkering with the media controls widget, the following flags need to be enabled. You know the drill—use their URLs in the address bar, enable them one by one, and restart the Chromebook.
1. chrome://flags/#global-media-controls-cros-updated-ui
2. chrome://flags/global-media-controls-cast-start-stop
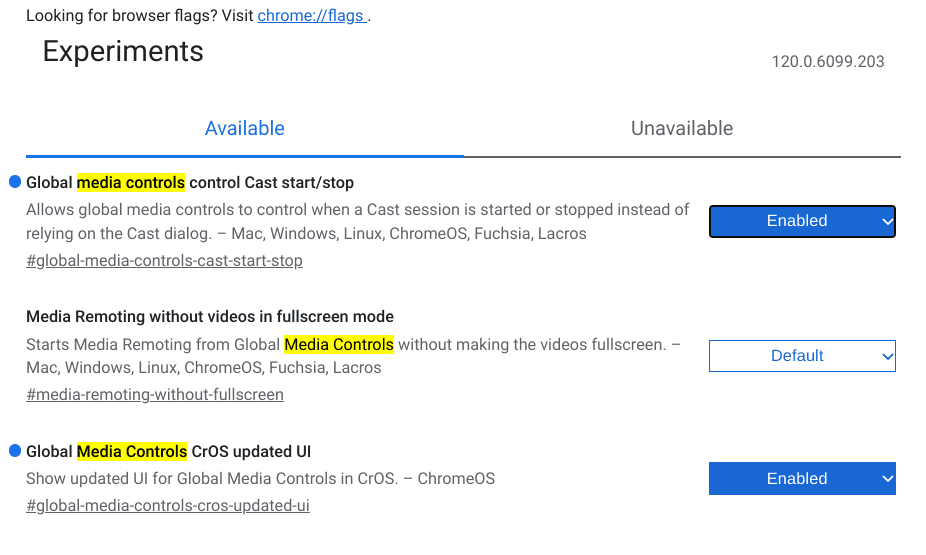
Toggling the relevant flags for the media controls widget
6. Extra mouse modification features
It’s not just the keyboard side of things that has been amped up in light of the latest Chromebook update—your touchpad’s functionality has been enhanced as well. For starters, you can now dedicate a specific input for performing a right-click on your Chromebook. For reference, the default method is to tap on the touchpad with two fingers at the same time.
Opening the Settings app to access the new feature
However, I’m pretty sure many are not going to accustom themselves to this different way of right-clicking on the screen so easily, especially the ChromeOS first-timers. Head to the “Settings” app, followed by choosing the “Device” menu from the left side of the screen. Select the “Touchpad” option after that to continue.
Altering the right-click input method
You can now easily look for the “Use touchpad and keyboard to right-click” feature present there and click on the toggle beside it to choose one out of three options—Disabled, Search + click, and Alt + click. I don’t know about you, but I’m keeping this disabled because I’m already pretty slick with the original way of right-clicking on ChromeOS.
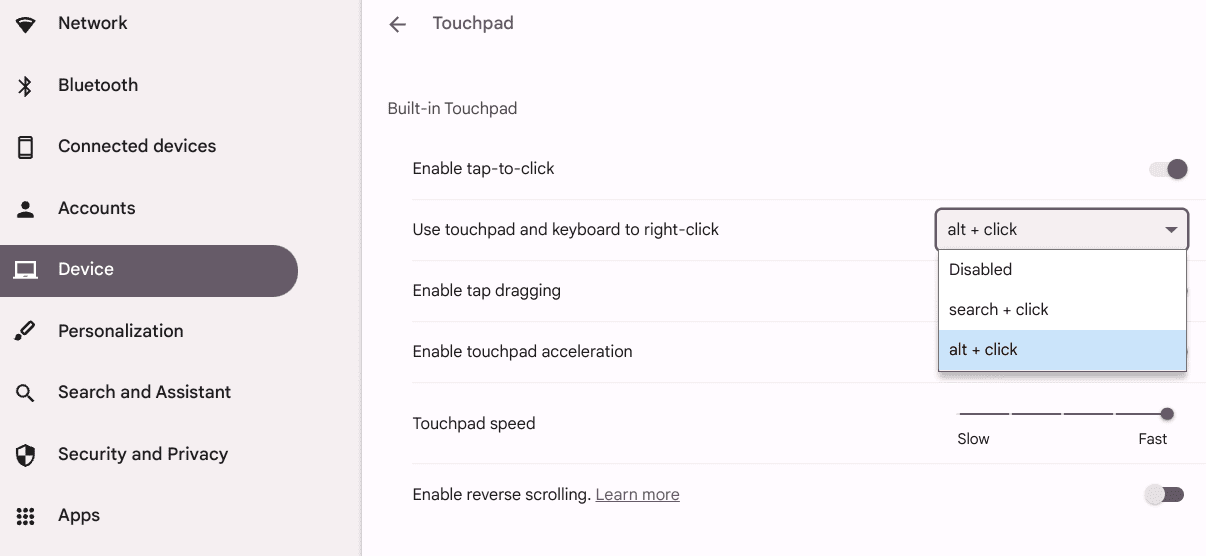
Altering a key mouse feature
More modifications to look out for
With ChromeOS 120, you can also enable a specialized flag for an externally connected mouse that holds the ability to switch up the way your left- and right-clicks behave on a Chromebook. It’s an exceptionally handy functionality that I surely see accommodating a sizable portion of the ChromeOS user base out there.
Turning on the peripheral customization flag
So to get it to work on your end, go ahead and type the following URL into the address bar and get straight to the flag you need to enable. Use the toggle there to select “Enable” and reboot the device so the changes can be applied right away.
chrome://flags/enable-peripheral-customization

Enabling the peripheral customization flag
Modifying the keys
Make sure to have your external mouse connected to your Chromebook at this point. Head to the “Touchpad” area back again in the “Settings” app, followed by clicking “Mouse.” You’ll visualize an option to “Customize mouse buttons” there. Click on it, and you should be redirected to another page. Make the necessary changes here by following the on-screen instructions.
7. Quick pasting from ChromeOS screen captures
Lastly, the ChromeOS screenshot tool — the native one, not the third-party applications — has received an upgrade, and it’s been a hot minute since the devs focused on this aspect of the operating system. Now, you can easily employ the drag-and-drop functionality immediately after taking a screenshot, which is more convenient than pasting a screen grab through conventional ways.
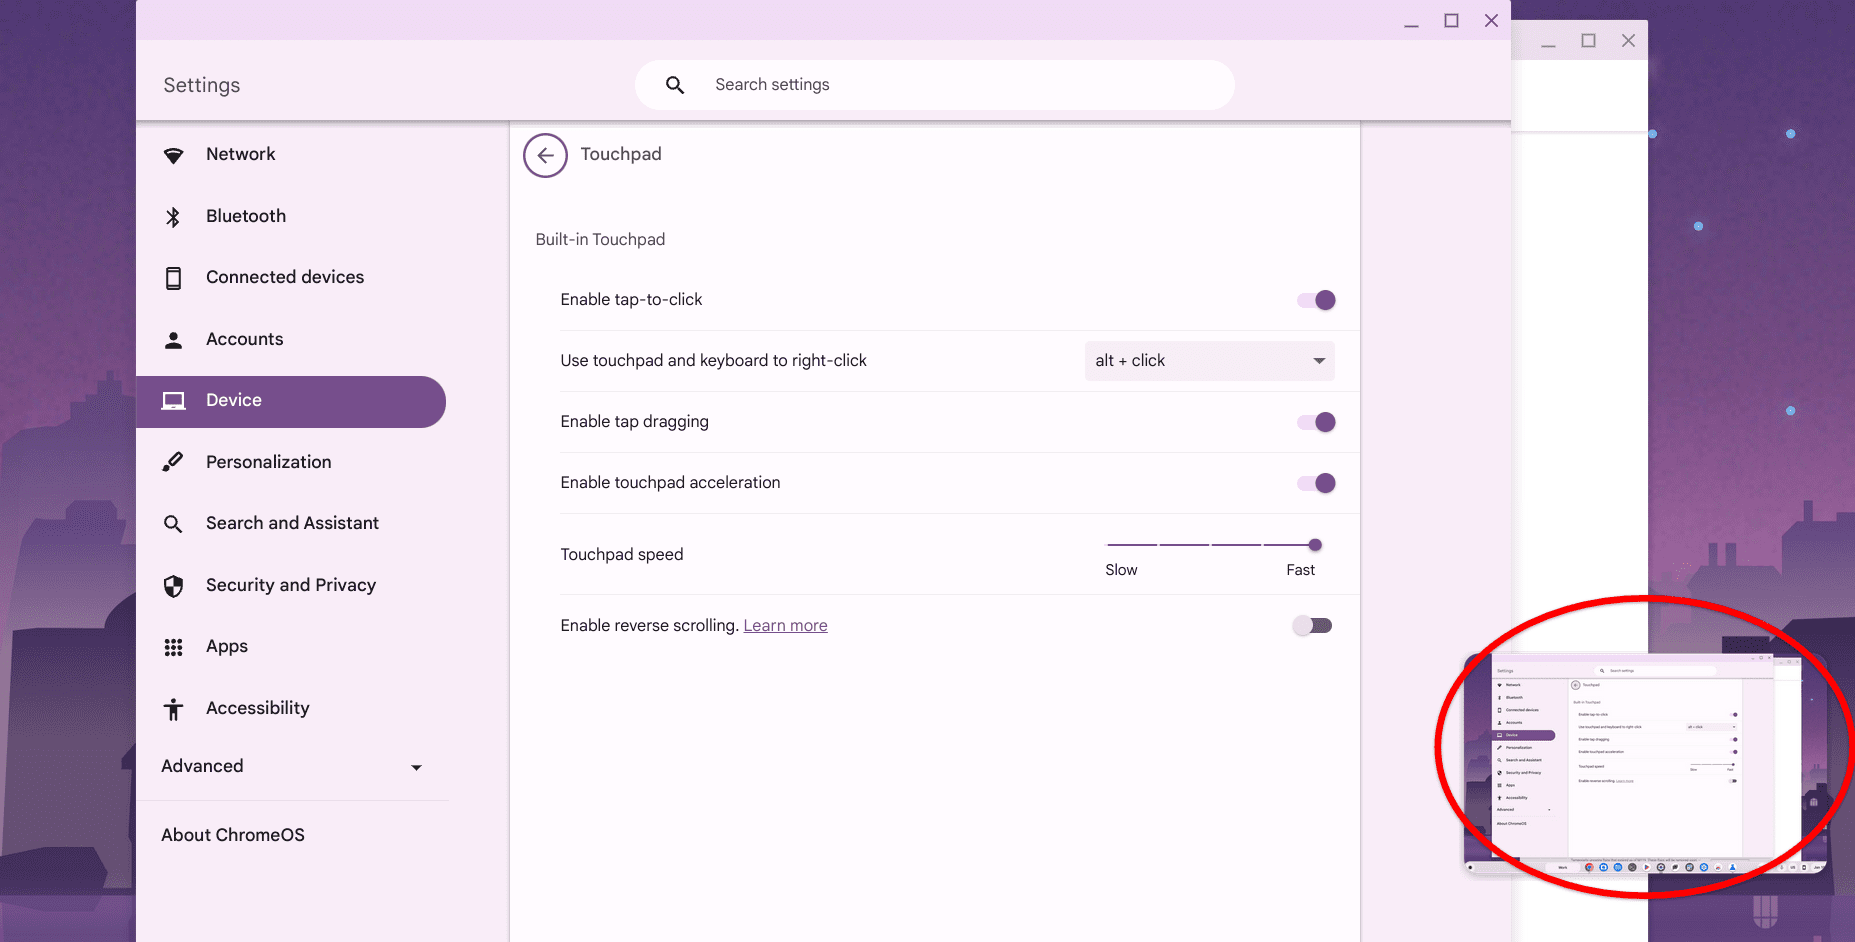
Dragging a screenshot on ChromeOS
How to update ChromeOS
All these features can only be accessed when you have your Chromebook updated to the latest ChromeOS version pushed out by Google. Although Chromebooks take care of updates automatically, make sure to pitch in with a more manual approach as well in case the update hasn’t popped up on your end yet.
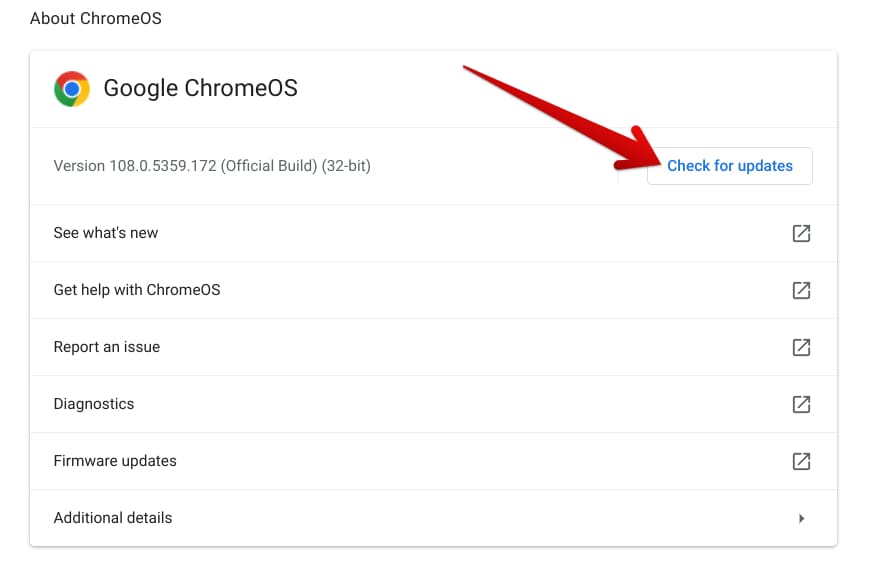
Checking ChromeOS for updates
It’s not all you sometimes
On certain occasions, the delay can be server-side as well, meaning that it’s taking longer for the update to arrive from the back-end rather than an insufficiency on your end. Google usually rolls out the new update globally over the course of a few days, so sit tight until you get that notification pop-up.
Conclusion – A great start to the year for Chromebook enthusiasts
In all fairness, ChromeOS 120 has brought a number of attractive changes to the Chromebook mainframe for end-users, thereby signaling a great start to the year. We’ve got advanced keyboard customization, a handy accessibility feature for virtual desks, and improved Nearby Share functionality to begin with.
Let us know in the comments section down below what feature has enticed you the most this time around. Personally, I’ve grown pretty fond of the flexibility to customize my cursor in various ways, and I love the drag-and-drop implementation for ChromeOS’ native screenshot tool. What about you?
