Are you struggling with network issues on your Chromebook? As a Chromebook user myself, I’ve been there, and I know how frustrating it can be. Fear not, though, because I’m here to guide you through some simple steps to get your Chromebook back on track with the internet. This guide is written in plain English and includes my personal insights, so even if you’re not a tech whiz, you can easily follow along.
Understanding the problem
Before diving into solutions, let’s understand what might be causing these network issues. Chromebooks are known for their simplicity and efficiency, but like any device, they can have their quirks. Common problems include not connecting to Wi-Fi, slow internet speeds, or frequent disconnections.
Check your Wi-Fi connection
First things first, ensure your Wi-Fi is working. I know, it sounds obvious, but sometimes the simplest solution is the right one. Check if other devices in your home are connected to the internet. If they aren’t, the issue might be with your router or service provider, not your Chromebook.
Update your Chromebook
Like any good tech aficionado, I recommend keeping your devices updated. An outdated Chrome OS can lead to various issues, including network problems. To update your Chromebook, go to ‘Settings,’ then ‘About Chrome OS,’ and finally ‘Check for updates.’ If there’s an update available, install it.

Checking ChromeOS for updates
Fixing the network issues
Restart your Chromebook
The classic ‘turn it off and on again’ method often works wonders. It’s a simple step, but restarting your Chromebook can resolve many network issues.
Forget and reconnect to the network
This is a trick I often use. Go to your Wi-Fi settings, forget the network, and then reconnect. This process can help resolve IP address conflicts or other connectivity issues. Resetting the Wi-Fi connection on a Chromebook is a straightforward process. Here’s a step-by-step guide:
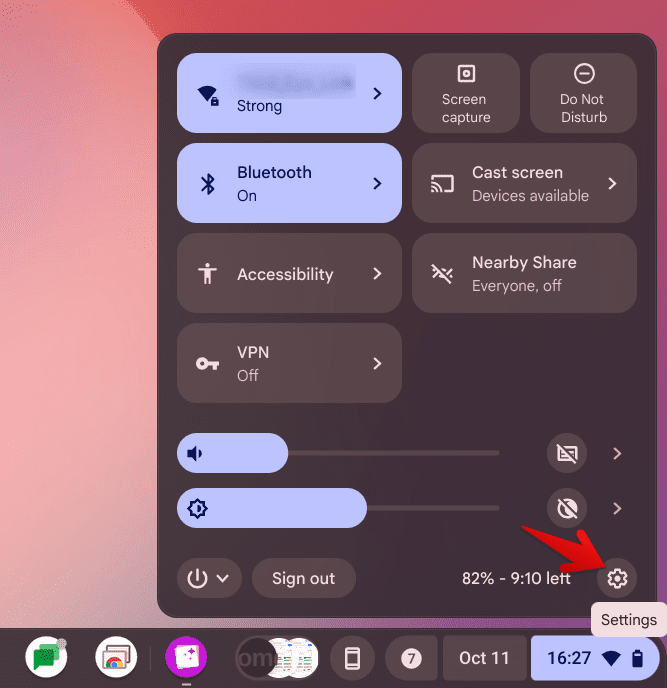
- Click on the time in the bottom right corner: First, click on the time displayed in the bottom right corner of your screen. This will open the system menu.
- Open settings: In the menu that appears, click on the gear icon to open the settings menu.

Accessing ChromeOS settings
- Go to network settings: In the settings menu, look for the “Network” section. You can usually find it quite easily as it’s where you manage your Wi-Fi and other connections.
- Select Wi-Fi: Under the Network section, you’ll see the Wi-Fi option. Click on it to see available networks and other Wi-Fi settings.
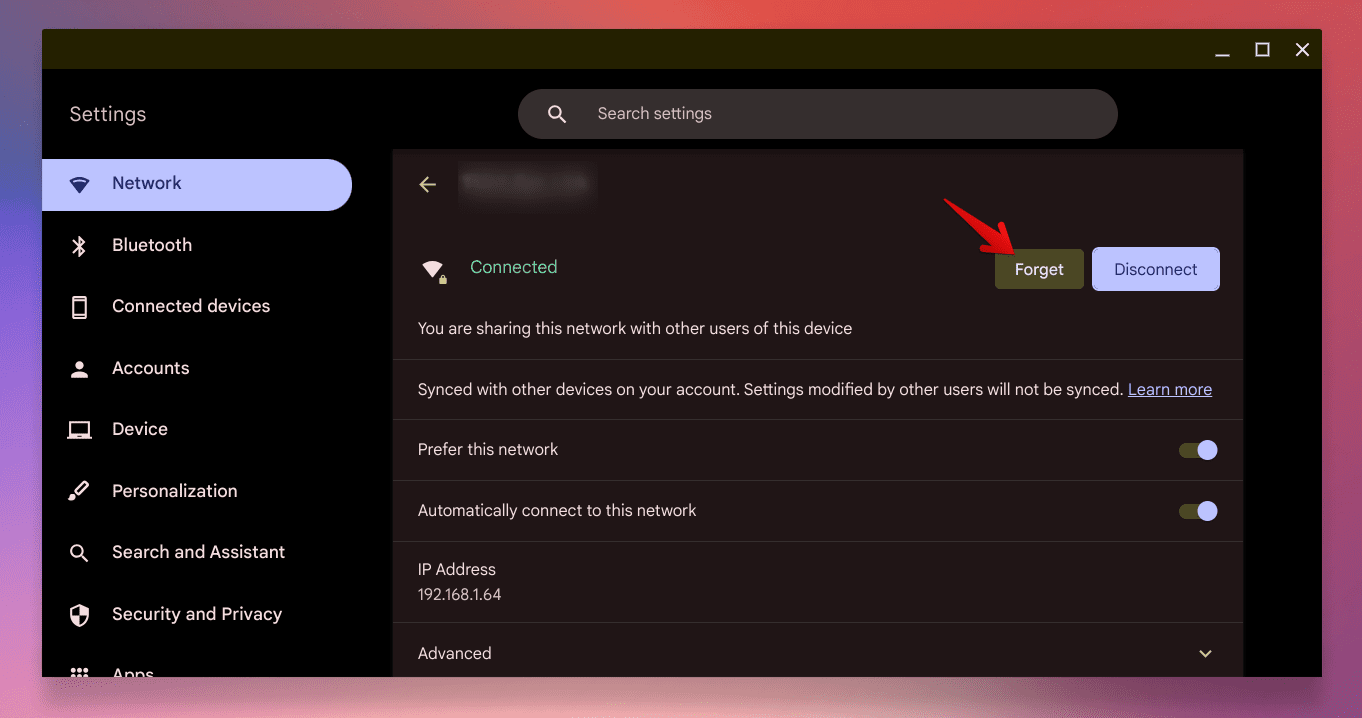
- Forget the network (if necessary): If you’re having trouble with a specific Wi-Fi network, you can try forgetting it and then reconnecting. To do this, find the network you’re having trouble with, click on the vertical three dots next to it, and select “Forget.” This removes the network from your saved networks.

Forget Wi-Fi settings
- Reconnect to the network: After forgetting the network, you can reconnect to it by selecting it from the list of available networks, entering the password (if required), and clicking “Connect.”
- Restart your Chromebook: Sometimes, a simple restart can help apply the changes effectively. Just turn off your Chromebook and turn it back on.
- Check for improvements: After reconnecting, check to see if your Wi-Fi connection is performing better.
If you continue to have issues after resetting your Wi-Fi connection, you might consider other troubleshooting steps like restarting your router or checking for Chrome OS updates. In some cases, network issues can stem from problems beyond the Chromebook itself, such as router settings or service provider issues.
Check for interference
Your Chromebook’s Wi-Fi can be affected by physical obstructions or interference from other electronic devices. Make sure your Chromebook is within a good range of your router and not blocked by walls or large objects.
Reset your network settings using Powerwash
If all else fails, you might want to reset your Chromebook’s network settings. This can clear out any corrupt settings that might be causing issues. Go to ‘Settings,’ then ‘Advanced,’ and select ‘Reset settings.’ But remember, this will erase all saved networks and passwords, so use this option as a last resort.
Here is our detailed guide: How to Powerwash (Reset) a Chromebook
Advanced troubleshooting
If you’re feeling a bit more adventurous and the above steps didn’t work, here are some advanced tips:
Check your router’s settings
Sometimes, the issue might be with your router’s settings. Ensure your router firmware is up to date and that there are no specific settings blocking or limiting your Chromebook’s connectivity.
Use Google’s diagnostic tool
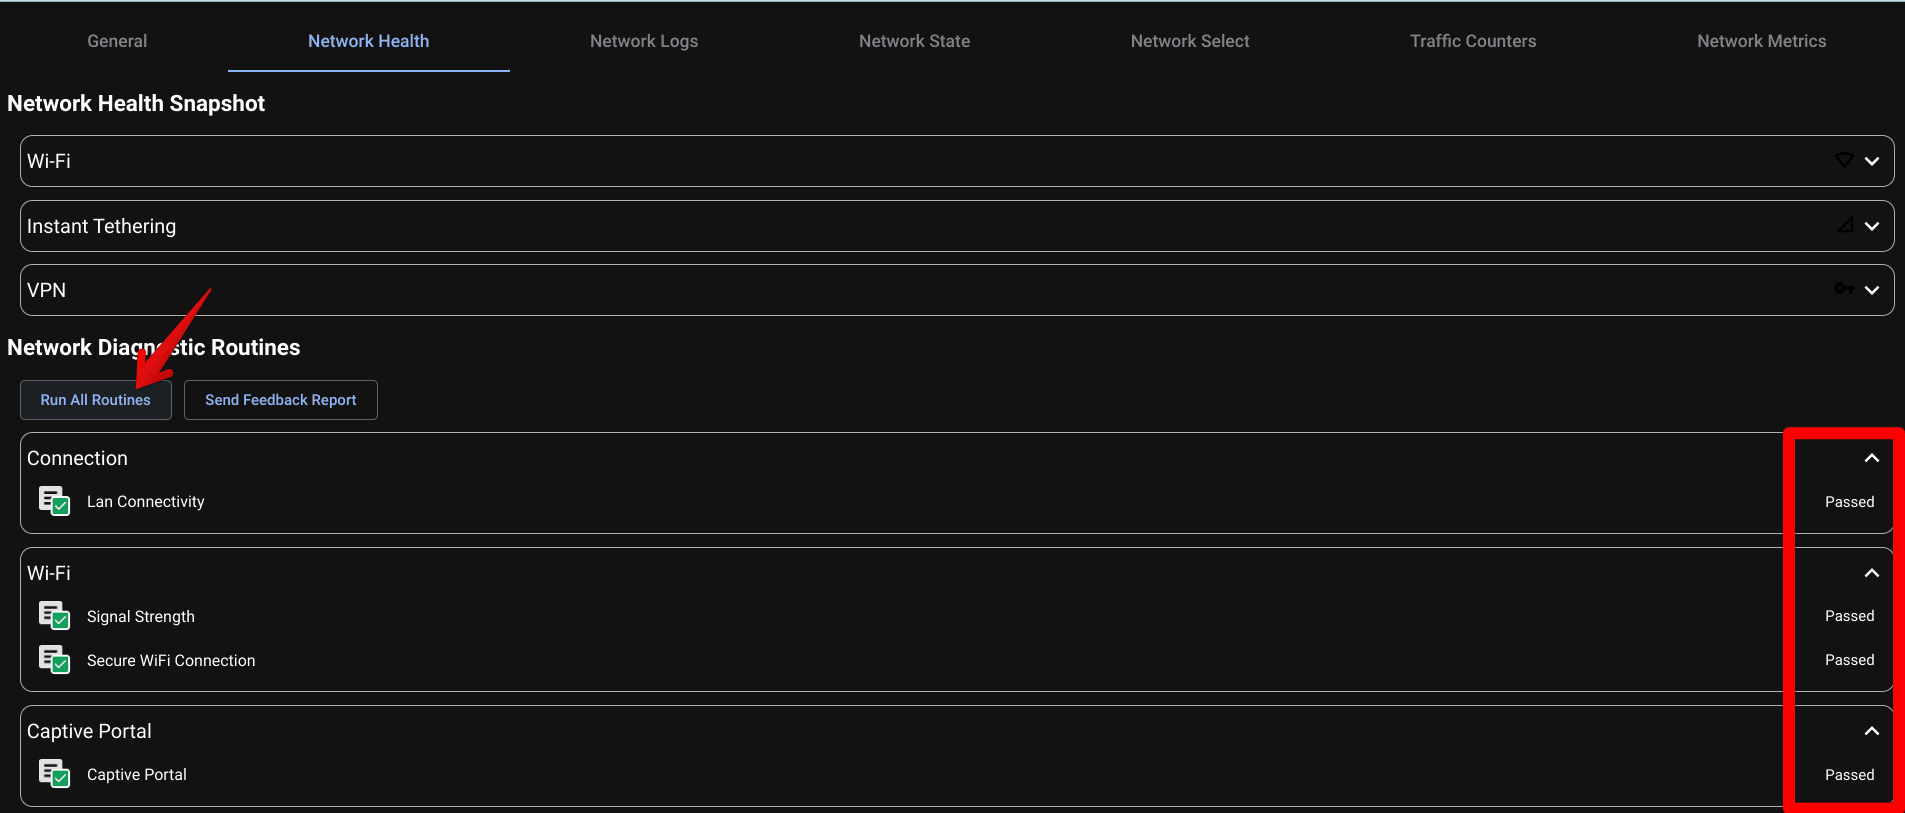
Did you know that Chromebooks have a built-in network diagnostic tool? It’s a neat feature that can help identify issues. To access it, type chrome://network in your browser’s address bar. Go to “Network Health” and then click/tap on the “Run All Routines” button. Wait for the process to finish and see if you get any errors on the right side.

Network Diagnostic Routine Checker
FAQ: Troubleshooting Network Issues on Chromebooks
Here’s a concise FAQ that can help you find quick answers to your problems.
1. Why won’t my Chromebook connect to Wi-Fi?
There could be several reasons, including incorrect Wi-Fi credentials, issues with the router, or problems with the Chromebook’s wireless adapter. Start by checking if other devices can connect to the Wi-Fi network. If they can’t, the issue might be with the router or the network itself.
2. How do I update my Chromebook?
To update your Chromebook, go to ‘Settings,’ click on ‘About Chrome OS’ at the bottom of the left panel, and then select ‘Check for updates.’ If an update is available, your Chromebook will download and install it automatically.
3. What does ‘Powerwash’ do on a Chromebook?
Powerwash is the term used for factory resetting a Chromebook. It erases all the data on the device, returning it to its original state when you first bought it. It’s used as a last resort to fix major issues, including persistent network problems.
4. Can a Chromebook get viruses that affect its network connectivity?
Chromebooks are designed to be secure and are less susceptible to viruses than other computers. However, it’s still possible to encounter malware that can affect performance, including network connectivity. Always ensure you’re downloading from trusted sources and keep your Chrome OS updated.
5. How do I perform a DNS flush on my Chromebook?
To flush the DNS on your Chromebook, open Chrome, type chrome://net-internals/#dns in the address bar, and press Enter. Then, click on the ‘Clear host cache’ button. This can sometimes resolve network issues related to DNS.
6. Why is my Chromebook’s internet connection so slow?
Slow internet on a Chromebook can be due to various factors, including a weak Wi-Fi signal, too many apps or tabs running simultaneously, or issues with your ISP. Try moving closer to the router, closing unnecessary tabs or apps, or resetting your router.
7. Can I use an Ethernet connection with my Chromebook?
Yes, you can use an Ethernet connection with your Chromebook. If your Chromebook doesn’t have an Ethernet port, you’ll need a USB-to-Ethernet adapter to connect to a wired network.
8. How do I restart my Chromebook?
To restart your Chromebook, click on the time in the bottom right corner, then click on the power icon and select ‘Restart.’ Alternatively, you can hold down the ‘Power’ button for a few seconds until the device turns off, then press it again to turn it back on.
9. What should I do if none of the troubleshooting steps work?
If you’ve tried all the basic troubleshooting steps and your Chromebook still has network issues, it may be time to contact customer support for your device or consult with a professional technician.
Conclusion
Addressing network issues on a Chromebook can range from simple fixes like restarting your device or checking Wi-Fi connections, to more involved steps such as updating the Chrome OS, performing a hard restart, or even a Powerwash for more persistent problems. We covered essential troubleshooting techniques, including updating the device, resetting network settings, and dealing with potential interference. The importance of backing up data before attempting a factory reset was also highlighted. Additionally, the FAQ section aimed to resolve common queries, offering a comprehensive approach to troubleshooting.


