From being able to utilize the Chrome browser’s Guest Mode to setting up the home page and startup page in the browser, Google Chrome is an all-inclusive internet browser that has only seen constant improvement as the years have gone by. It makes it possible to create different usable profiles on the fly and switch between them whenever the user wishes. This offers a heightened level of freedom to people using the same device.
This detailed guide will teach us all it takes to create and switch profiles in Google Chrome. Thankfully, the browser makes it simple to accomplish the task, so we doubt there’s anything to hassle over here. We’ll also explain the difference between creating a Chrome profile and signing in with a different account by the end of the write-up, so stick around for the best results.
Without any further delay, let’s dive right into the guide.
What are the major benefits of creating different profiles in Google Chrome?
Before we get to the heart of the article, it’s worth talking about what exactly using different profiles in Chrome brings to the table here. The foremost plausible reason one would want to utilize this powerful Chrome feature is when multiple people use the same PC. When that happens, things can quickly get intertwined, and you’re no longer in charge of your bookmarks, saved passwords, autofill data, and browsing history.
Enjoy a separate identity with a new Chrome profile
In such cases, it’s important to separate yourself from the rest of the folks using a PC, and what better way to get that done than creating a new Chrome profile? When you do that, you can comfortably use the internet crawler in your own space rather than putting up with the unintentional invasion of your privacy by others. However, it’s worth noting here that you should only create a profile on a PC as long as you trust the other people using the device.
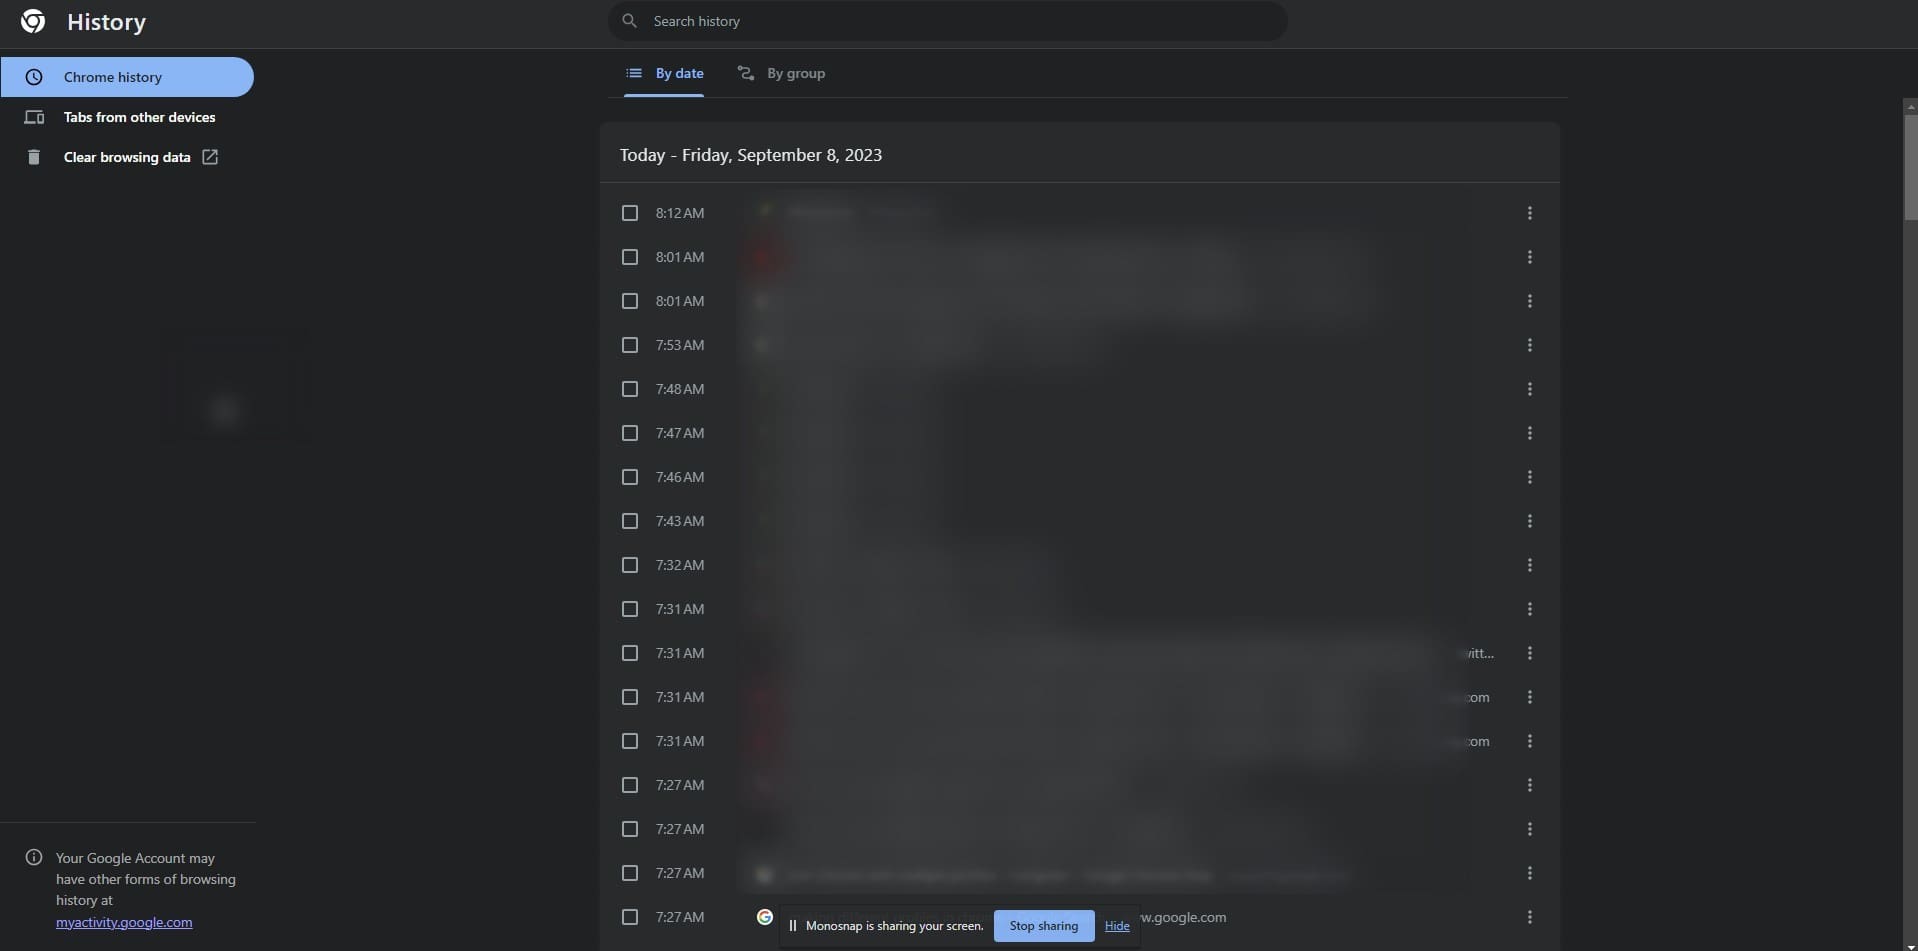
Browsing history in Chrome
Privacy and freedom combined
That’s because you cannot lock your separately created profile from being accessed by others, at least not yet. So, others can easily switch to your profile with just a handful of clicks if they want to. Creating boundaries right from the get-go is important so everyone can proceed with their work swimmingly and not have to engage in each other’s profiles.
Creating profiles in Chrome – Explained
That is the gist of it. Let’s go over the working steps to help you create a new profile in Google Chrome.
Step 1. Accessing the profile section in Chrome
As iterated earlier, Google makes it truly simple to create a new profile. All that’s required is the right know-how of where to begin, and you’ll be good to go. Get started by clicking your profile icon in the top-right corner of Chrome’s interface, next to the “Customize and control Google Chrome” button.
Clicking on your profile icon in Chrome
Step 2. Adding a new profile
Doing that will reveal a drop-down menu where you can control many of Chrome’s account-centric functions. The next step is to click on the “Add” button, which should take you forward.
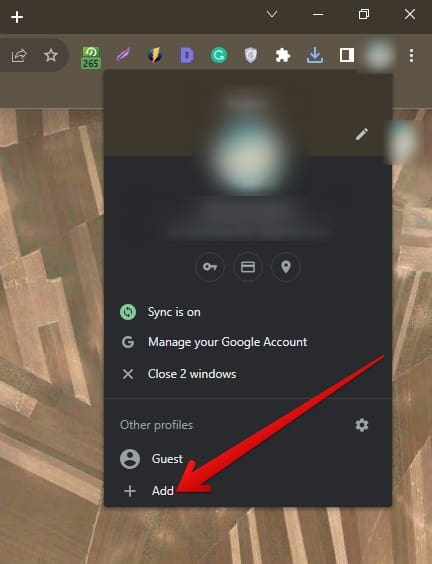
Choosing the “Add” button
Step 3. Setting up the new profile
After clicking on “Add,” you’ll notice a window on the screen asking you to set up your new Chrome profile from here on out. You’ll now face two options: “Sign in” and “Continue without an account.” We’ll move forward with the latter for now. Click on it to get to the next step.
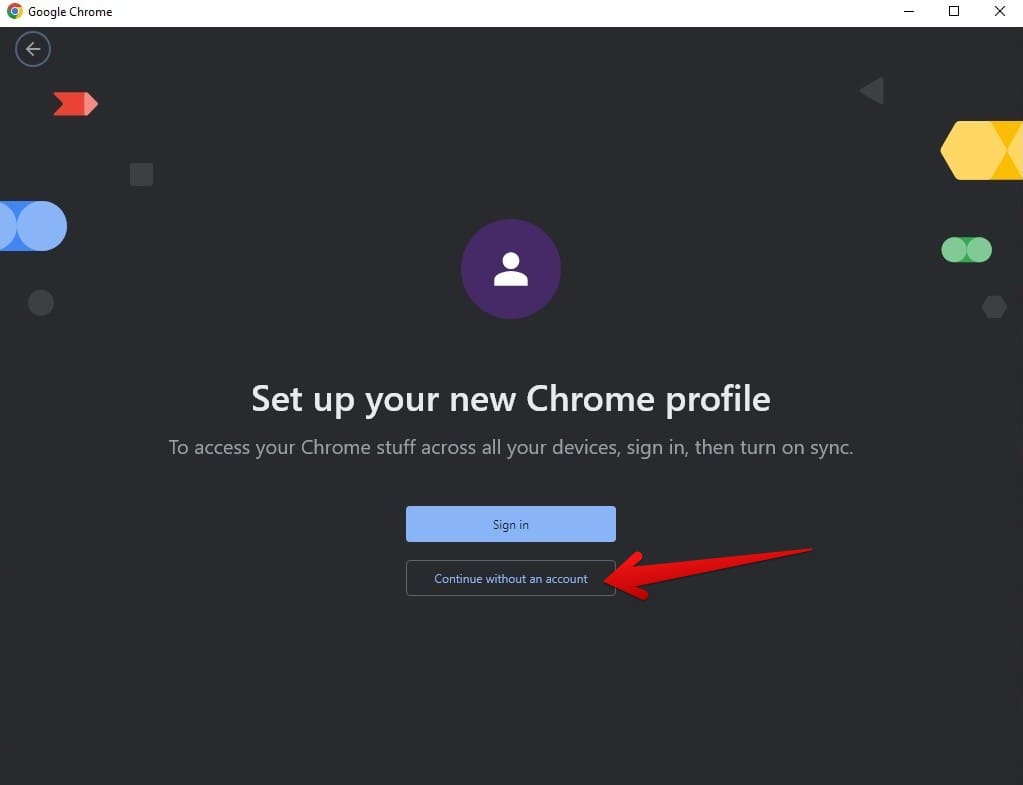
Getting to the next step
Step 4. Getting ready for new beginnings
The moment you click on “Continue without an account,” a new Chrome window will appear, which should be different from the one you were using just now. Within the new window, a small-scale section will be present, and it’ll ask you to enter the name of the profile and move forward with a basic level of customization oriented around setting the theme of the Chrome browser. Click on “Done” when you’re finished and voila! You’ve just made a new Chrome profile.
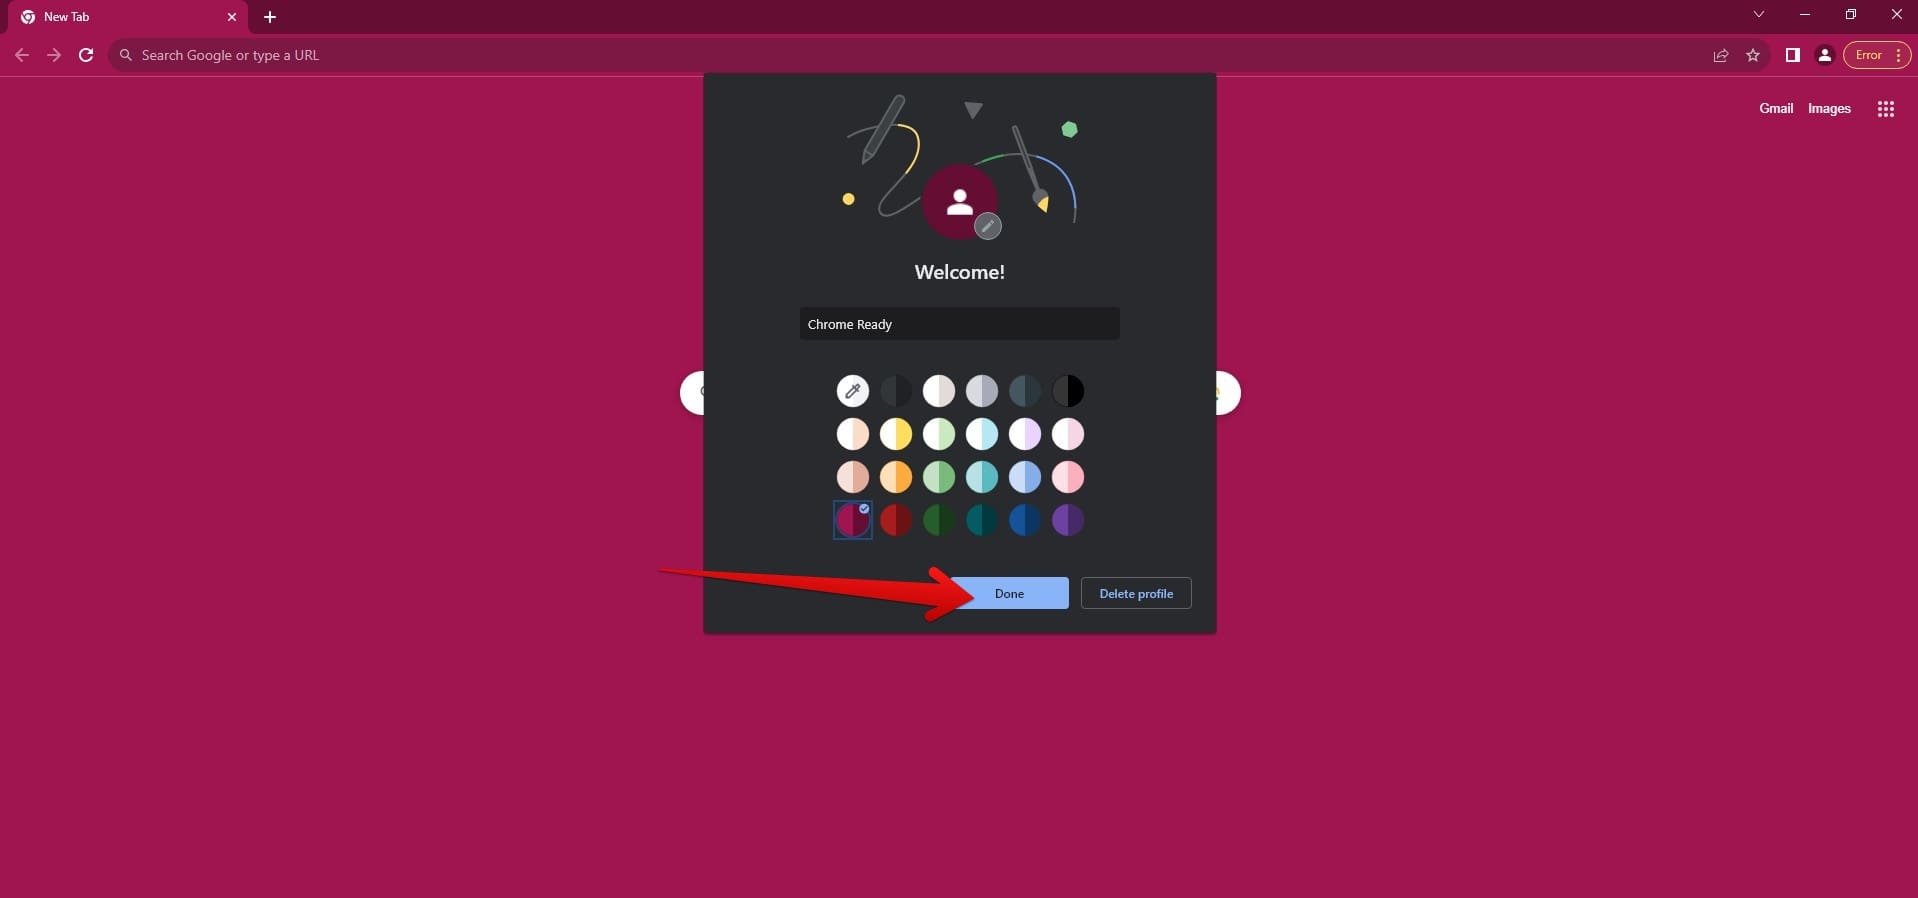
Creating a new profile in Google Chrome
That’s about it! You’ve successfully learned how a new profile in Chrome is created. Do note that since now two different profiles are sitting on your PC, where one presumably has your Google account signed in, and one is what you just created for yourself, Your profile icon will designate Chrome Windows from now on. That will help clarify who precisely is using Chrome and differentiate between one Chrome profile and the other.
Linking your Google account is a recommendation
In addition, you might have noticed that we chose the “Continue without an account” option in one of the steps above. That is because there is a difference between creating a Chrome profile only and signing into it with a Google account. Using a different profile on Chrome has no prerequisites for signing in with an account, but if you do that, you can enjoy added benefits in a flash. Let us explain how.
The difference between signing into a Google account and using a Chrome profile without a synced account
You might have noticed already that using a Google account boasts many benefits for Chrome users. Not only do we get the added ability to sync all of our browsing data, such as browsing history, saved bookmarks, addresses, card details, passwords, and whatnot, but having our account makes it possible to sign into any device hassle-free and continue working seamlessly like nothing ever happened.
Using a Google account alongside a Chrome profile is your safety net
However, a simple Chrome profile does not boast that level of flexibility or freedom. It won’t be able to sync your data unless you also sign in with a Google account. Otherwise, all that’s kept and stored in terms of your browsing data, including your history and saved passwords, are remembered only by the PC you’re using. If, for instance, your profile was to get deleted from the browser, all of the subsequent information would also be lost forever.
That is unless you had already signed in with a Google account for that Chrome profile and enabled the browser’s sync functionality. Doing so will make staying in touch with your privacy and other personal data easy. However, the ease and comfort of using the Chrome browser in this manner also come at a cost. If you’re using a shared PC, it won’t take long for others to switch to your Google account and snoop around however they please.
Enabling sync
That is why it’s essential to ensure you trust the other people using the same device enough before giving it all away. To sign in with a new account on another profile, switch to the profile in question and click the profile icon in the upper-right area. Once done, select the “Turn on sync” button, which should take you directly to the dedicated sign-in page on Google. If you don’t have another Google account, follow the on-screen instructions to make one.
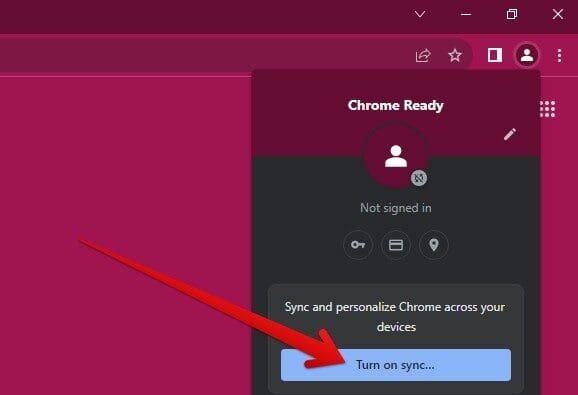
Signing in with a Google account
How to switch to another profile in Google Chrome
Now that you’ve made a new profile in Chrome, how do you switch to your previous one, or another one, for that matter? It’s all laid out in the same profile icon section we accessed earlier, allowing you quick access over all the created profiles of your PC’s Chrome browser.
Using the profile section in Chrome to make the switch
Begin by clicking on your profile icon in the browser to reveal the drop-down menu. Doing so will lay out the profiles that you’ve made on your end, making it easy to make the switch without breaking a sweat.
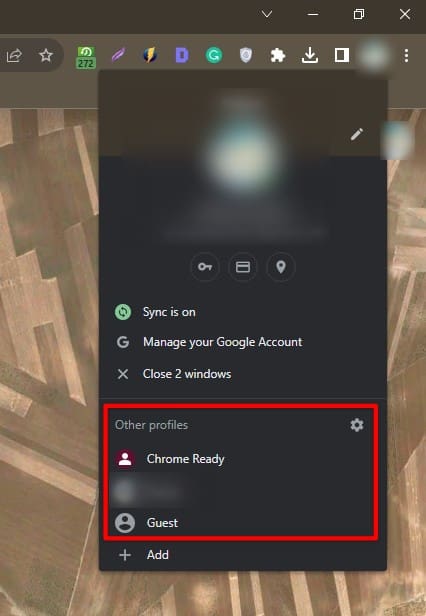
Switching to another profile in Chrome
You can approach the same menu whenever you want to use a different profile on Chrome—no questions asked. The transition is smooth, and the mechanism is derived so that multiple profiles can be used simultaneously. Now, the fact of the matter is that you also need to learn how to manage your created profiles because you might not be sticking with them forever.
Removals can be necessary on certain occasions, and you must know how to care for them when the time comes. The following section will guide you on that.
How to manage Chrome profiles
Creating a new profile doesn’t mean you don’t need to manage it. In cases where you no longer require the service of an extra profile or you’re looking to tweak specific settings related to it, there’s an easy-to-use section that Chrome has been designed with so users can effortlessly take care of their alternate profiles.
Step 1. Accessing the “Settings” of Chrome profiles
Begin by selecting the same profile icon that sits in the top-right area of the browser’s interface. Once done, look for the gear-shaped icon beside “Other profiles.”
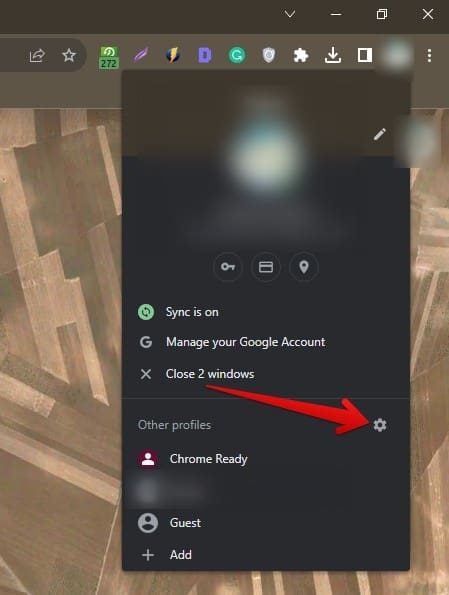
Accessing the Chrome profiles’ settings
Step 2. Managing the profiles with ease
Once done, a window should pop up on the screen, allowing you to gain an overview of all the different profiles on the browser. You can also rename each profile by clicking on the existing name and making the edit accordingly. In addition to that, Each profile will have a dedicated “Options” button present in it, allowing you to click and select either “Edit” or “Delete.”
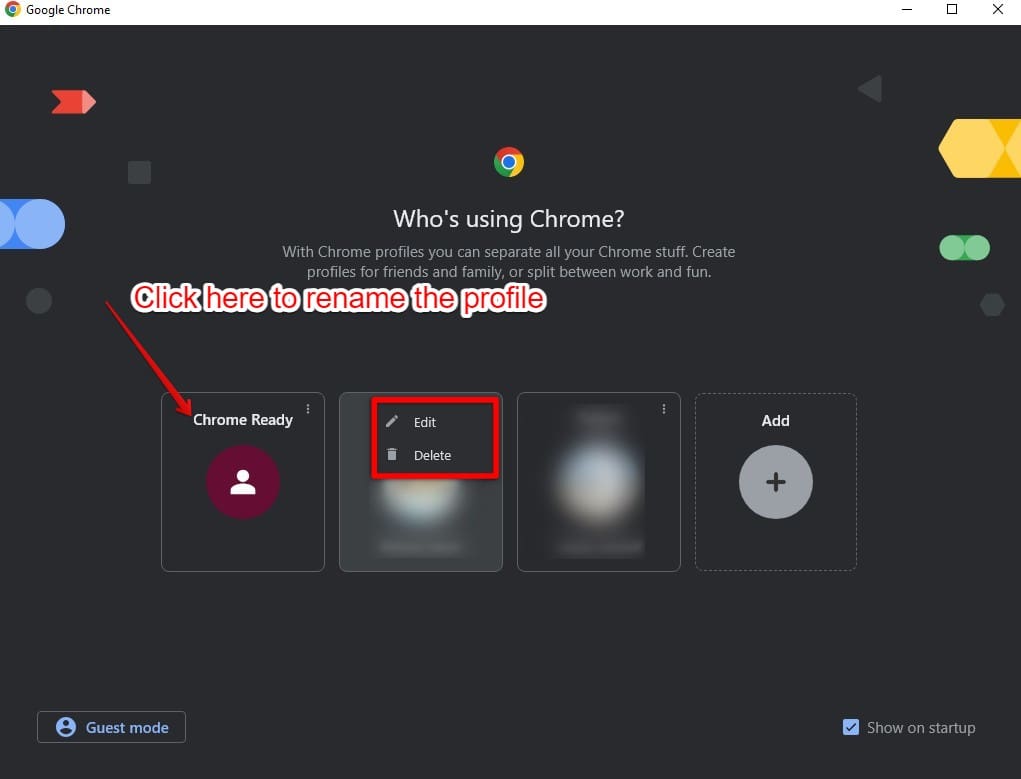
The managerial options for various Chrome profiles
Step 3. Taking the time to customize
The latter will remove the profile from the face of Chrome, and “Edit” will open a window dedicated to the relevant profile, allowing you to tweak some of its settings on the go. This is basically where you can change the theme color of the browser, followed by employing a different avatar to your name as well. There are many options to choose from, and if you sign in with a Google account, you can also set your profile picture.
Lastly, this setting allows you to create a desktop shortcut to access the profile quickly on your PC. You may choose to enable it as per your preference.
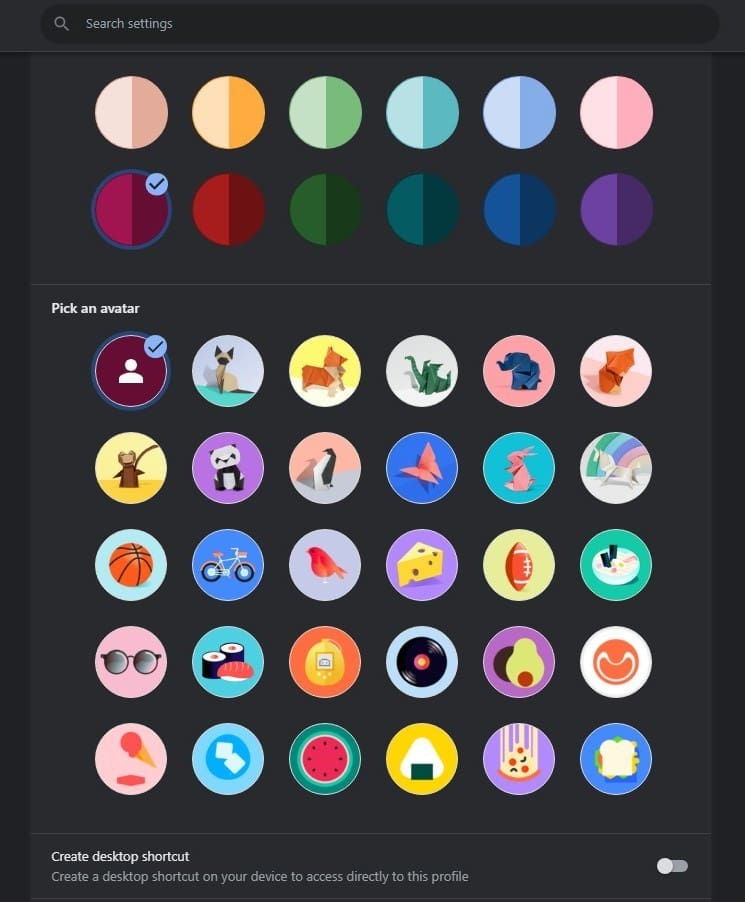
Customizing the new profile in Google Chrome
Conclusion
Google Chrome traces its initial release back to 2008, and the years that have followed post that period have all been filled with constant improvement for the famed internet browser. Today, it’s bursting at the seams with multi-faceted functionality, including being able to set up a proxy, work with site isolation, and other extra tools, such as live captions and Do Not Track.
In this guide, we’ve highlighted a specific portion of Chrome’s overall functionality, i.e., its ability to let users create multiple profiles and work with them on the go. Creating a new profile means that you’re separating yourself from others. It’s either that or you’re formulating a balance between work and entertainment. Whatever the cause, the procedure has been laid out above for you to replicate, so you should be able to get it done successfully.
Comment below and tell us whether you found the write-up valuable. Thanks for reading!
