In the bustling digital era of 2023, browsers have become our gateway to the vast world of the internet. Among them, Google Chrome stands as a beacon of versatility and user-friendliness, offering a plethora of features to make our online journey smooth and enjoyable. One such feature, which often goes unnoticed but holds immense significance, is the bookmark management system.
In this blog post, I will walk you through the simple yet essential steps of importing, exporting, and saving bookmarks on Google Chrome. As someone who spends a considerable amount of time surfing the web, I have grown to appreciate the convenience and organization that bookmarks bring to my digital life. So, let’s delve into the nitty-gritty of bookmark management, sprinkled with my personal likes and dislikes, to help you navigate this feature with ease.
Understanding the importance of bookmarks
Before we dive into the technical aspects, let’s take a moment to appreciate the beauty of bookmarks. In my personal experience, bookmarks have served as a virtual library, allowing me to save, categorize, and revisit my favorite web pages with just a click. It’s like having a personal assistant who remembers all the interesting corners of the internet for you. However, I must admit, there have been times when I found myself with an overwhelming number of bookmarks, making it a tad bit difficult to find what I was looking for. Hence, learning to manage them effectively has been a game-changer for me.
Why you should care about bookmark management
- Time-saving: Once you get the hang of it, you would realize that bookmarks can save you a considerable amount of time, especially when you are researching or working on a project.
- Organization: Bookmarks allow you to categorize and organize your favorite web pages, making it easier to find them when needed. I personally love this feature as it helps me keep my digital space tidy and well-arranged.
- Ease of access: With bookmarks, you can access your favorite websites from any device, as long as you are logged into your Google account. This has been a lifesaver for me, especially when switching between devices.
Now, let’s move on to the main sections where I will guide you step-by-step on how to import, export, and save bookmarks on Google Chrome.
Getting started with bookmark management on Google Chrome
How to save bookmarks
Saving bookmarks on Google Chrome is a breeze. Here’s how you can do it:
- Open the webpage: Navigate to the webpage that you want to bookmark.
- Click on the star icon: You will find a star icon in the address bar, usually at the end. Click on it to save the webpage as a bookmark. Personally, I find the star icon to be a cute reminder of marking something ‘favorite’.
- Organize your bookmark: A small window will pop up, allowing you to edit the name of the bookmark and choose the folder where you want to save it. I usually prefer creating different folders for various categories, such as ‘Recipes’, ‘Work’, ‘Research’, etc.
- Saving the bookmark: Once you have made the necessary changes, click on ‘Done’ to save the bookmark.
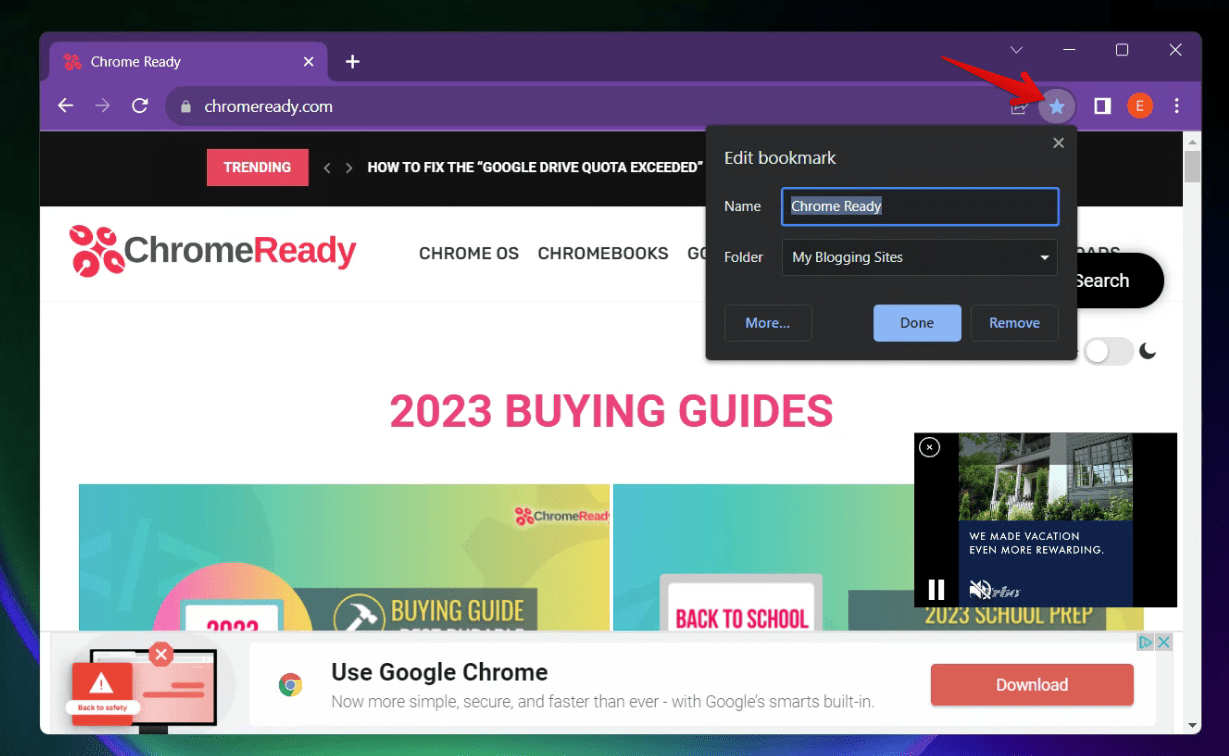
Bookmarking a site on Chrome
How to import bookmarks
If you are switching from another browser to Google Chrome, importing bookmarks is a feature that you would find extremely useful. Here’s how you can do it:
Step 1: Open the bookmark manager: Click on the three vertical dots at the top right corner of the browser, navigate to ‘Bookmarks’, and then select ‘Bookmark manager’. I must say, I find the bookmark manager to be a well-organized space where I can manage all my bookmarks efficiently.
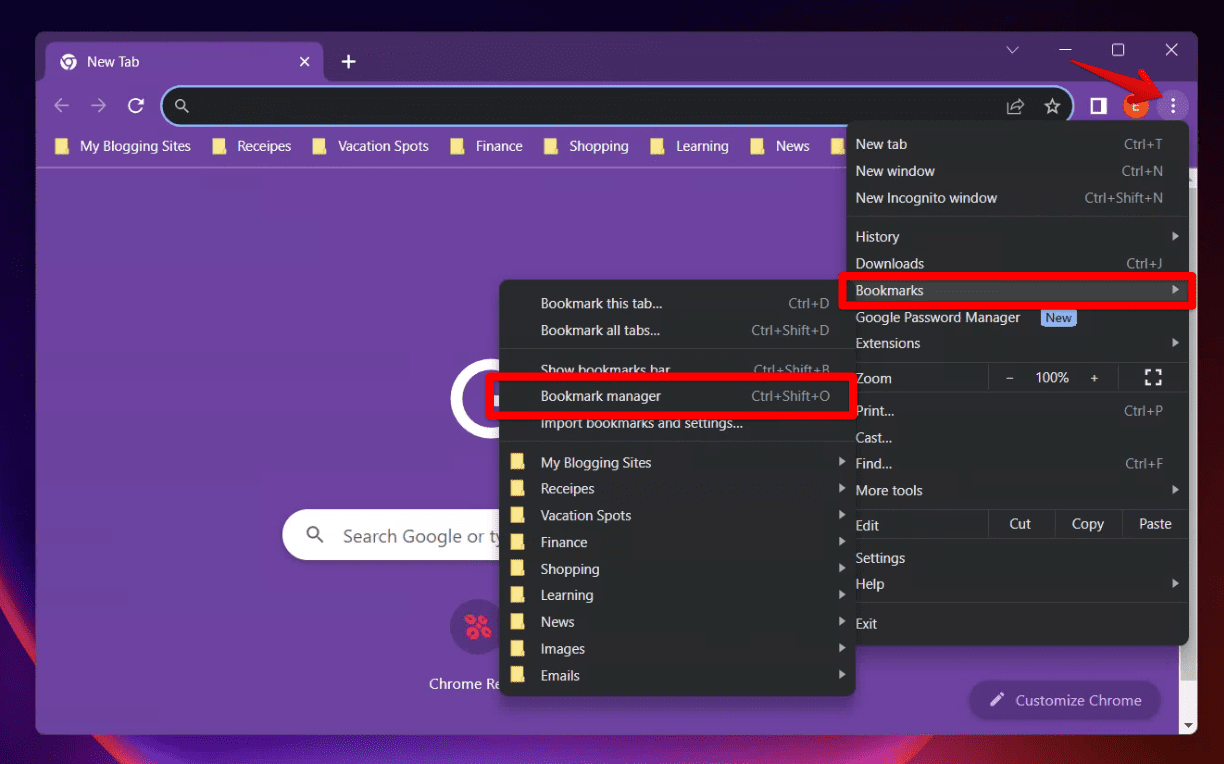
Launching Chrome Bookmarks Manager
Step 2: Import bookmarks: In the bookmark manager, click on the three vertical dots to open the menu and select ‘Import bookmarks’.
Step 3: Select the bookmark file: You would be prompted to select the bookmark file from your computer. Choose the file and click on ‘Open’ to import the bookmarks. The bookmarks file you imported from another browser or system will be in HTML format (.html).
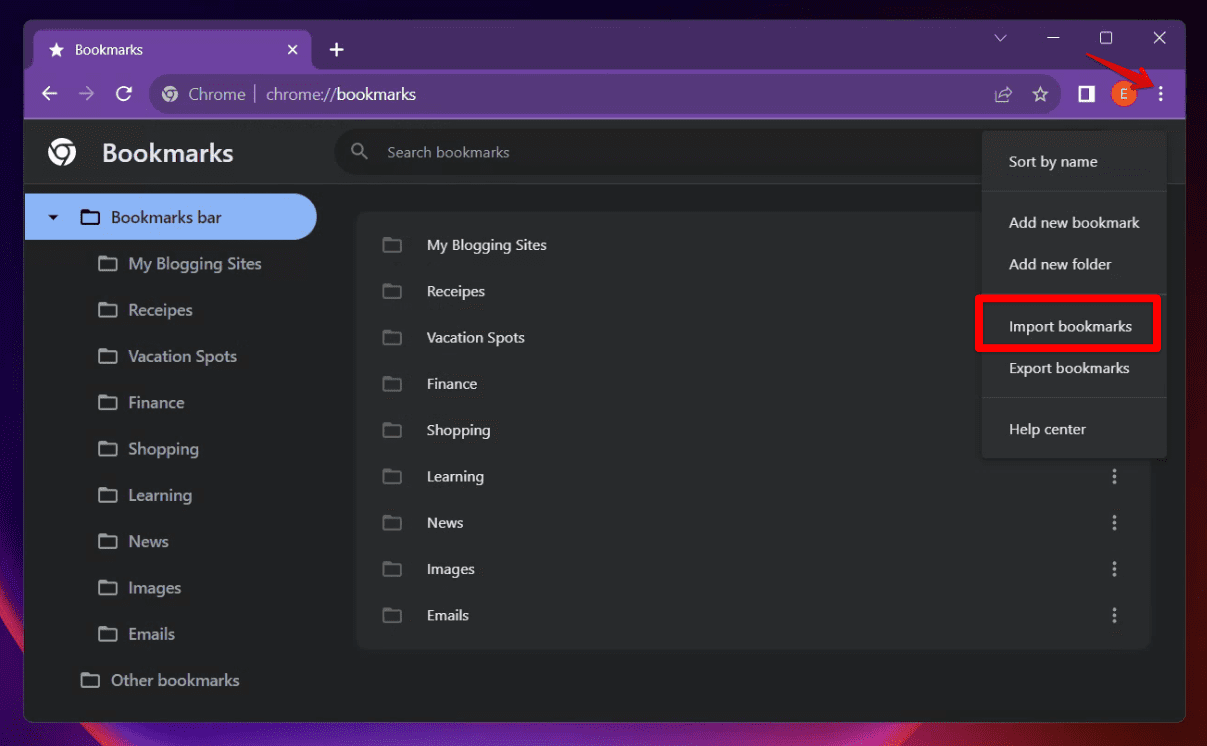
Import Bookmarks in Chrome
How to export bookmarks
Just like importing, exporting bookmarks is a straightforward process. Follow these steps to export your bookmarks from Google Chrome:
- Open the bookmark manager: As mentioned earlier, navigate to the bookmark manager by clicking on the three vertical dots at the top right corner, then ‘Bookmarks’, and ‘Bookmark manager’.
- Export bookmarks: In the bookmark manager, click on the three vertical dots to open the menu and select ‘Export bookmarks’.
- Save the bookmark file: You will be prompted to save the bookmark file on your computer. Choose a location and click on ‘Save’ to export the bookmarks.
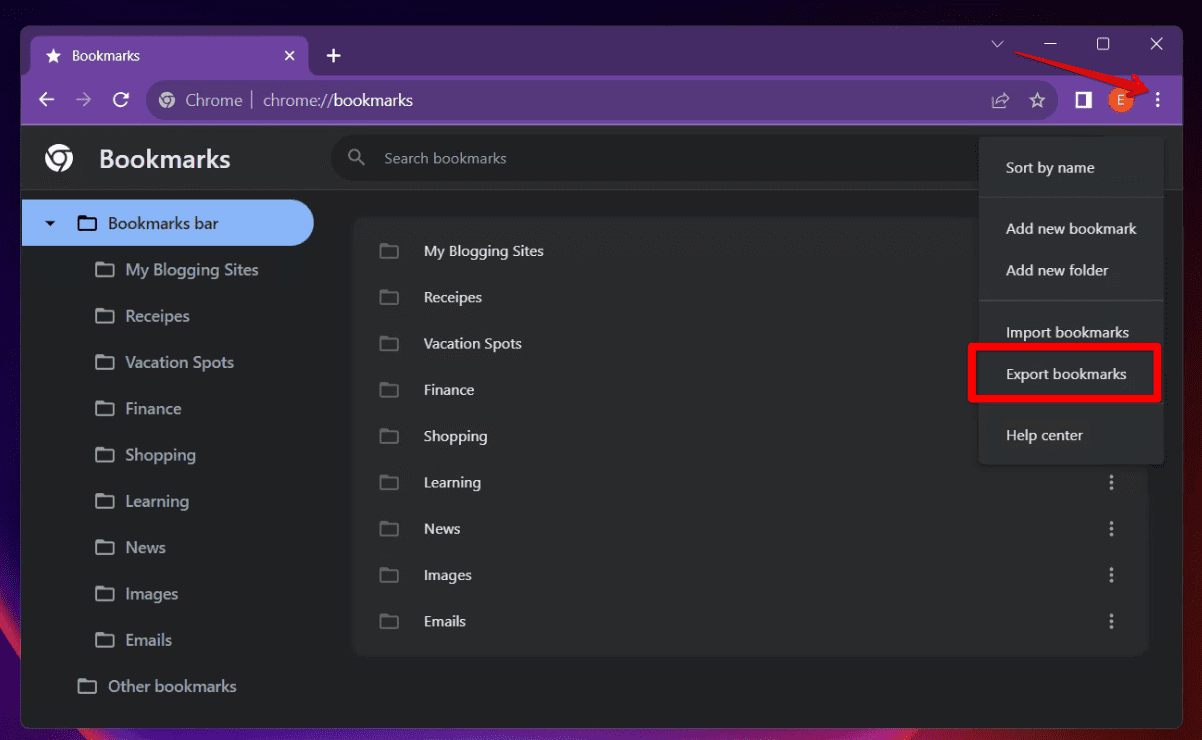
Exporting bookmarks in Google Chrome
I find the export feature particularly useful when I want to share a collection of bookmarks with my friends or colleagues. It’s a great way to share knowledge and resources with others.
Tips for effective bookmark management
Now that we have covered the basics, here are some tips that I have found to be extremely helpful in managing my bookmarks effectively:
- Regular cleaning: Every once in a while, take some time to go through your bookmarks and remove the ones that are no longer relevant. I usually do this once a month, and it helps me keep my bookmark library fresh and up-to-date.
- Using folders wisely: Create folders to categorize your bookmarks. This not only helps in organization but also makes it easier to find what you are looking for. I have a folder for almost everything, and it has been a great help in keeping things organized.
- Backup your bookmarks: It’s always a good practice to backup your bookmarks regularly. You never know when you might need to switch browsers or devices, and having a backup can save you a lot of trouble.
- Using keywords: When saving a bookmark, try to use keywords in the title that would help you find it easily later. I often include keywords that describe the content of the webpage, making it easier to locate when I search for it in the bookmark manager.
Harnessing the power of bookmark extensions
In my journey of exploring the functionalities of Google Chrome, I stumbled upon a treasure trove of extensions that can further enhance the bookmark management experience. These extensions add a layer of functionality that goes beyond the basic features, offering more control and customization. Here, I would like to share some of my favorite bookmark extensions and how they can make your life easier.
1. Bookmark Sidebar
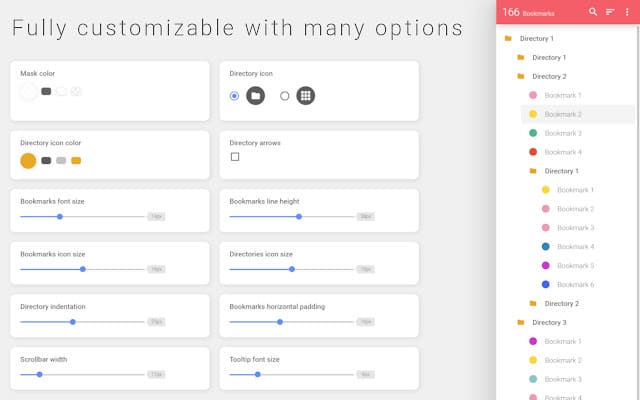
Bookmark Sidebar Chrome extension
I have always been a fan of quick access, and the Bookmark Sidebar extension has been a godsend in this regard. It allows you to access your bookmarks through a sidebar on the Chrome browser. You can easily drag and drop bookmarks and folders, making organization a breeze. I particularly enjoy the visual appeal it adds to the browser, making navigation fun and interactive.
2. SuperSorter
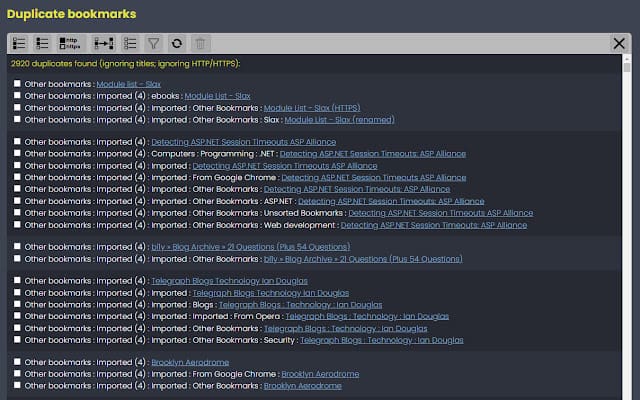
Supersorter Chrome extension
If you are someone who accumulates bookmarks at a rapid pace, like me, then SuperSorter is a tool you would appreciate. It helps in sorting bookmarks automatically, removing duplicates, and organizing them in a neat manner. I must admit, it has saved me from the daunting task of cleaning up my bookmark mess several times.
3. Raindrop.io

Raindrop.io chrome extension
Raindrop.io has been a revelation in my bookmark management journey. It not only allows you to save and organize bookmarks but also offers a visual representation of saved pages, making it easier to find what you are looking for. Moreover, it facilitates the sharing of bookmarks with others, which has been a fantastic feature for collaborative projects.
Sharing bookmarks with others: A collaborative approach
In the digital age, collaboration is key. Sharing bookmarks with others has opened up new avenues for learning and collaboration. Here, I would like to share some methods and personal experiences of sharing bookmarks with others.
1. Using the Bookmanager Speed Dial
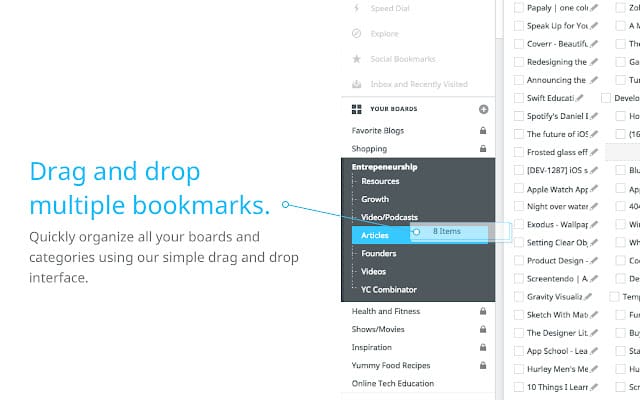
Bookmark Manager Speed Dial Chrome Extension
In my pursuit of efficiency and speed, the Bookmark Manager Speed Dial has been a remarkable find. This extension transforms your new tab page into a personalized bookmark manager, where you can access all your favorite websites with just a click. The visual speed dial makes it incredibly easy to find and open bookmarks, offering a graphical interface that is both pleasing and functional. Personally, I have found this to be a time-saver, especially when I am in a hurry and need to access my bookmarks quickly.
But the features don’t end here. One of the aspects I adore about this extension is its sharing capability. It allows you to share your bookmarks with others effortlessly, fostering collaboration and knowledge sharing. Whether it’s sharing a reading list with a group of friends or distributing resources among colleagues, this extension makes the process seamless. Personally, I have found this to be a time-saver, especially when I am in a hurry and need to access my bookmarks quickly, or when I want to share a collection of insightful articles with my network.
This modification adds a personal touch to the description of the Bookmark Manager Speed Dial extension, highlighting its sharing capabilities and how it can be a useful tool for collaboration and sharing resources with others. It integrates well with the theme of the blog, which emphasizes the convenience and collaborative potential of modern bookmark management tools.
2. Exporting and sharing bookmark files
As mentioned in the earlier section, you can export your bookmarks as a file and share it with others. This method is particularly useful when you want to share a large collection of bookmarks. I have used this method to share resources with my peers, and it has always been received with appreciation.
3. Collaborative bookmarking platforms
There are several platforms available that facilitate collaborative bookmarking. Platforms like Diigo allow users to create groups, share bookmarks, and even annotate web pages. I have been a part of several such groups, and it has been a rich source of knowledge and resources. Extensions like Bookmark Manager Speed Dial take bookmarking to a whole new level.
Syncing bookmarks across devices: Your personal web library on the go
In 2023, we are not confined to a single device. We constantly switch between smartphones, tablets, and computers. In such a scenario, syncing bookmarks across devices has been a feature that I have grown to love. It ensures that your personal web library is always with you, no matter which device you are using. Here’s how you can do it:
1. Enabling sync in Google Chrome
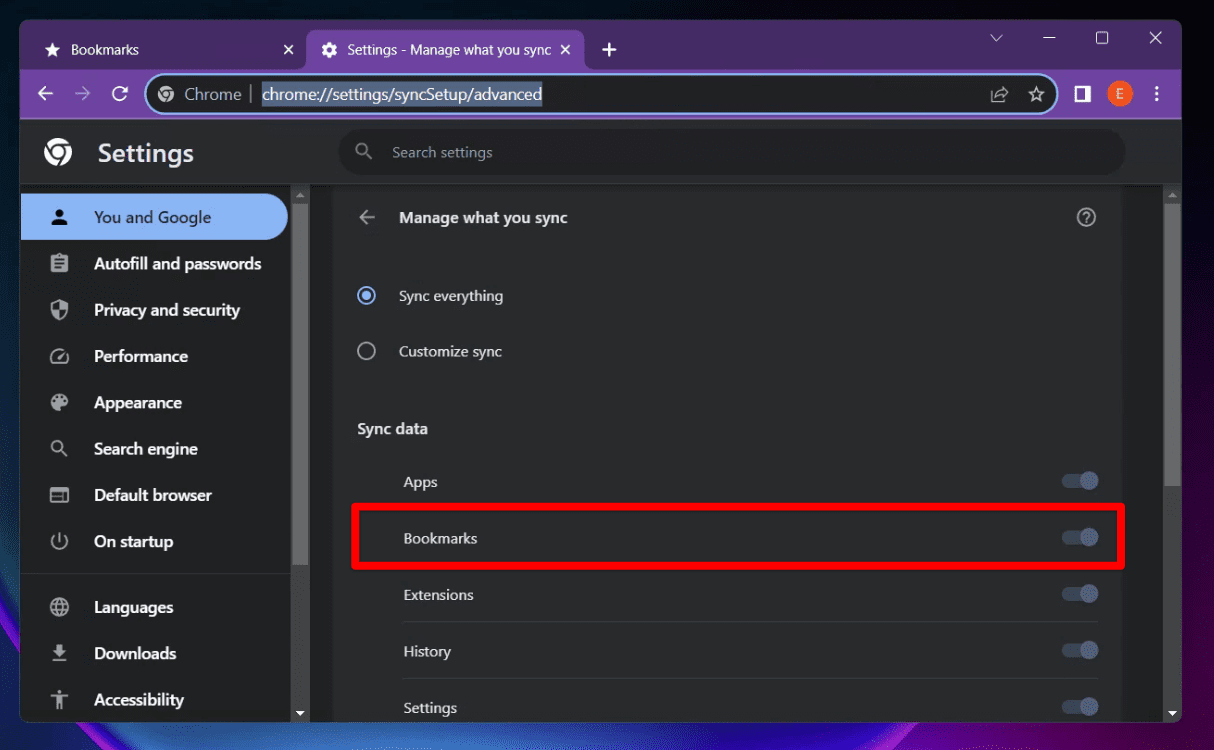
Sync setting in Chrome
To have your bookmarks with you on all devices, ensure that the sync feature is enabled in Google Chrome. You can do this by logging in with your Google account and enabling sync in the settings (chrome://settings/syncSetup/advanced). I cannot emphasize enough how this feature has made my life easier, allowing seamless transition between devices.
2. Using third-party bookmark syncing services
If for some reason, you are not using the sync feature of Google Chrome, there are third-party services available that allow you to sync bookmarks across devices. I have mentioned a few in this article above, and they offer a good alternative to the built-in sync feature.
3. Manual sync
Though not the most convenient method, you can also manually sync bookmarks by exporting them from one device and importing them on another. I have used this method in the past, and while it gets the job done, I would recommend using the sync feature for a smoother experience.
Conclusion
Managing bookmarks on Google Chrome in 2023 has become an art of convenience and collaboration. From harnessing the power of extensions to sharing bookmarks with a community of like-minded individuals, the possibilities are endless. Moreover, the ability to sync bookmarks across devices ensures that your personal web library is always at your fingertips, ready to assist you in your digital journey. I hope this comprehensive guide has equipped you with the knowledge and tips to navigate the world of bookmarks with ease and efficiency.
