If you’ve landed here, it’s quite likely that you are in the process of returning your Chromebook to its original, out-of-the-box state by removing Linux. Now, I have a bit of a soft spot for Linux. The penguin logo, the world of open source, and the sheer customization it offers has always appealed to me. But, I also understand that sometimes, we need to get back to basics, or perhaps, Linux just wasn’t your cup of tea. Whatever your reason, you’re in the right place. Let’s walk through the process step-by-step.
1. Understanding why you might want to remove Linux
Before diving deep, let’s pause for a moment. Why remove Linux? For some, the initial lure of diving deep into Linux’s world might fade away as the learning curve becomes steeper. For others, it might be about space constraints or optimizing performance. Maybe you got a bit experimental (like I often do) and now just wish to revert to the comfort of familiar Chrome OS grounds.
2. Back up your important data (If you choose method 3 and higher)
The golden rule: Always back up. I cannot emphasize this enough. I’ve learned this the hard way (lost some treasured pictures of my pet cat, Whiskers, once). Whether you’ve stored personal files, important documents, or those vacation photos, ensure they are saved safely elsewhere before you start.
How to backup:
- Refer to our detailed guide: How to back up and restore your Chromebook data
Below are quick steps from the detailed article:
- External Hard Drive: The old-school method. Plug it in, transfer files, and you’re good.
- Google Drive: Since you’re on a Chromebook, you probably have a Google account. Make use of the Google Drive space.
- Cloud Services: Other cloud services like Dropbox, OneDrive, etc., are also an option.
3. Removing Linux from Chromebook
There are multiple methods to install Linux on a Chromebook, which implies that there are also various ways to uninstall it. To ensure a smooth process, it is recommended to follow the same tutorial used for installation, starting with the easiest method and progressing from there.
Method 1: Through the Settings app
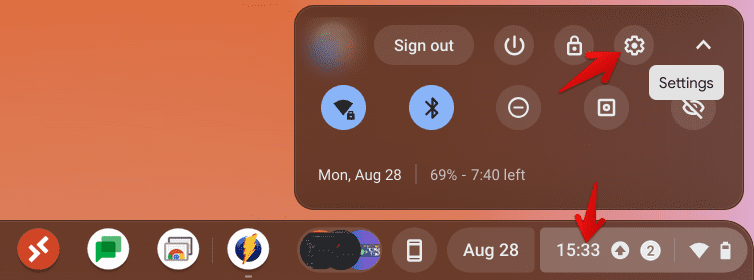
Open the Settings app.

Opening ChromeOS Settings
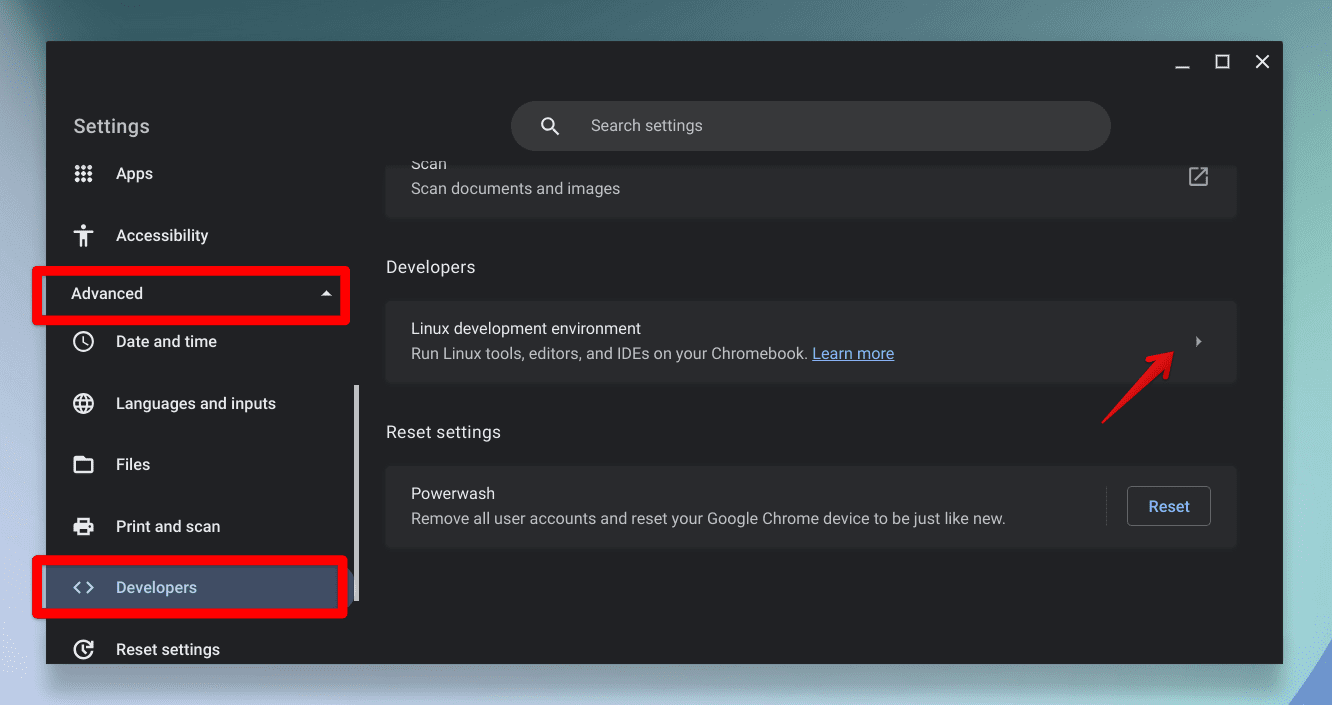
Click on Advanced > Developers. Then on the right side, click on “Linux development environment”.

ChromeOS Advanced Settings
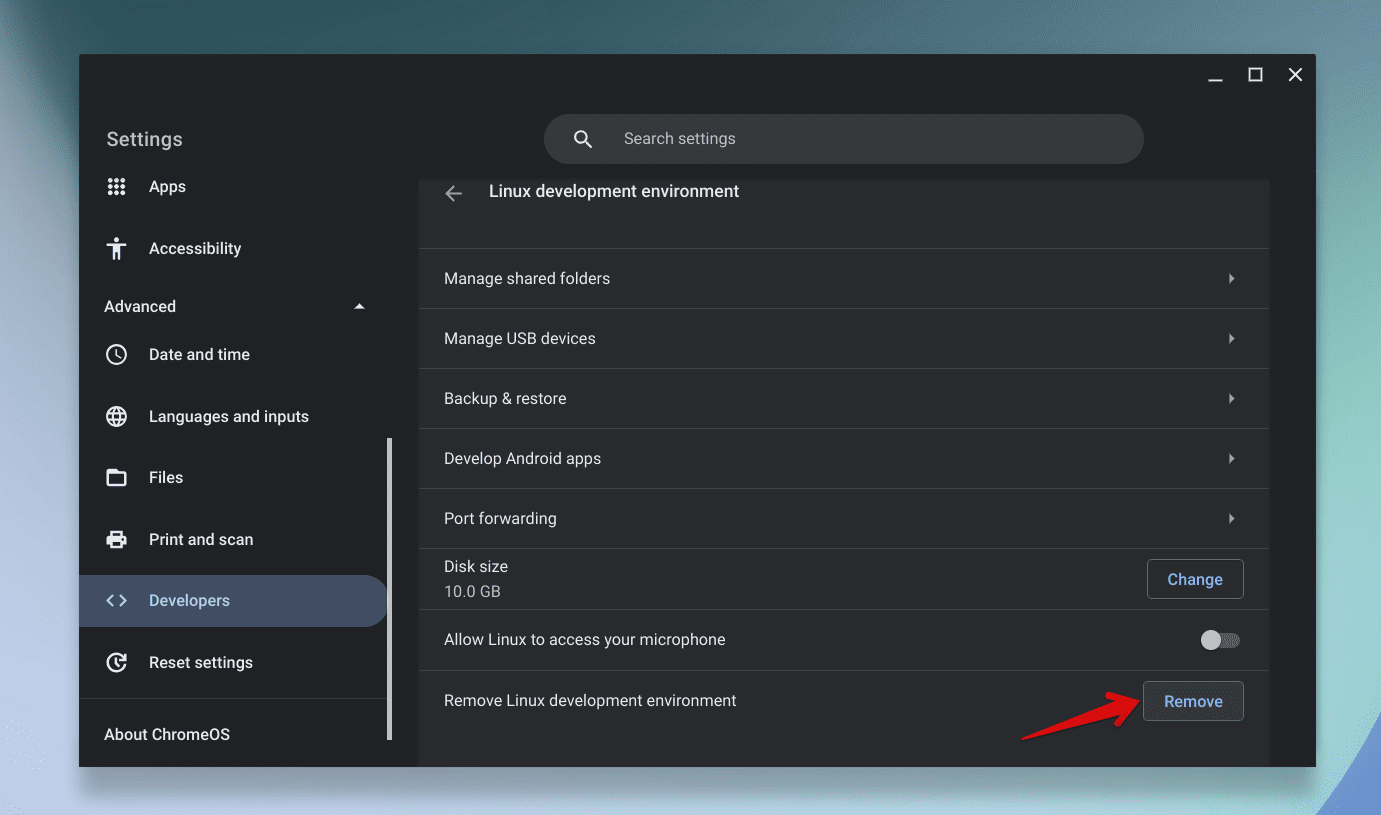
Under Linux development environment, click on Remove.

Removing Linux from ChromeOS
Click on Delete to confirm and proceed with the simple on-screen instructions to uninstall Linux. That’s it!
Method 2: Through the terminal
Open a terminal window.
Type the following command:
sudo delete-chroot *
Press Enter.
Type the following command:
sudo rm -rf /usr/local/bin
Press Enter.
This will remove all Linux files and folders from your Chromebook.
Method 3: For those who installed Linux using Crouton

Crouton
If you installed Linux using the Crouton method, you will need to put your Chromebook in Developer Mode before you can remove it. This will erase all your files and settings, so make sure to back up anything important before you do this.
To put your Chromebook in Developer Mode, follow the below summarized steps. For a detailed walk-through with screenshots, refer to our article: How to enable Developer mode on a Chromebook
- Turn off your Chromebook.
- Press and hold the Esc key and the Refresh key at the same time.
- While holding these keys, press the Power button.
- Release all the keys when you see the Chrome OS recovery screen.
- Click on Advanced.
- Click on Enable Developer Mode.
- Click on Restart now.
Once your Chromebook has restarted, you can follow the instructions above to remove Linux.
Method 4 : Powerwash: The first step to cleanliness

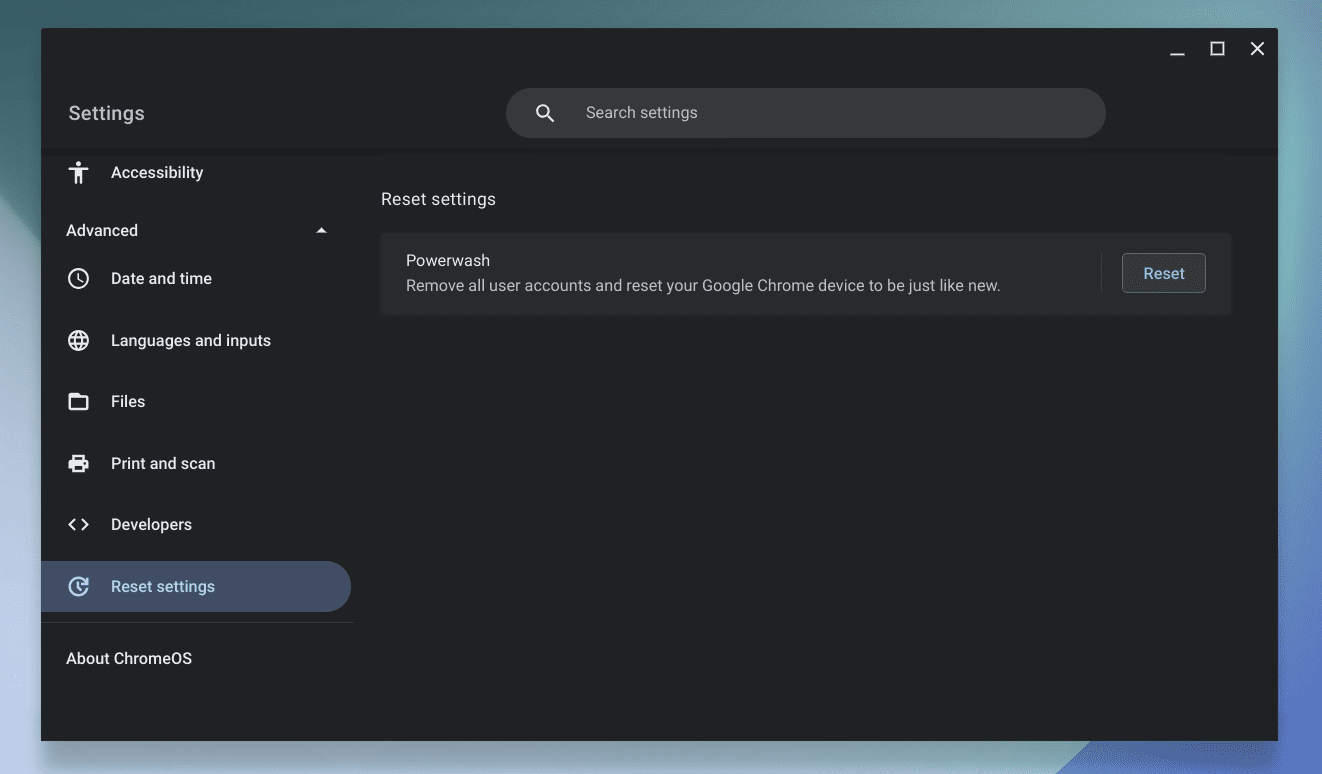
Resetting Chromebook
Powerwashing is Chromebook’s factory reset feature. It will remove all user accounts and locally stored data, returning your device to its original state. This process also deletes Linux if you installed it via the Linux (Beta) feature.
Here’s how to do it: How to Powerwash (Reset) a Chromebook
Below are quick steps for your reference:
- At the bottom right, select the time.
- Select the Settings gear icon.
- In the bottom left, select Advanced.
- Under “Reset settings”, select Powerwash > Restart.
- In the box that appears, select Powerwash > Continue.
Your Chromebook will restart, and you will need to set it up again, sans Linux.
Method 5. Dealing with a dual-boot scenario
Now, if you went the extra mile and set up a dual-boot scenario with ChrUbuntu or something similar, the process is a bit more intricate. Here, Powerwash won’t do the trick. Let’s break down the steps.
Removing via Chrome OS:
- Boot into Chrome OS.
- Open a terminal by pressing
CTRL + ALT + T. - Type
shelland press enter. - Now, if you have ChrUbuntu, type
sudo cgpt add -i 6 -P 0 -S 1 /dev/sdaand press enter.
This will make Chrome OS the default again.
Removing the dual-boot partition:
For this, we will need to enter the scary-sounding “Developer Mode.” Fear not! I promise it’s not as intimidating as it sounds.
- First, let’s start your Chromebook. If you see a warning that says, “OS verification is OFF”, press
CTRL + D. - When the transition screen appears, press the
SPACEbar. - Follow the on-screen instructions to enable developer mode.
Once you’re in Developer Mode:
- Press
CTRL + ALT + Tto open a terminal. - Type
shelland press enter. - To remove the partitions created for Linux, type
sudo rm -rf /usr/local/and press enter.
Remember, this is powerful stuff! The commands can be as destructive as fire if misused. Always double-check what you’re typing.
Method 6. Restore Chrome OS with a Recovery Drive
There were times when I, in my overzealous attempts at customization, messed things up royally. If you feel you’ve gone down a rabbit hole, and wish to start fresh, restoring Chrome OS via a recovery drive is a fantastic option.
Refer: Chrome OS recovery is simpler than you think
Creating a Recovery Drive:
- On another computer (not your Chromebook), install the Chromebook Recovery Utility from the Chrome Web Store.
- Launch the app and follow the on-screen instructions to create a recovery drive. For detailed steps, refer: How to create a Chromebook Recovery USB drive
Using the Recovery Drive:
- Plug the recovery drive into your Chromebook.
- Hold down
ESC + Refreshand then press the power button. This will reboot your Chromebook into Recovery Mode. - Follow the on-screen instructions and select the recovery media you’ve inserted.
- Once the process is finished, your Chromebook will reboot, and you’ll be greeted with a fresh Chrome OS.
Revisiting your choice
With Linux out of the picture, it’s time to embrace Chrome OS wholeheartedly again. But remember, the beauty of technology is in the freedom to experiment, adapt, and grow. Maybe Linux wasn’t right for you now, but who knows about the future?
Final thoughts
Navigating the tech world, especially with something as intricate as Linux, is like a roller coaster ride. There are highs, lows, and occasionally, you might want to get off the ride and try something different. That’s perfectly okay. It’s all part of the journey.
If you ever feel the itch to go back to Linux, remember, it’s just a few clicks away. But for now, relish the simplicity and efficiency of your Chromebook. Until next time, happy computing!
