When I first began my journey into the digital realm, I was lost in a sea of formats, browsers, and multimedia players. If you’re anything like me, you’ve probably faced the same confusions. Today, I want to share with you the ins and outs of playing audio files on Chrome. Let’s dive in!
The basics: Understanding Chrome’s built-in capabilities
Chrome, by default, is pretty impressive when it comes to multimedia capabilities. From my earliest memories of using the browser (oh, the days when I discovered endless cat videos), I have been a fan of how intuitive and user-friendly it is.
However, I must admit, I’ve had moments of frustration (more on that later). Here’s a basic rundown of Chrome’s capabilities:
- Supported audio formats: Chrome can handle various formats such as MP3, WAV, and OGG without breaking a sweat. Additional information regarding the formats will be provided later in this article.
- Drag and drop feature: One of my absolute favorite features. You can drag and drop an audio file directly into a Chrome tab, and it starts playing.
- Playback controls: Chrome offers play/pause, a slider for progress, and volume control. Simple, yet effective!
Methods to play audio files on Chrome
Local playback
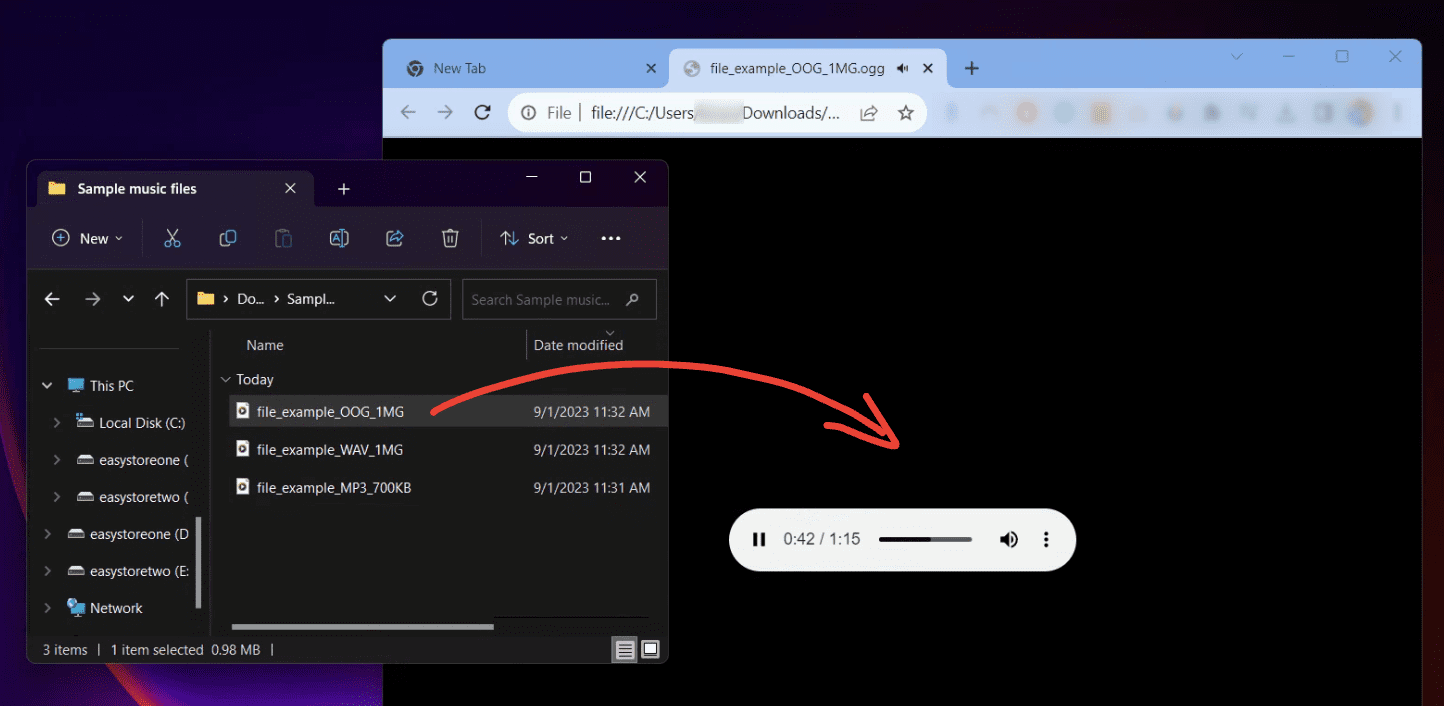
Opening audio files on Google Chrome
- Drag and drop: As I mentioned earlier, just open Chrome, grab your desired audio file, and drag it into an open tab. Voila! It’s almost magical.
Online playback
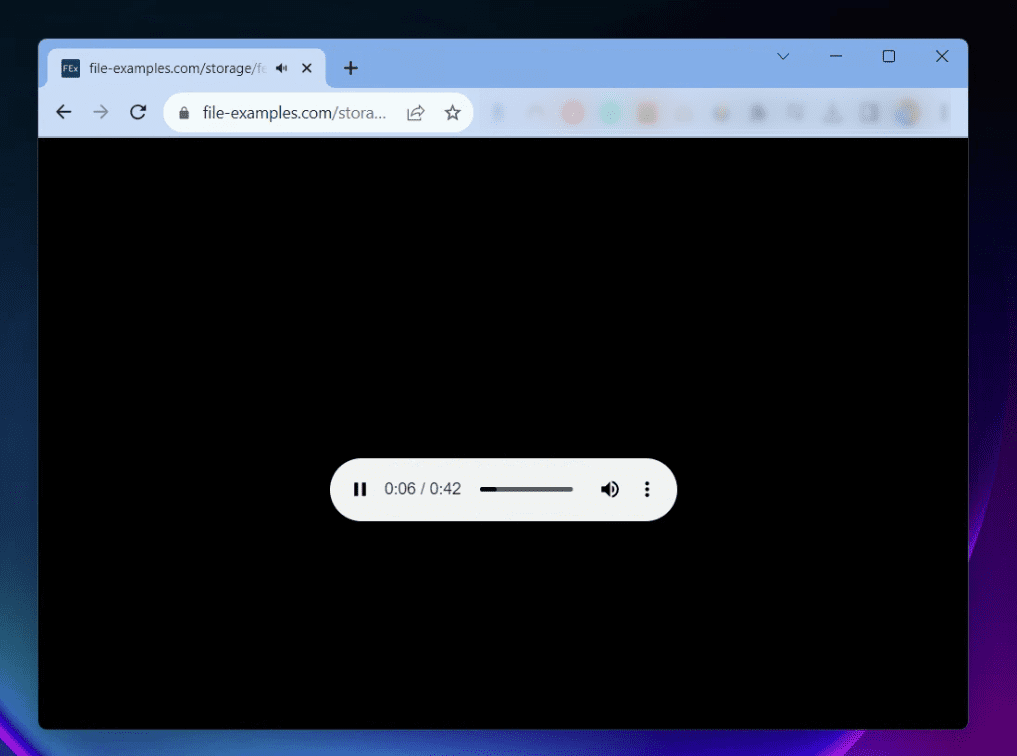
Playing online music file directly in Chrome
- Most audio files hosted online will automatically play when you visit the link on Chrome. Websites like SoundCloud or Spotify have their own built-in players.
Using extensions: One day, I stumbled upon a minor hiccup. I was trying to play a less common audio format. This is where Chrome extensions came to the rescue! There are numerous extensions available that can enhance the audio playback experience.

Audio Player extension for Chrome
Recommendation: I personally love the “Audio Player for Chrome” extension. It’s user-friendly and supports a variety of formats. You need to simply drag and drop the audio file on to its interface. If your operating system doesn’t permit installing a media player or you’re using Chromium OS, this extension can be helpful. It’s also useful if you want to play only the audio stream. Most media players can only handle both video and audio. For example, if you have a recorded media file from a concert and you only want to listen to the audio while working, this extension can help.
Tips and tricks for a smooth audio playback experience on Chrome
- Avoid having too many tabs open: I’m guilty of this. At one point, I had so many tabs open that my computer began to lag. If you’re playing audio, especially high-quality tracks, limit the number of unnecessary tabs.
- Keep Chrome updated: Sometimes, I’d notice minor glitches in playback. Keeping Chrome updated often solved these issues.
- Watch out for auto-playing ads: There have been instances where I’d be deep into a podcast episode and suddenly, an ad starts blaring! My tip: always be ready with the mute button or use ad-blockers.
Casting media to available devices: A seamless audio experience
Amidst my exploration of Chrome’s audio capabilities, I had one of those eureka moments – the discovery of casting media. You might wonder, “Why cast when you can listen directly?” Well, sometimes, you just want to fill the room with your favorite tunes or share a podcast episode with a group. And that’s where casting comes into play!
Why Cast audio from Chrome?
Before we dive into the how-to, let’s understand the why. Imagine you have a stellar sound system or a smart TV in your living room. You’re playing an audio file on your laptop in Chrome. Instead of restricting that sound to your laptop, casting lets you play the audio through that superior sound system, enhancing the overall experience.
How to cast audio from Chrome
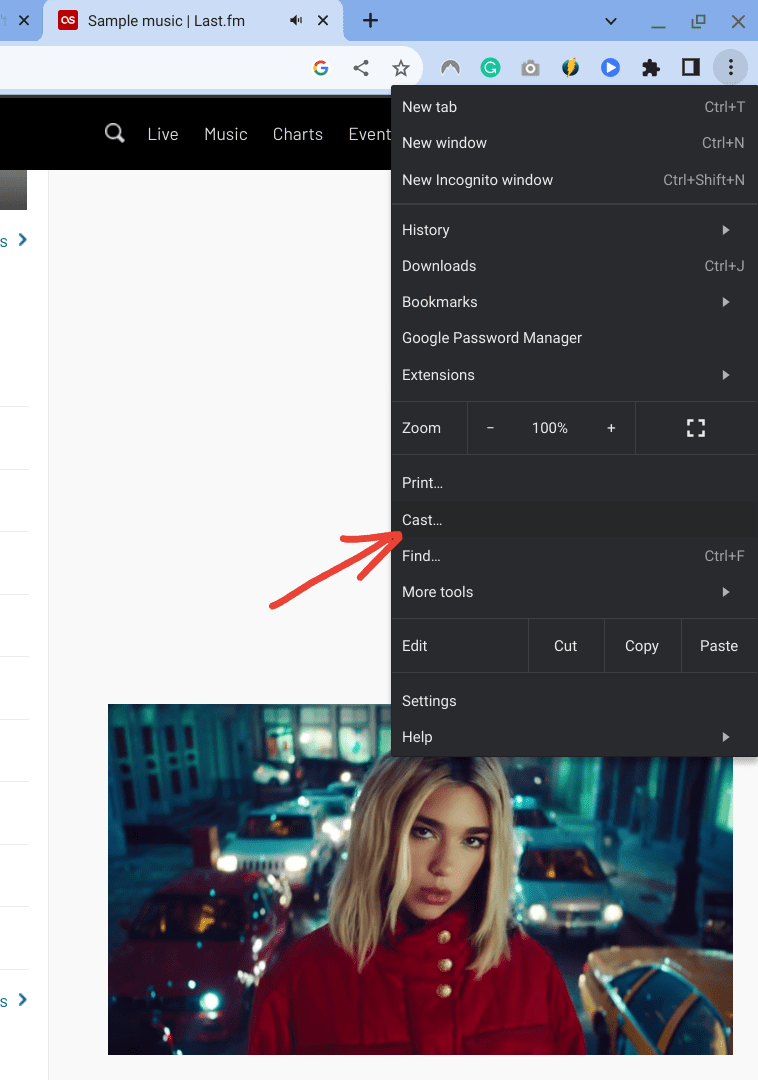
Casting music to streaming devices
- Check your setup: First and foremost, ensure your Chromecast (or any compatible device) is set up correctly and connected to the same Wi-Fi network as your computer.
- Play your audio file: Begin by playing the desired audio file in Chrome.
- Access the Cast option: Click on the three vertical dots at the top right corner of Chrome. From the dropdown menu, you should see the “Cast” option.
- Choose your device: Once you select “Cast”, Chrome will search for available devices. Simply select your Chromecast or other compatible devices from the list.
- Enjoy the sound: Your audio file should now play through the selected device. And believe me, the first time I cast an audio book to my living room speakers, it felt like magic!
Things I adore about casting from Chrome
- Flexibility: I can move around my home without lugging my laptop. Perfect for those days when I’m multi-tasking or just want to relax on the couch.
- Quality: Casting often delivers better audio quality, especially if you’re sending the sound to a superior system.
Minor hiccups I’ve encountered
- Connectivity issues: Every now and then, there might be slight delays or disconnections. Ensure your Wi-Fi signal is strong and devices are properly set up to mitigate this.
- Device compatibility: Not all devices are Chromecast-friendly. It’s essential to check compatibility before planning a casting session.
A Little Tip: If you frequently cast media, consider adding the Cast button directly to your Chrome toolbar. This way, it’s just a click away! Simply right-click on the Cast icon when it appears and choose “Always show icon”.
Adding cast icon to Chrome
Playing music or sound across Chrome tabs: A multi-tab symphony
In the sprawling realm of Chrome, there’s one scenario that nearly stumped me: playing music or sound across multiple tabs. It’s a unique challenge, especially when I’m researching, working, and entertaining myself simultaneously. And if you’ve ever had the joy (read: slight confusion) of managing sound from multiple sources in Chrome, you’ll relate wholeheartedly to this.
Why play sound across multiple Chrome tabs?
At first, I wondered, “Why on Earth would anyone want sounds from different tabs playing at the same time?” But then came scenarios like:
- Listening to soft background music on one tab while watching a muted tutorial on another.
- Having a timer or alarm set on one tab, while enjoying a podcast on another, ensuring you don’t miss any reminders.
- Participating in a muted webinar while playing your own motivational playlist in the background.
Managing sound across multiple tabs
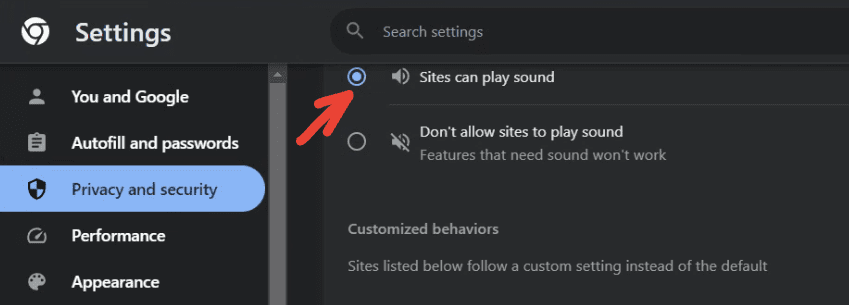
Enable sites to play audio in Chrome
To play music or sound across Chrome tabs, you first need to enable the “Sites can play sound” option in Chrome’s sound settings. You can do this by opening Chrome and going to chrome://settings/content/sound. Once this option is enabled, you can start playing music or sound on any tab. The audio will continue to play even if you switch to a different tab.
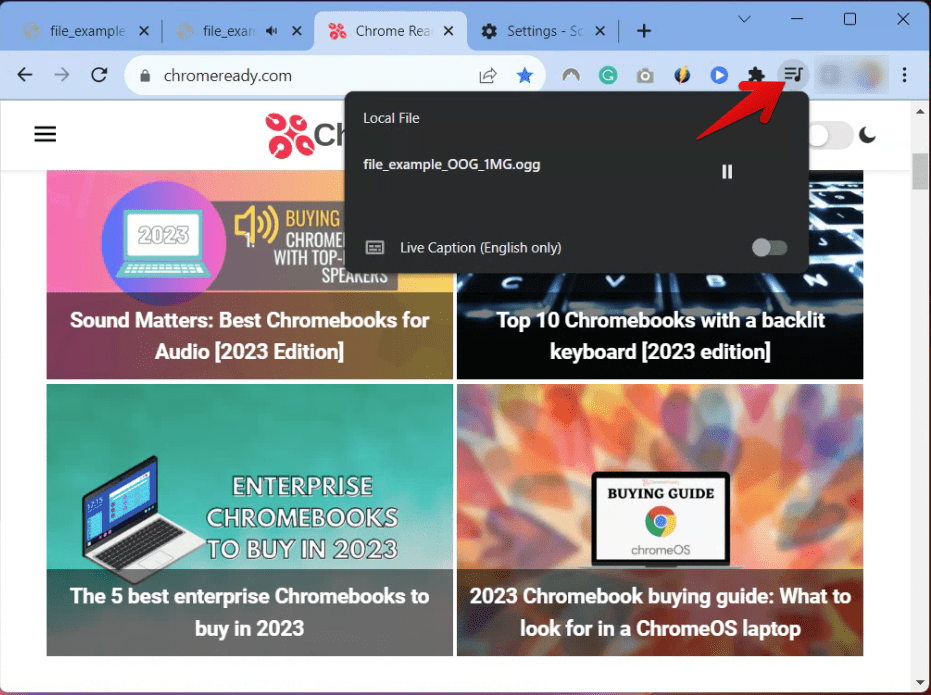
Playing audio across tabs in Chrome
You can control the sound of each tab individually by clicking on the media controls in the top right corner of the tab. These controls allow you to pause, play, skip forward or backward, and adjust the volume of the audio.
If you want to stop all audio from playing, you can click on the speaker icon in the taskbar. This will mute all audio from all tabs.
Tips for harmonious playback across tabs
- Prioritize your tabs: Decide which sound is primary and which is secondary. For instance, I’d keep my podcast volume up and my background music lower. This way, you can enjoy both without feeling overwhelmed.
- Limit simultaneous audio sources: It might seem enticing to have sounds from multiple tabs, but it can get chaotic. A personal rule I’ve set is not to have more than two tabs playing sound simultaneously.
- Use headphones: It might sound basic, but using headphones can offer a clearer distinction between sounds from different tabs compared to external speakers.
My love-hate relationship with multi-tab audio
What I cherish:
- Multitasking: As someone who thrives on multitasking, having sound across multiple tabs means I can learn, work, and relax, all at once.
- Personalized soundscapes: Combining sounds from different sources, like rain sounds from one tab and a piano playlist from another, creates a unique soundscape.
Challenges I’ve faced:
- Overlapping voices: Trust me, listening to two podcasts at once is not enlightening – it’s confusing!
- Losing track: Sometimes, hunting down which tab is playing sound becomes a game. Thankfully, the audio icon on the tab saves the day!
Changing your default sound permissions on your computer
As I ventured deeper into the intricacies of audio in Chrome and beyond, another dimension opened up before me: the realm of sound permissions. Believe it or not, managing sound permissions can be as crucial as the playback features themselves. After all, in today’s digital age, privacy and control go hand in hand.
Why adjust sound permissions?
Ever stumbled upon a website that instantly plays a loud advertisement or background music? Or perhaps, you’ve noticed some sites requesting microphone access without clear reason. Adjusting sound permissions means you decide what plays, when, and how.
Steps to change default sound permissions
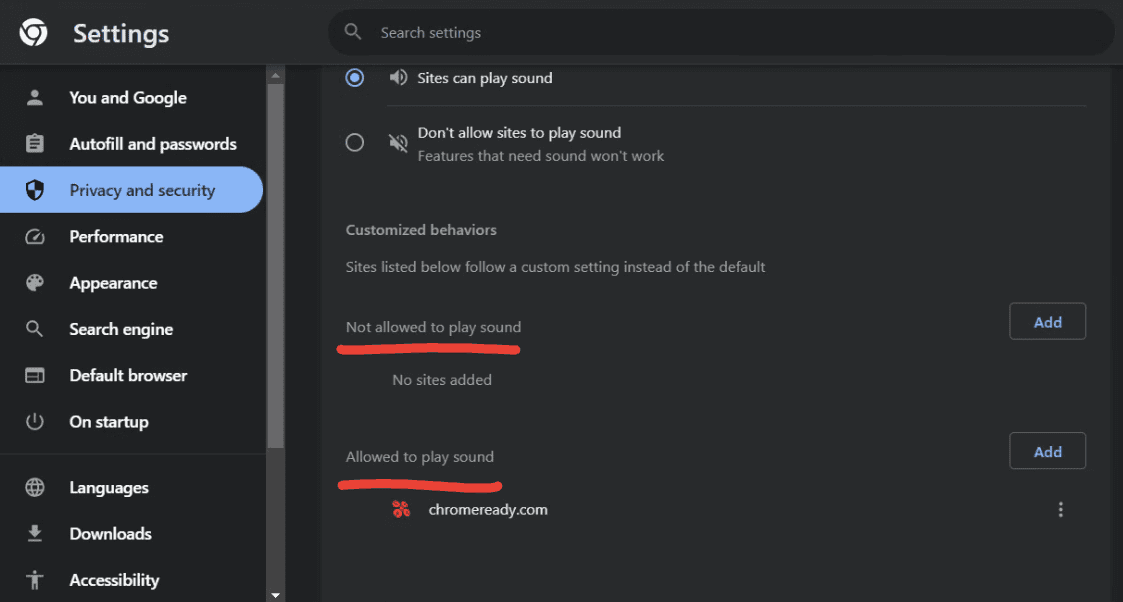
Allowing and not allowing sites to play sound through Chrome
- Access Chrome settings: Click the three vertical dots on the top right corner, then ‘Settings’.
- Navigate to Privacy: Scroll down to ‘Privacy and security’, click on ‘Site Settings’.
- Manage sound permissions: In the permissions section, you’ll find ‘Sound’. Here, you can customize which websites are allowed to play sound and which aren’t.
Personal experiences and recommendations
What I truly appreciate:
- Control: I can’t emphasize enough how empowering it feels to control which applications and websites can play sound.
- Peace of mind: Knowing that a random ad won’t start blaring when I’m in a serene mood or during a quiet night is priceless.
Challenges I’ve encountered:
- Over-customization: Initially, I went a bit overboard and restricted sound on several sites. It was a tad frustrating when I later visited a site and wondered why the sound wasn’t playing!
A Pro tip: Regularly review your sound permissions, especially within Chrome. As you visit new sites and try out new applications, your preferences might change. It’s always a good idea to do a quarterly review and make necessary adjustments.
Which audio formats does Chrome support?
Chrome supports the following audio formats:
- AAC (MPEG-4 Audio): This is a lossy compression format that is commonly used for streaming audio. Chrome supports the Main, LC, and HE profiles of AAC.
- FLAC (Free Lossless Audio Codec): This is a lossless compression format that preserves the original audio quality. Chrome supports FLAC files up to 96 kHz/24 bit.
- MP3 (MPEG-1 Audio Layer III): This is a lossy compression format that is one of the most popular audio formats. Chrome supports MP3 files up to 320 kbps.
- Opus (Open Audio Coding): This is a royalty-free lossy compression format that is designed for high-quality audio streaming. Chrome supports Opus files up to 512 kbps.
- Vorbis (Ogg Vorbis): This is a free and open-source lossy compression format. Chrome supports Vorbis files up to 48 kHz/16 bit.
- WAV (Waveform Audio File Format): This is an uncompressed audio format. Chrome supports WAV files with PCM encoding.
In addition to these audio formats, Chrome also supports the following container formats:
- MP4 (MPEG-4 Part 14): This is a container format that can store audio, video, and subtitle data.
- Ogg (Ogg Media File): This is a container format that can store audio, video, and text data.
- WebM (WebM container format): This is a container format that is specifically designed for the web. It can store audio, video, and text data.
It is important to note that the audio formats that Chrome supports may vary depending on the operating system and device. For example, Chrome on Android supports a few additional audio formats, such as AMR and WMA.
My personal favorites (and not-so-favorites)
As with all things in life, I have my personal likings and dislikings when it comes to playing audio on Chrome.
Things I love:
- Speed: Chrome is quick. Whether it’s local or online playback, Chrome doesn’t make me wait.
- Simplicity: No complicated settings. Just straightforward playback controls.
Things I wish were better:
- EQ settings: I sometimes wish Chrome had in-built equalizer settings. As someone who loves tweaking audio outputs to perfection, this is a slight disappointment.
- Better integration with other Google services: With Google being the tech giant, I wish there was a smoother integration with services like Google Drive for direct audio playback.
To conclude: The world of audio in Chrome
There we have it, a detailed dive into playing audio files on Chrome. Whether you’re a casual listener or an audio aficionado, Chrome has something for everyone. From its quick drag-and-drop feature to the plethora of extensions available, the possibilities are almost endless.
Yet, as with any tool, Chrome is not without its quirks. But in the grand tapestry of online audio, I find Chrome to be a reliable and efficient ally.
So, the next time you find yourself with an audio file in hand, remember this guide, open up Chrome, and lose yourself in the world of sound. Until next time, happy listening!
