Ah, the world of technology. A double-edged sword. On one hand, it blesses us with convenience and quick access to vast information. On the other, it occasionally fills our lives with unnecessary clutter, like a laundry list of saved Wi-Fi networks that we might have connected to just once. If you’re a proud Chromebook owner like me, you know exactly what I mean.
Over time, you would have accumulated a myriad of Wi-Fi networks, from that one time at a friend’s place to that café where the coffee was, well, questionable. The real dilemma? Figuring out how to clear this long list and return to digital simplicity. Don’t worry, my friend. I’m here to help. Let’s deep dive into the world of Chromebook and learn how to clean up those preferred Wi-Fi networks.
Understanding the importance of a clean Wi-Fi list
Before we begin, let’s understand why this exercise is so essential. Remember, our devices reflect our state of mind. If they’re cluttered and disorganized, chances are our thoughts are too. A streamlined list of Wi-Fi networks ensures:
- Speedy connections: No more waiting as your Chromebook decides between twenty networks.
- Enhanced security: Less chance of connecting to a dubious network.
- Simplicity: And let’s be honest, who does not love simplicity?
Step-by-step guide to cleaning up Wi-Fi networks on Chromebook
1. Booting up your Chromebook
Let’s start with the basics. If you’re a seasoned Chromebook user, you would already know how swiftly these devices boot up. Yet, every time I switch mine on, it surprises me with its speed. A small joy of life, I must say. Turn on your Chromebook and log in to your account. If you’re using it after a while, take a moment to admire its clean interface. There’s something genuinely refreshing about it, isn’t there?
2. Navigate to the settings menu
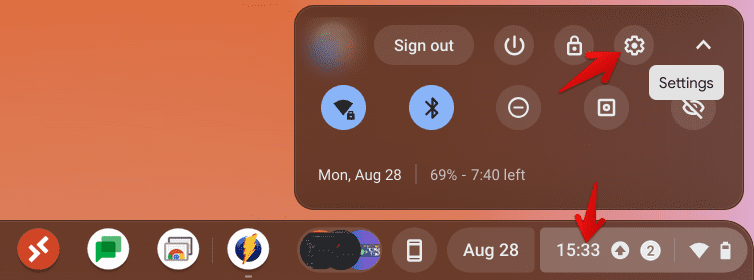
Once logged in, you’ll find the status area at the bottom right corner of the screen. This is where you see the time, battery, and the all-important Wi-Fi icon. Click on it.
3. Opening up the network settings
Upon clicking the Wi-Fi icon, a list of available networks would appear. But that’s not what we’re here for. Instead, look for the ‘Settings’ option, which looks like a gear icon. Ah, the Settings menu! This place reminds me of the storeroom at my grandmother’s place. So many memories, and yes, so much clutter.

Opening ChromeOS Settings
4. Delving into the Wi-Fi networks
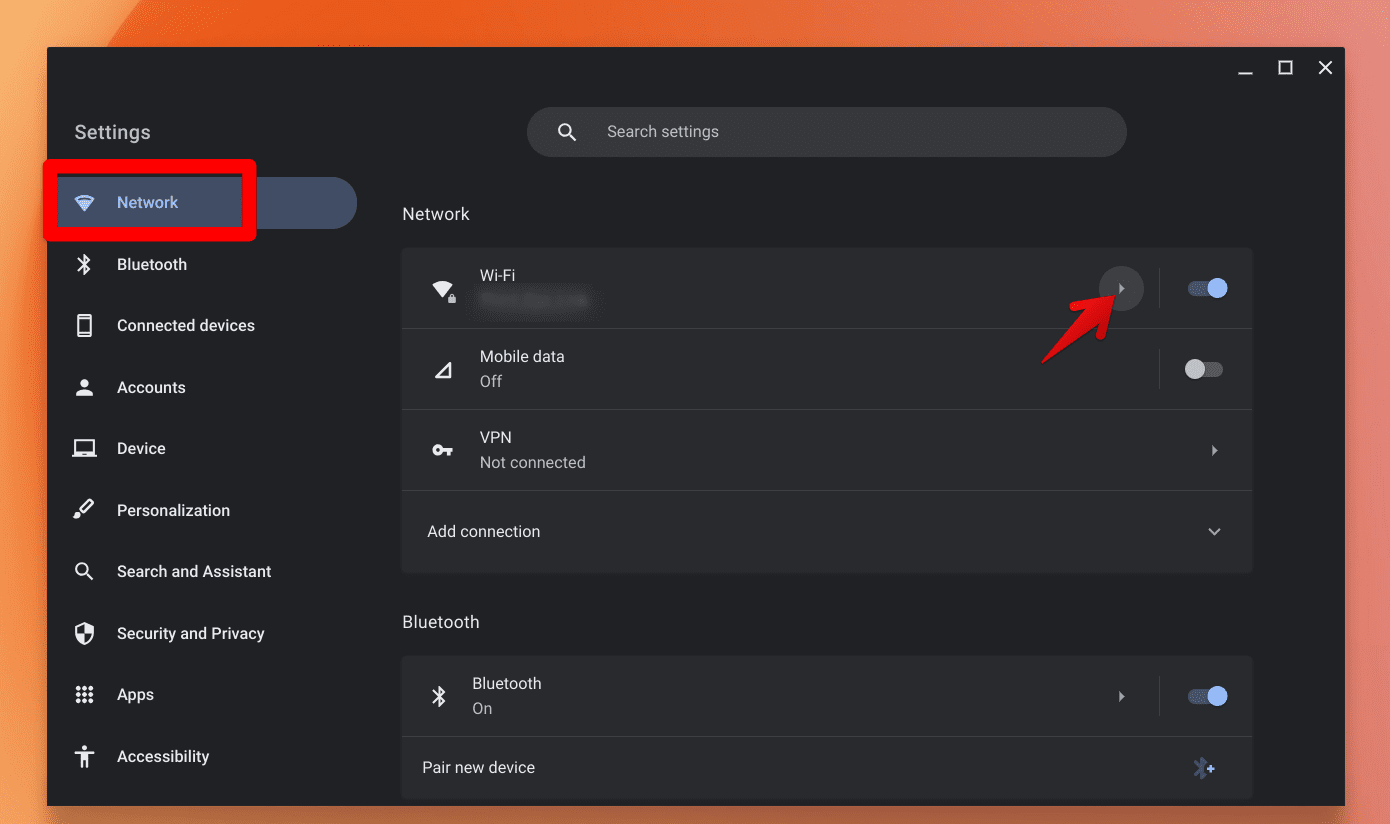
In the Settings menu, you’ll notice a section titled “Network.” Go ahead and click on it. This will reveal the Wi-Fi networks section. Click on the arrow next to the Wi-Fi.

Wi-Fi Settings on Chromebook
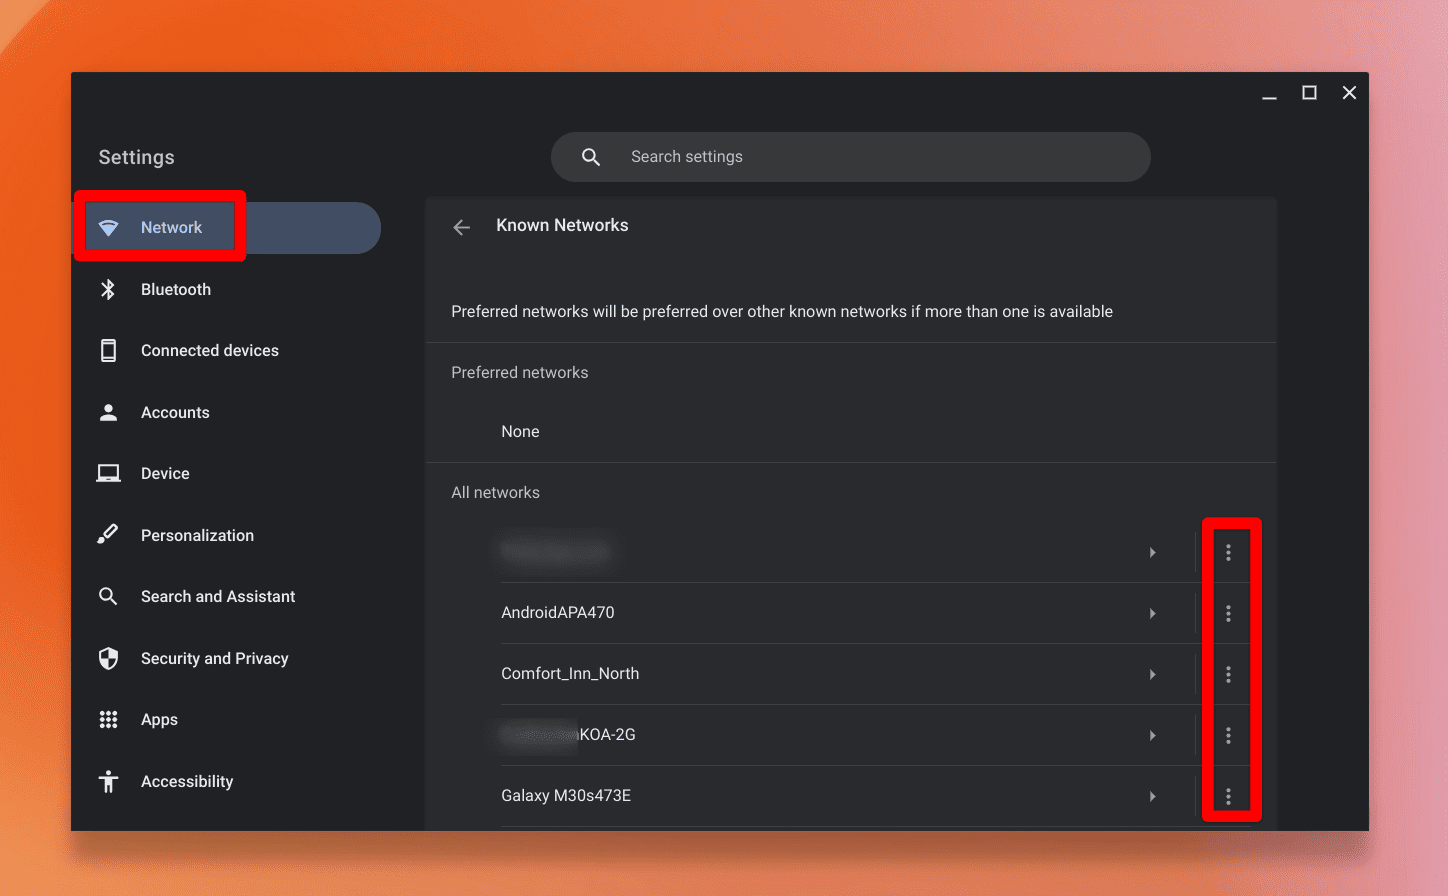
Here, you will see the ‘Known networks’ section, which lists all the networks your Chromebook remembers. Each time I open this section, it’s like a walk down memory lane. That hotel from last summer’s vacation, the mall where I spent hours shopping, the library… it’s nostalgic and overwhelming.

Saved Wi-Fi Networks on ChromeOS
5. Removing the unwanted networks
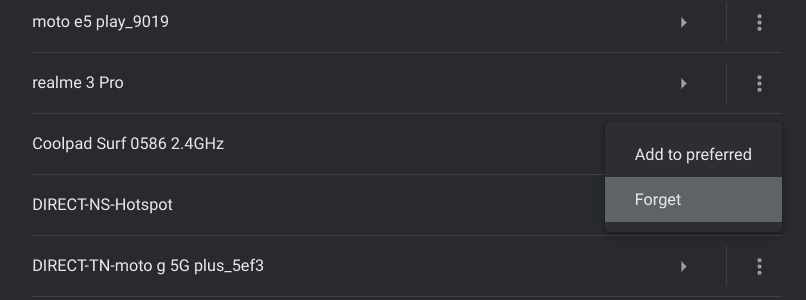
This step is where the actual cleaning begins. Beside each known network, there’s a tiny ‘i’ (information) icon. Clicking on it reveals details about the network. But our goal here is the ‘Forget’ option. As much as it hurts to forget some places (like the pizzeria with the best cheese burst pizza), it’s necessary for the sake of digital decluttering. Click on ‘Forget’ for every network you no longer need.

Forgetting a saved Wi-Fi Network on ChromeOS
6. Prioritizing the networks
If you, like me, have a few favorites – like home and work networks – that you always want your Chromebook to connect to first, there’s an option for that too. In the same details section, you would find the ‘Add to preferred’ setting. Adjust it as per your preference, ensuring your most-used networks are at the top.
Some extra tips to keep your Wi-Fi list streamlined
1. Periodic cleanup: It’s a good practice to revisit the ‘Known networks’ section every few months. It ensures you’re not hoarding networks. Trust me, it’s as therapeutic as cleaning out your wardrobe.
2. Be selective: Just because a Wi-Fi network is available doesn’t mean you have to connect to it. Save connections for places you frequent.
3. Check for updates: Ensure your Chromebook OS is updated. With newer versions, you might find enhanced options to manage your networks better.
Conclusion
Cleanliness, as they say, is next to godliness. While they might have been referring to the physical world, I genuinely believe it applies to our digital lives too. A clean, organized list of Wi-Fi networks is not just about better connectivity. It’s about creating a more streamlined and efficient user experience. So the next time you open your Chromebook, take pride in knowing that it’s as organized as it can be. And as for that café with the questionable coffee? Maybe give it another shot. But this time, don’t save the Wi-Fi.
