I‘ve been using Chromebooks for a good while now, and there’s a soft spot in my heart for their simplicity and ease of use. Yet, with that simplicity comes the occasional moment of frustration. Like when I recently wondered, “How much space is each account on my Chromebook taking up?” And the answer wasn’t immediately obvious. Today, I’m going to walk you through the process of checking that very detail. You may wonder why, and to that, I say: Isn’t it always handy to know where your storage space is vanishing to? Let’s dive in!
Understanding Chromebook storage
Before we deep dive, let’s chat a bit about Chromebook’s storage. Unlike traditional PCs or Macs, Chromebooks rely heavily on cloud storage, primarily Google Drive. The built-in local storage, often 32GB or 64GB, can seem limited. But remember, Chromebooks are designed to be light, fast, and cloud-centric. Though I love this, I also can’t help but occasionally miss the monstrous storage capabilities of my old PC.
The quest for checking hard disk space
On many devices, checking storage usage is straightforward. But with multiple accounts on a Chromebook, it gets a tad more challenging. Here’s a step-by-step guide on how to check the hard disk space consumed for every account:
1. Switch on and log in
- Fire up your Chromebook and log in to the primary account (often the first account you set up or an admin account).
- I personally prefer to start with the primary account because it grants you more privileges, especially if it’s an admin account. Ah, the power of administration!
2. Access the settings menu
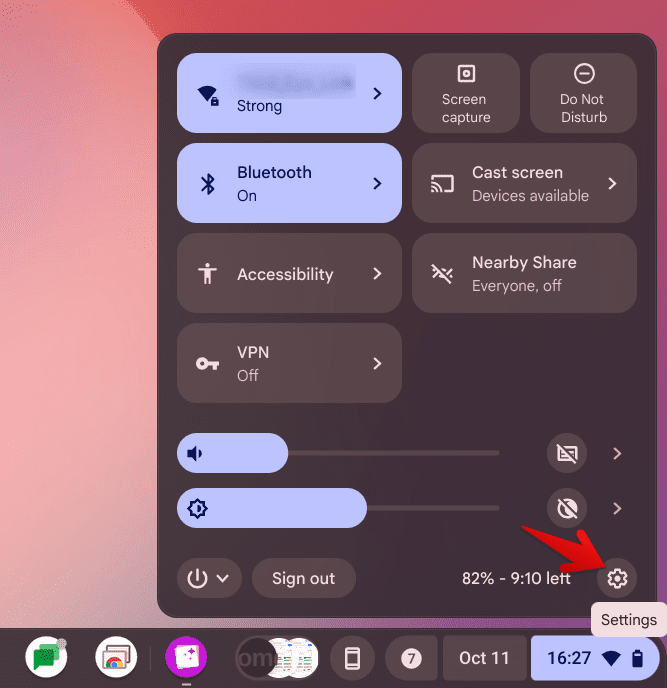
- On the bottom right of the screen, you’ll see the status area. Click on it.
- Next, click on the gear icon – that’s your Settings.
- I’ve always liked the clean and minimalistic look of Chrome OS, but I’ll admit, sometimes it feels like a maze!

Accessing ChromeOS settings
3. Enter the device menu
- In the Settings menu, scroll down to the “Device” section.
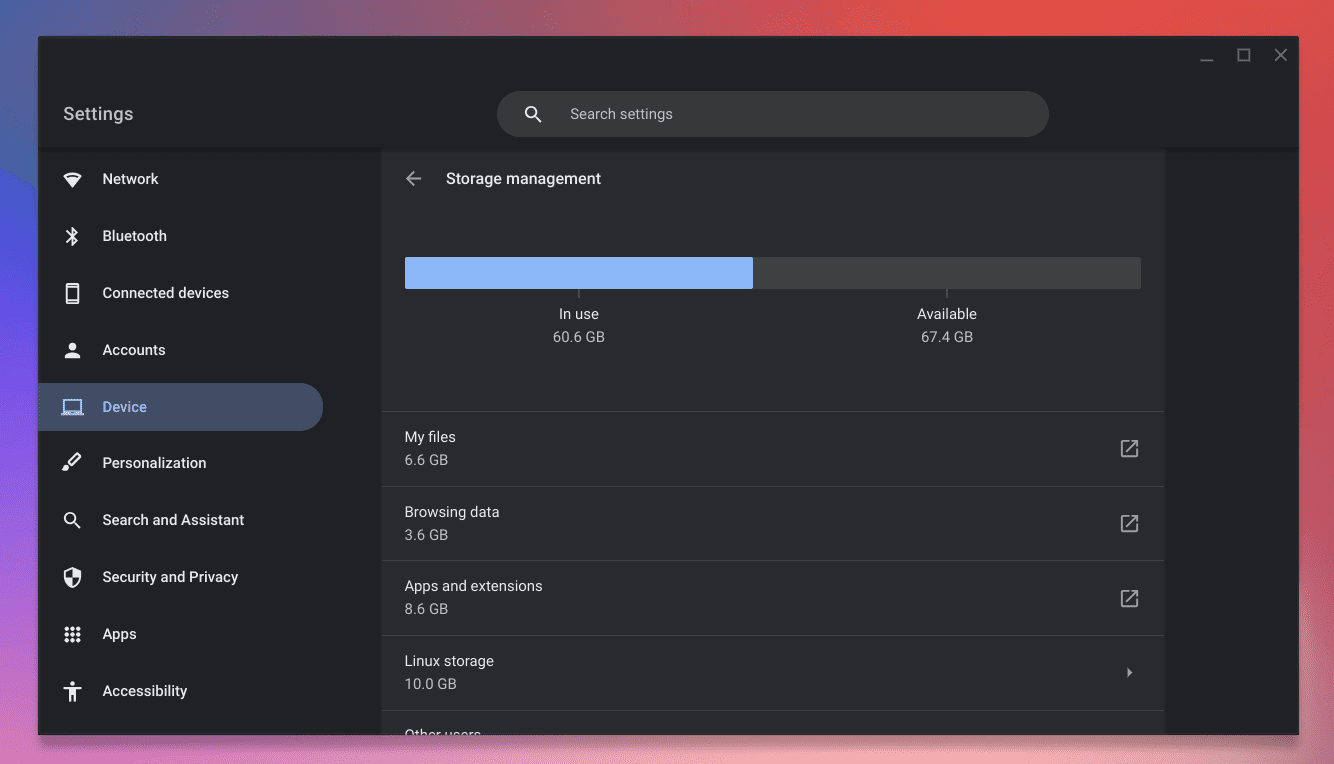
- Click on “Storage management.” Here, the plot thickens! This section provides a breakdown of how storage is being utilized.
4. Break it down

Storage management in ChromeOS
Here’s where things get juicy:
- “My files”: This section shows space taken up by files you saved. If you’re like me, who sometimes forgets to clear out old downloads, this can be a surprisingly large number. Also, Chromebooks store some Google Drive files offline. Handy? Yes! A space guzzler? Sometimes.
- “Apps & extensions”: While web-based, Chromebooks still run apps & extensions, some of which can take up significant space. Some apps I adore, while others I’ve pondered, “Why did I even download this?”
- “Browsing data”: This section shows how much space is being used by information such as your browsing history, cookies, and cached images.
5. Checking space for other accounts
Here comes the slightly tricky bit.
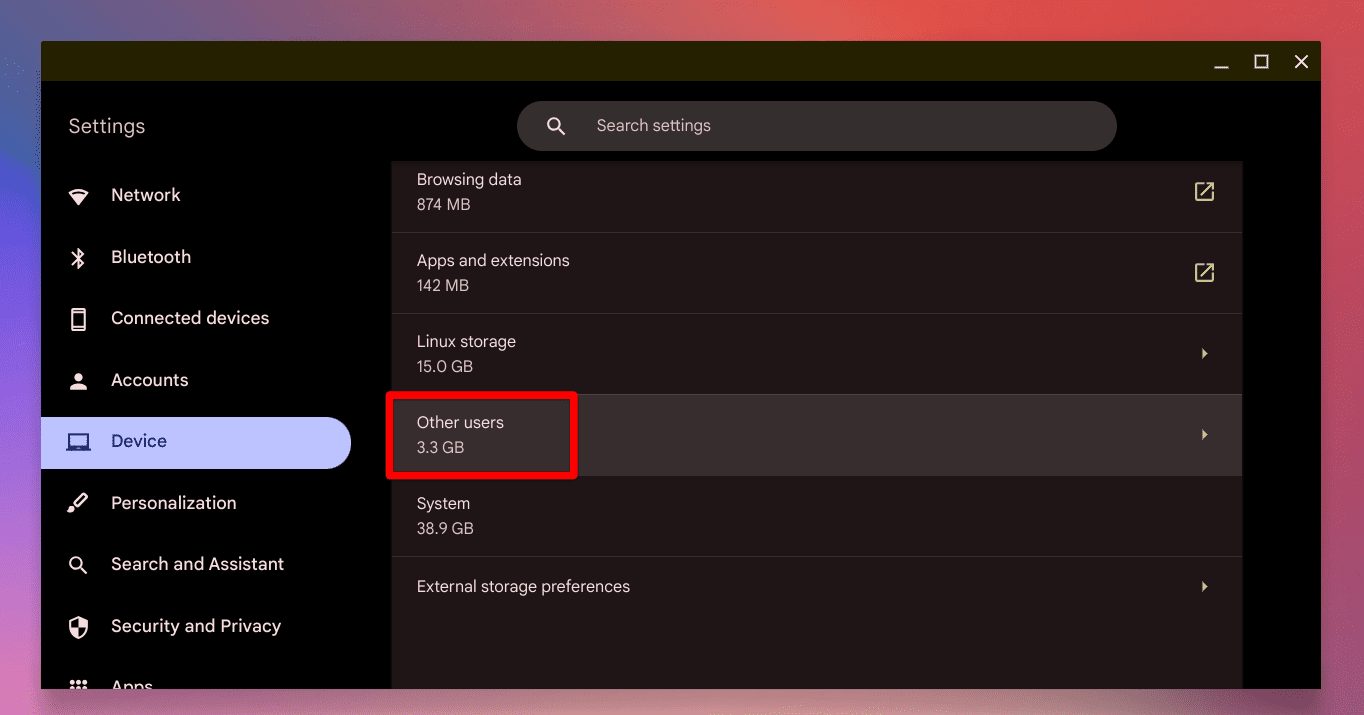
- Although Chrome OS doesn’t directly show storage used by different profiles in the Storage Management, it does show you the combined storage used by all other users on your Chromebook. The section “Other users” is what you need to look for.

Storage used by other users
- I know, I know! This feels a bit incomplete to be unable to see the space usage by user level, but that’s all we get as of when this article is written. Every time I do this, there’s a teeny tiny grumble in my head wishing Google would streamline this process.
Tips to free up space
Now that we’ve unearthed the storage secrets, you might find your Chromebook is running out of space. Fret not! Here are some quick tricks to free up space:
1. Clear your downloads
- Visit the “Files” app.
- Click on “Downloads” on the left panel.
- Select files you no longer need and hit the trash icon.
- I often find forgotten memes and old documents here. Bidding them goodbye is both nostalgic and oddly satisfying.
2. Manage offline files
- If you have files from Google Drive saved for offline use, consider if you still need them offline.
- You can make files online-only again by right-clicking and selecting “Available online only.” It’s a life-saver when I realize I’ve been hoarding documents offline that I haven’t glanced at in ages!
3. Review apps and extensions
- Go back to “Storage management” under Settings.
- Click on “Apps & extensions.”
- From here, uninstall any apps or extensions you no longer use.
4. Powerwash (with caution!)
- If you feel brave and need a fresh start, consider Powerwashing your Chromebook. This will reset it to factory settings, so back up any vital data first. The first time I did a Powerwash, it felt like moving into a new, freshly cleaned home. So refreshing!
We have published a detailed article here.
Can an owner or school admin check the accounts’ space usage directly?
For Chromebook enthusiasts and newbies alike, the way Chrome OS handles multiple accounts has always been intriguing. And if you’re an owner or a school admin managing multiple Chromebooks or Chrome OS devices, you’d naturally wonder: “Is there a more efficient way to manage and monitor storage space?”
Well, let’s delve into this.
For owners:
If you’re the primary owner of the Chromebook, you have administrative rights that allow you to control certain settings and features. However, the bad news is, as of when this article is written, Chrome OS doesn’t natively allow owners to view detailed storage consumption for other accounts on the device. You would need to log in to each individual account and follow the steps outlined in the earlier sections.
But, having owner privileges does allow you to perform system-wide actions like Powerwashing, which can be handy if space runs critically low. Just remember to alert all users before doing so, as this can erase all local data!
For school admins:
Yes, a school admin can check the accounts’ space usage directly. There are a few different ways to do this:
- Google Workspace admin console: If you are using Google Workspace for Education, you can check the accounts’ space usage directly in the admin console. To do this, go to the Apps page and click on Google Drive. Under the Storage tab, you will see a list of all of the users in your domain, along with their current storage usage.
- Google Drive: You can also check the accounts’ space usage directly in Google Drive. To do this, go to My Drive and click on the Settings gear icon in the top right corner. Then, click on Manage storage. You will see a list of all of the files and folders in your Drive, along with their size. You can also see the total amount of storage space that you are using and how much space is remaining.
- Third-party tools: There are a number of third-party tools that can also be used to check the accounts’ space usage. These tools typically offer more features than the built-in tools that are provided by Google Workspace for Education. For example, some third-party tools can generate reports that show how the accounts’ storage space is being used over time.
Which method you choose to use will depend on your specific needs and preferences. If you are only interested in seeing the total amount of storage space that each user is using, then you can use the built-in tools that are provided by Google Workspace for Education. However, if you need more detailed information, such as a report of how the accounts’ storage space is being used over time, then you may want to consider using a third-party tool.
Final thoughts
While Google has made significant strides in making Chrome OS user-friendly and efficient, there are some areas where there’s room for improvement, especially for power users and administrators. We can only hope that in the future, Google might roll out features that make storage monitoring across multiple accounts more intuitive.
And for all the owners out there, I feel your pain. The occasional lack of detailed control reminds me of trying to find a misplaced book in a vast library. It’s there, but it might take a little effort to locate. Here’s to hoping for more refined features in future Chrome OS updates!

