If you’ve recently hopped onto the Chromebook bandwagon, or have been a loyal user like me for some time, you might be wondering about the wonders of Google Drive. Today, I will share my comprehensive guide on how to share a folder with other users using Google Drive on your Chromebook. By the end of this, you’ll be a sharing maestro!
A bit of background
Before diving in, let’s reminisce a little. Remember the days when we used to share files by burning them onto CDs or transferring them via USB drives? Ah, those were the days. But today, we live in the era of cloud storage, and I must say, I love the convenience it brings. While I sometimes miss the tactile feel of sharing physical storage mediums, the ease and speed of online sharing have indeed won me over.
Google Drive on Chromebook: A match made in heaven
Chromebook and Google Drive are like peanut butter and jelly; they just go so well together. Given that Chromebooks largely operate in the cloud, it’s no surprise that Google Drive becomes the cornerstone for storage and sharing. I personally adore the integration, but occasionally, I wish there was just a tad more local storage.
Let’s get down to business: Sharing a folder with other Chromebook users
1. First things first: What is the ‘Files’ app on Chromebook?
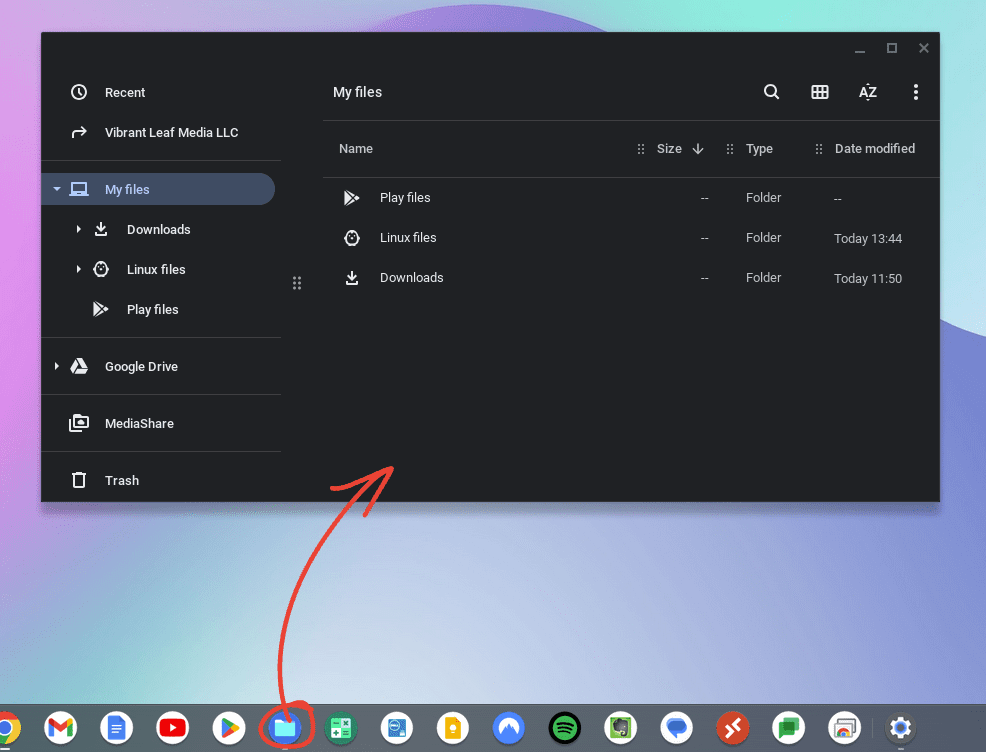
Files App on ChromeOS
Before we dive into the detailed steps, let’s take a moment to familiarize ourselves with the “Files” app. The Files app on Chromebook is essentially your one-stop-shop for all file-related tasks. Think of it as your Chromebook’s version of File Explorer on Windows or Finder on Mac. It’s where you can see all your downloads, documents, images, and – you guessed it – your Google Drive! You can access it either from the dock or by using the launcher.
2. Enabling Google Drive in the ‘Files’ app
One of the first things I noticed (and honestly, I was a bit miffed about it) was that my Google Drive wasn’t immediately visible in the Files app. But fret not! It’s an easy fix.
2.1. Checking if Google Drive is connected: When you open the Files app, look on the left sidebar. If you see ‘Google Drive’, then congratulations, you’re all set! But if not, we’ll need to enable it.
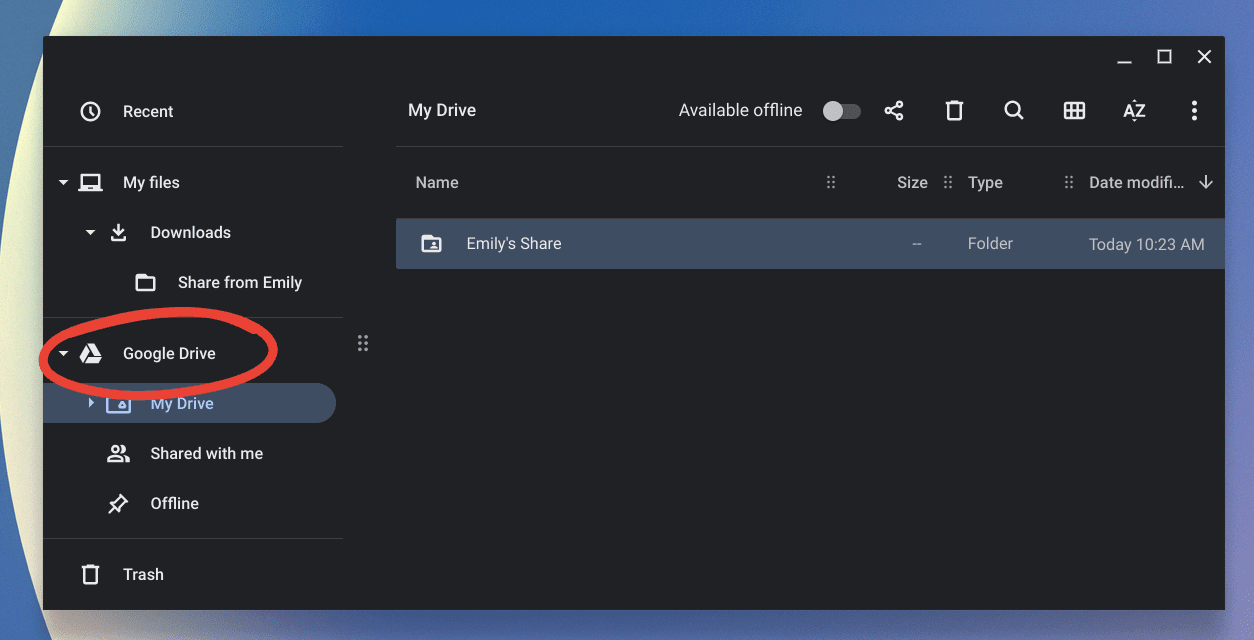
Google Drive integrated into Files app
2.2. Steps to enable Google Drive:
- Open the “Files” app on your Chromebook.
- Click on the three vertical dots (often called the ‘hamburger’ menu) on the top right corner.
- From the dropdown, select “Files settings”.
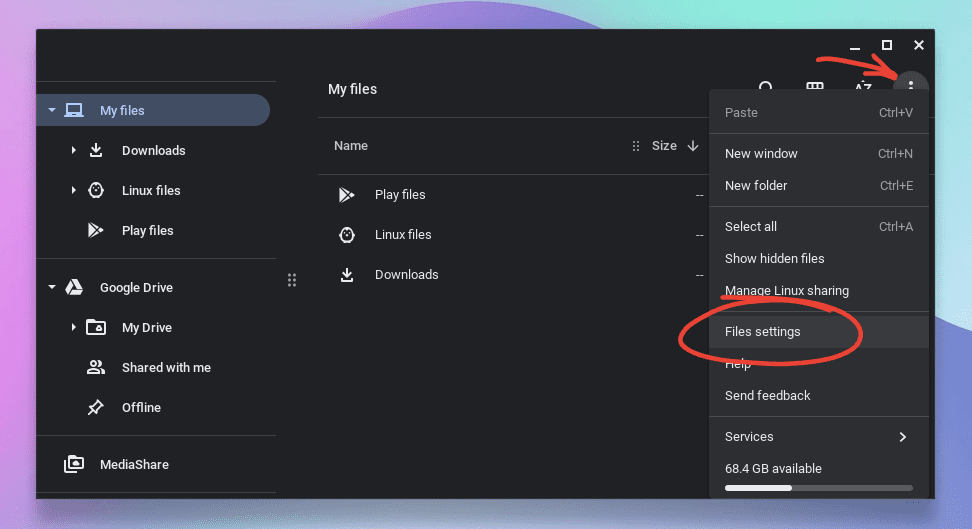
Opening Files Settings
- In the “Files” section, turn off the option “Disconnect Google Drive account”. Sign in with your Google account (if prompted).
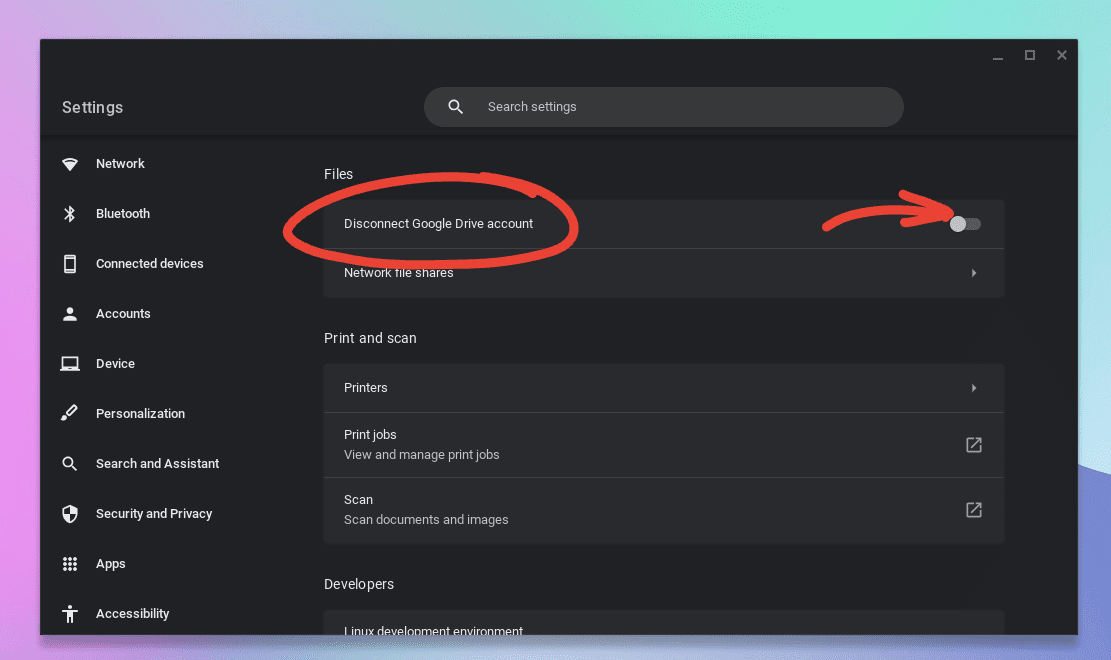
Google Drive setting in Files settings
Voilà! Google Drive should now appear in your Files app.
Honestly, I wish this were enabled by default because it took me a little while to figure this out. But once it’s done, the convenience is unparalleled. It’s possible that the feature is disabled on my Chromebook, but it may already be integrated on yours.
3. Sharing files with other Chromebook users using Google Drive
Now to the main event! I must say, this is one of my favorite features as it takes collaboration to a whole new level.
3.1. Locate the file you want to share: Navigate to the file or folder in your Google Drive that you wish to share. Remember, since we’re doing this from the Files app, you don’t need to open any browser or separate Google Drive app.
3.2. Right-clicking is your friend: Once you’ve located the file or folder, right-click on it. This will bring up a menu with various options. For our purpose, select ‘Share with others’.
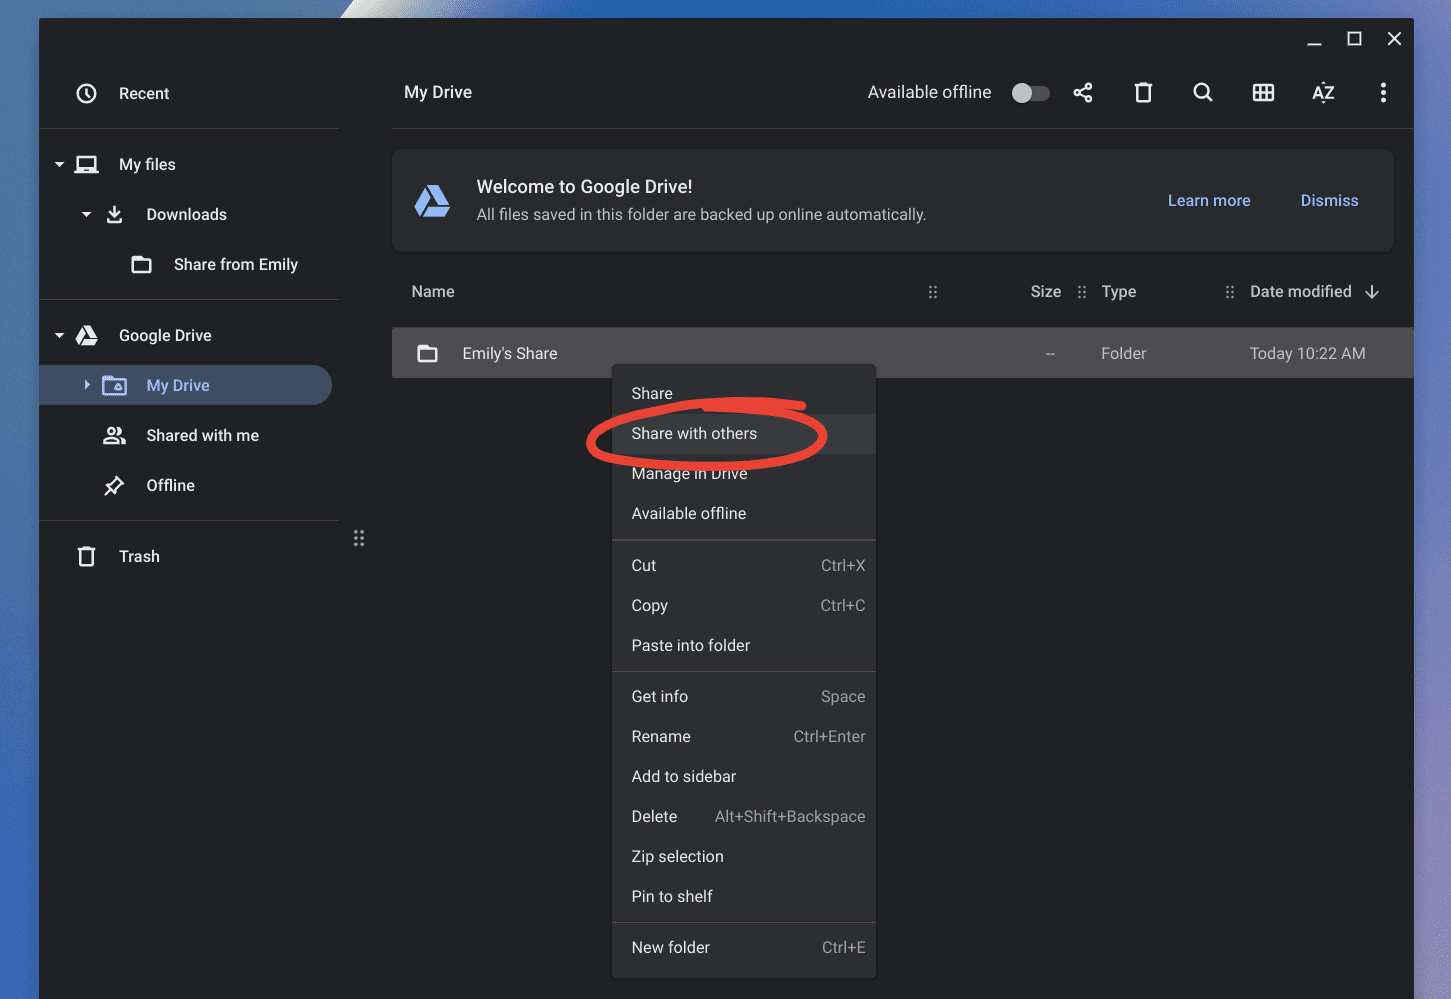
Sharing a folder with other using Google Drive
3.3. Entering the recipient’s details: After clicking ‘Share’, a window will pop up. Here you can:
- Enter the email address of the person you want to share the file with.
- Decide their permission level – Can they edit, comment, or only view the file? Personally, I love this feature as it gives you so much control over how others interact with your files.
3.4. Adding a personal touch: If you’re sharing with someone for the first time or want to include specific instructions, you can add a note. I often use this to add a touch of personalization, like “Hey Sam, here’s the presentation for next week. Let me know your thoughts!”
3.5. Finalizing the share: Once you’re satisfied with the permissions and any messages, click ‘Send’. Your file is now shared!
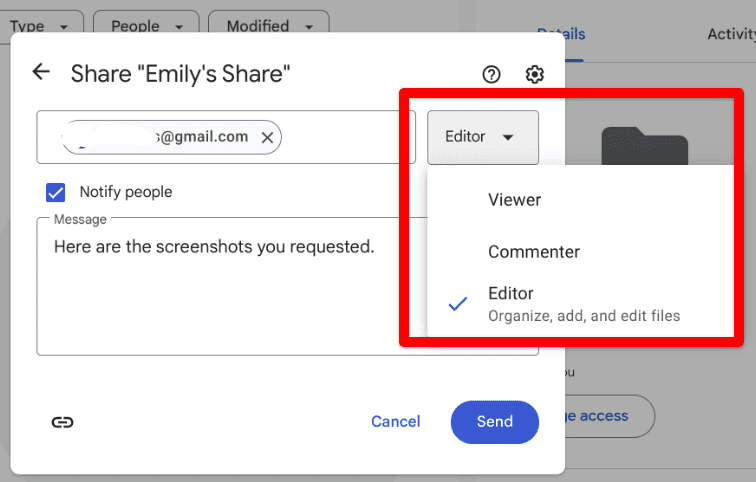
Sharing the folder
4. Keeping track of your shared files
One of the features of the Files app is that it shows which files you’ve shared and which files are shared with you. To check which files you’ve shared and which have been shared with you, go to the Google Drive section in your Files app. A shared folder is indicated by a user profile picture over the folder icon. Additionally, there is a separate section titled “Shared with me” that shows content others have shared with you.
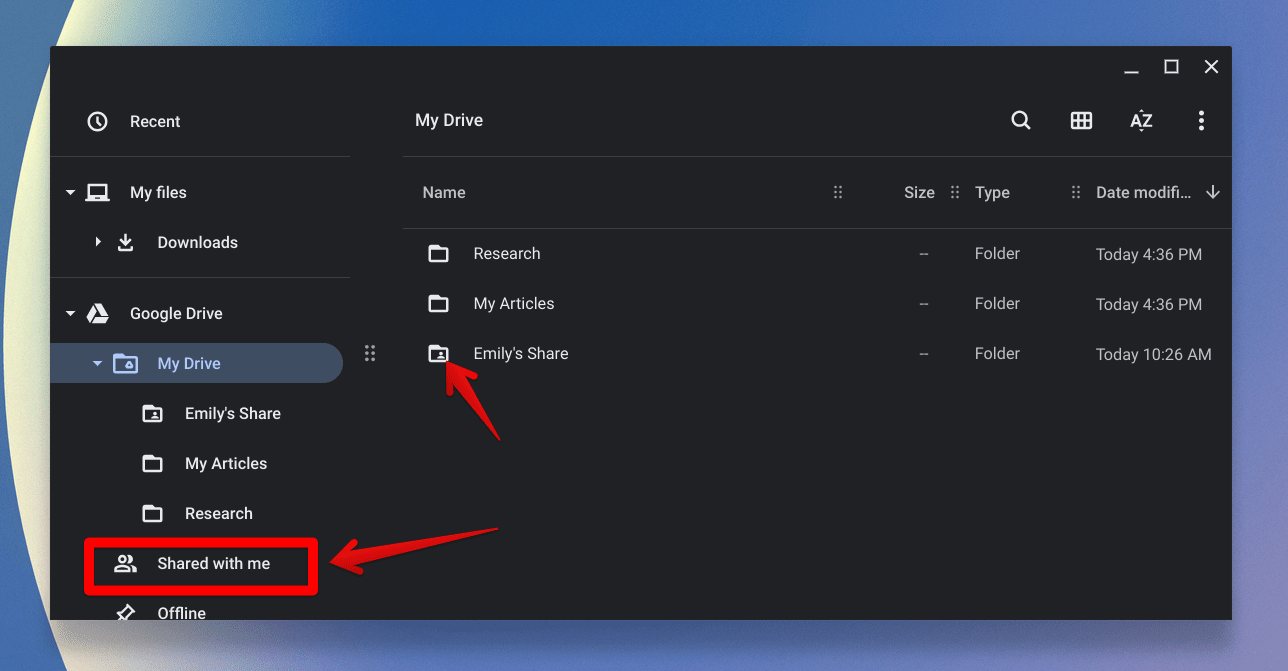
Google Drive Shared folders in Files app
However, keep in mind that the “Files” app does not provide advanced information such as owner information, time stamps, or access rights. For detailed information, you need to visit your Google Drive page in your browser.
To access advanced file and folder information, click the three dots in the top right corner of the “Files” app again and choose “Go to drive.google.com…”.
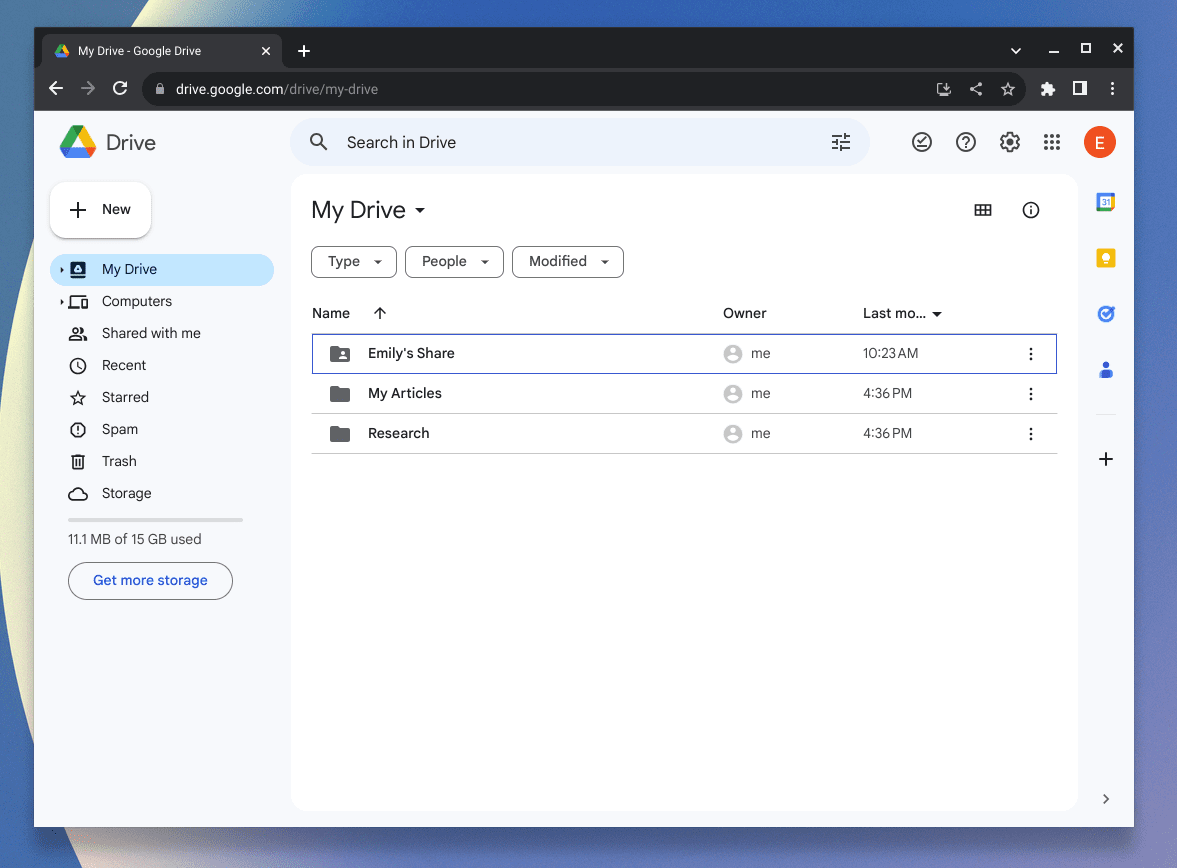
Google Drive showing file properties
Closing thoughts
The Chromebook’s Files app integration with Google Drive is, without a doubt, a game-changer. It bridges the gap between local and cloud storage, making file-sharing with fellow Chromebook users (or any Google Drive users) a breeze.
Sharing folders on Google Drive from a Chromebook is incredibly intuitive and easy. While I adore the ease, I do hope for a few more features in the future, like password-protected links or even more nuanced sharing permissions.
Nonetheless, I hope this guide helps you share with ease and confidence. Remember, the digital world is about connection and collaboration. So, share away, and enjoy the beautiful dance of Chromebook and Google Drive!
