Chromebooks have come a long way since their inception. With their cloud-centric approach and user-friendly interface, they’ve become a favorite for many. As a personal lover of the minimalist design and quick boot-up times, my Chromebook has been my sidekick for many an adventure. But, like any computer, it can get cluttered. Today, I will be guiding you through the process of deleting files on your Chromebook in 2023. Let’s declutter, shall we?
Understanding your Chromebook’s storage
Before diving into the delete process, it’s essential to understand how Chromebooks store data. They rely heavily on Google Drive for cloud storage. But, local storage still plays a crucial role. Just last week, I remember downloading several large PDFs for a project. By the time I was done, I was slightly taken aback by the space they occupied!
Where do your files live?
The main place to look for files on a Chromebook is the “Files” app. If you’ve used Chromebook even for a week, you might have noticed this app. It houses all your downloads, and if you’ve saved items offline, this is their home.
Steps to delete files on your Chromebook
Let’s not delay further and jump straight into the step-by-step guide to delete those files and reclaim our space!
Open the Files app:
-
- On the shelf, the bottom row of your Chromebook screen, find and click on the ‘Files’ icon. If it’s not there, click on the launcher (a circle icon with a dot at the bottom-left) and type “Files” to search and open.
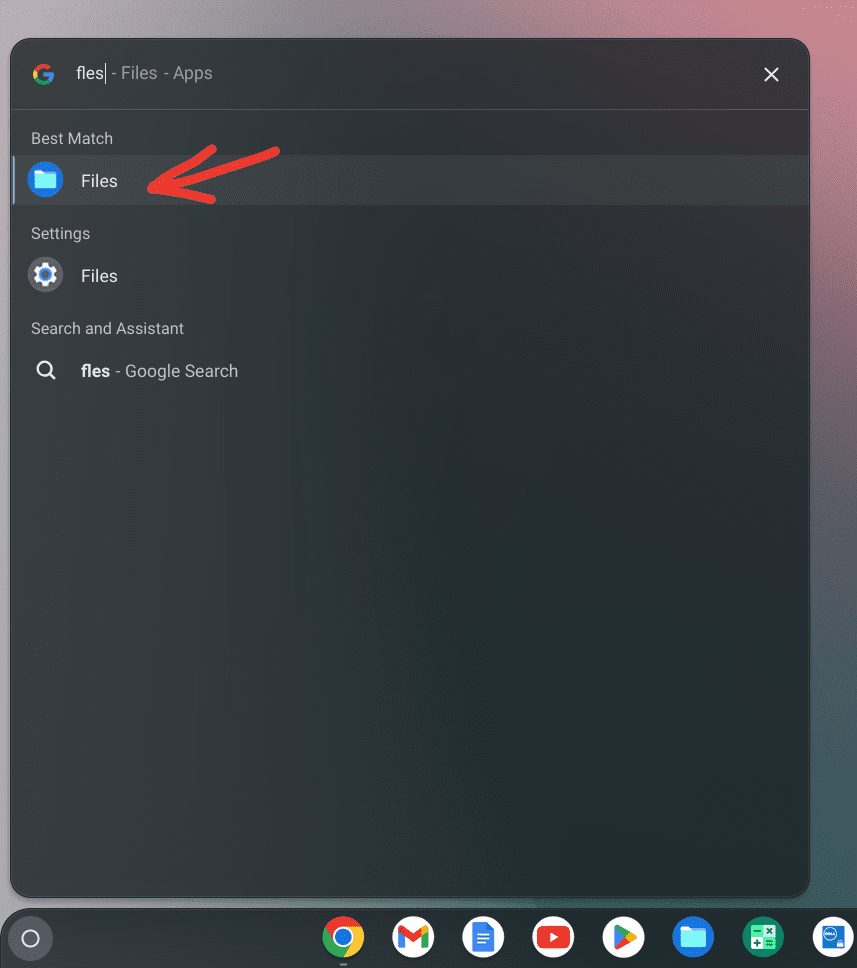
Launch Files app
Navigate to the file or folder:
-
- On the left panel, you’ll see categories like ‘My files,’ ‘Google Drive,’ and ‘Downloads.’ Most of the files you’re looking to delete are likely in the ‘Downloads’ folder. Click on it.
- If you’re someone like me who loves organizing, you might have sub-folders. Dive deep into them as needed.
Select the file or folder:
-
- Once you spot the file you wish to delete, single click on it. If there are multiple files, hold the ‘Ctrl’ key and select each file. This trick always reminds me of the numerous times I had to clear my desktop clutter!
Delete:
-
- With the file or files selected, right-click to open a menu. From the dropdown, click on ‘Delete.’ Alternatively, just press the ‘Alt’ key and the ‘Backspace’ key together. Or even use the trash icon on the top as shown in the image below. And voila! The file moves to the trash.
- If you’re like my friend Jenny, who sometimes gets too delete-happy, don’t worry. The files aren’t gone for good yet. They’ve merely moved to the trash can.
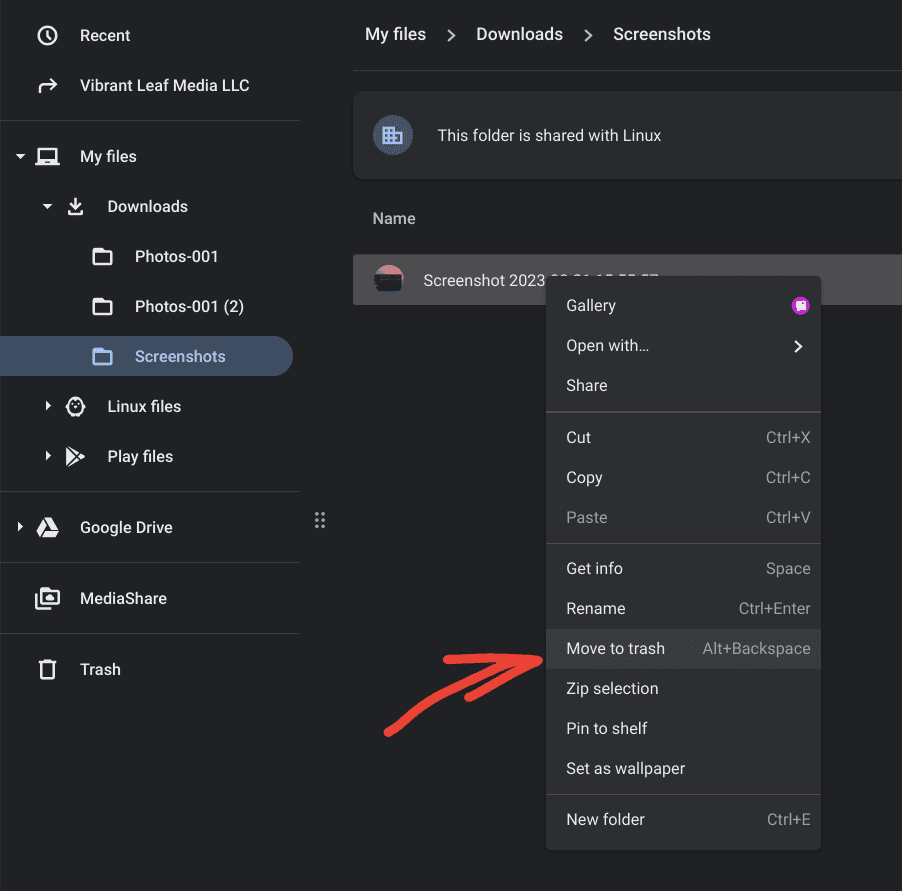
Using right-click options to delete a file
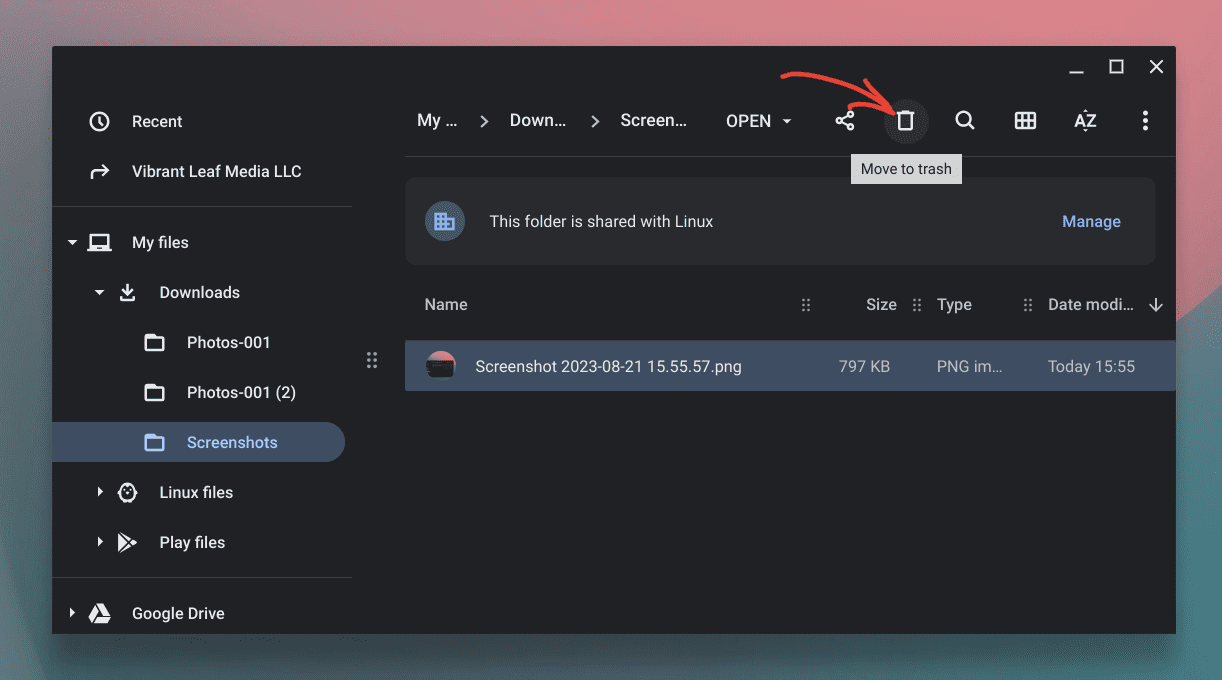
Deleting files from Files app on ChromeOS
Empty the trash (The final goodbye):
-
- On the left panel, click on ‘Trash.’
- Here, you’ll see all your deleted files. If you’ve made a mistake, you can right-click on the file and choose ‘Restore.’ But if you’re certain you want them gone for good, click on ‘Empty trash’ at the top-right corner. It’s a bittersweet moment, a bit like throwing away old memories, but necessary nonetheless.
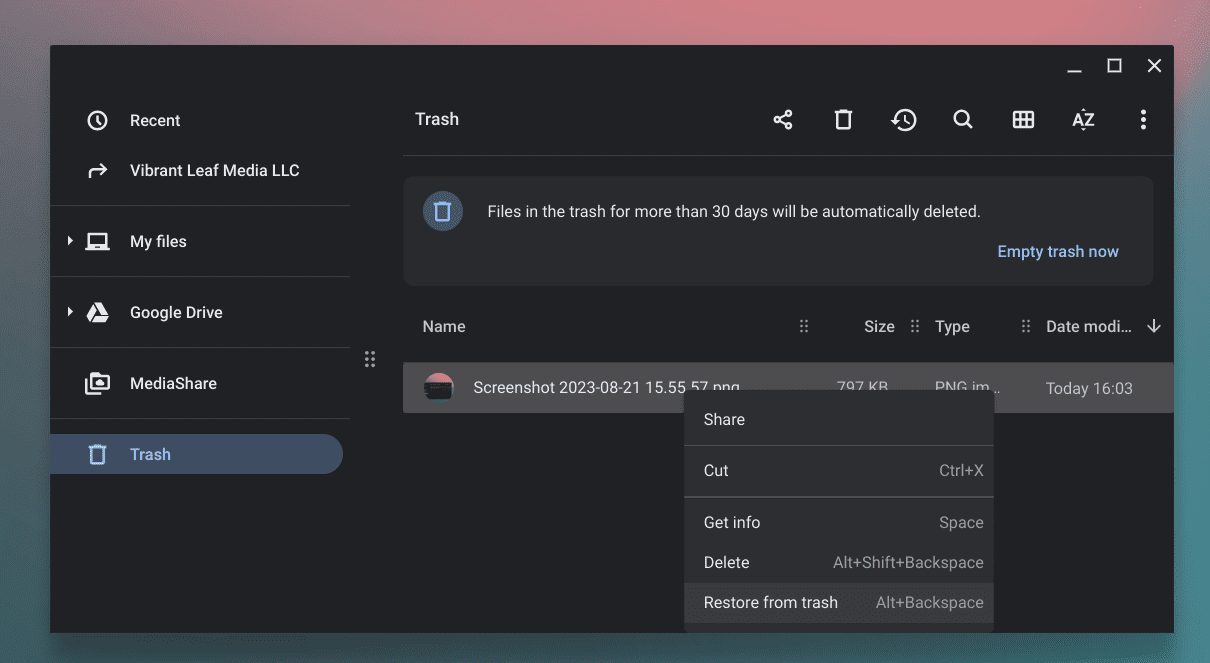
Restore deleted file from trash
Why you should regularly clear out files
I’ve often been asked why one should bother with file deletion. It’s not like we’re running out of space, right? Well, although Chromebooks are known for their cloud storage, they still have limited local storage. It’s easy to forget this, especially with our increasing reliance on cloud platforms.
The regular cleanup is beneficial for several reasons:
- Performance: Even though it’s not as pronounced as traditional PCs, Chromebooks can experience a slowdown with too many files. It’s subtle but real.
- Easier searches: Trust me on this. There’s nothing more frustrating than trying to locate a file amidst a cluttered Downloads folder. A tidy file system is a speedy file system.
- Preparedness for offline days: On those rare occasions when the internet decides to take a day off, you’ll want to make sure your local storage is optimized with only the necessary stuff.
An ounce of prevention
A quick tip to prevent this overflow of files: change your download settings. Instead of automatically downloading files to the ‘Downloads’ folder, set your Chrome browser to ask where to save each file before downloading. This way, you are more in control, and it gives you a moment’s pause to decide if you really need that file.
Pro-tips for managing files on your Chromebook
After having explored the fundamental process of deleting files, let’s delve into some expert tricks that could elevate your file management game on the Chromebook. Having spent a fair amount of time with my trusty Chromebook, I’ve come to appreciate these nuances that make everyday tasks a breeze. So, get ready to add some arrows to your digital quiver!
1. Use keyboard shortcuts:
- Quick Delete: Instead of the right-click and delete method, just press ‘Alt + Backspace’ when you’ve selected a file.
- Select All Files: Press ‘Ctrl + A’ when inside a folder. This comes in handy when you want to clear out a folder entirely.
2. Backup before deleting:
- If you’re in two minds about deleting certain files, consider backing them up on Google Drive or an external USB drive. It’s always good to have a safety net.
3. Sort files by size:
- This is something I find immensely useful, especially when I’m trying to free up some space quickly. In the ‘Files’ app, click on the three vertical dots (more options) at the top-right and select ‘Sort by.’ Choose ‘Size’ to view files from the largest to the smallest. It’s eye-opening to see what’s taking up the most space.
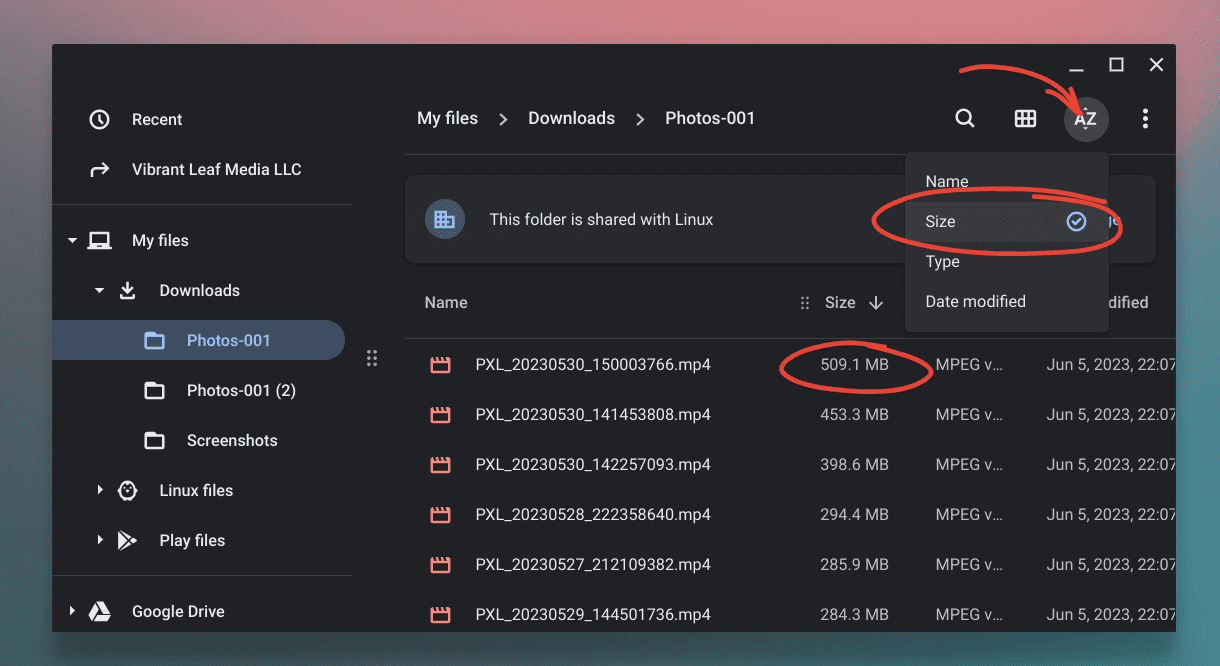
Sorting by file size in Files app
4. Regularly review downloads:
- Set a monthly reminder to review and clear out your Downloads folder. It’s easy to forget about files once they’ve served their immediate purpose.
5. Use the space analysis tool:
- If you’re curious about how storage is being utilized, navigate to Settings > Device > Storage management. This breakdown can guide your deletion decisions.
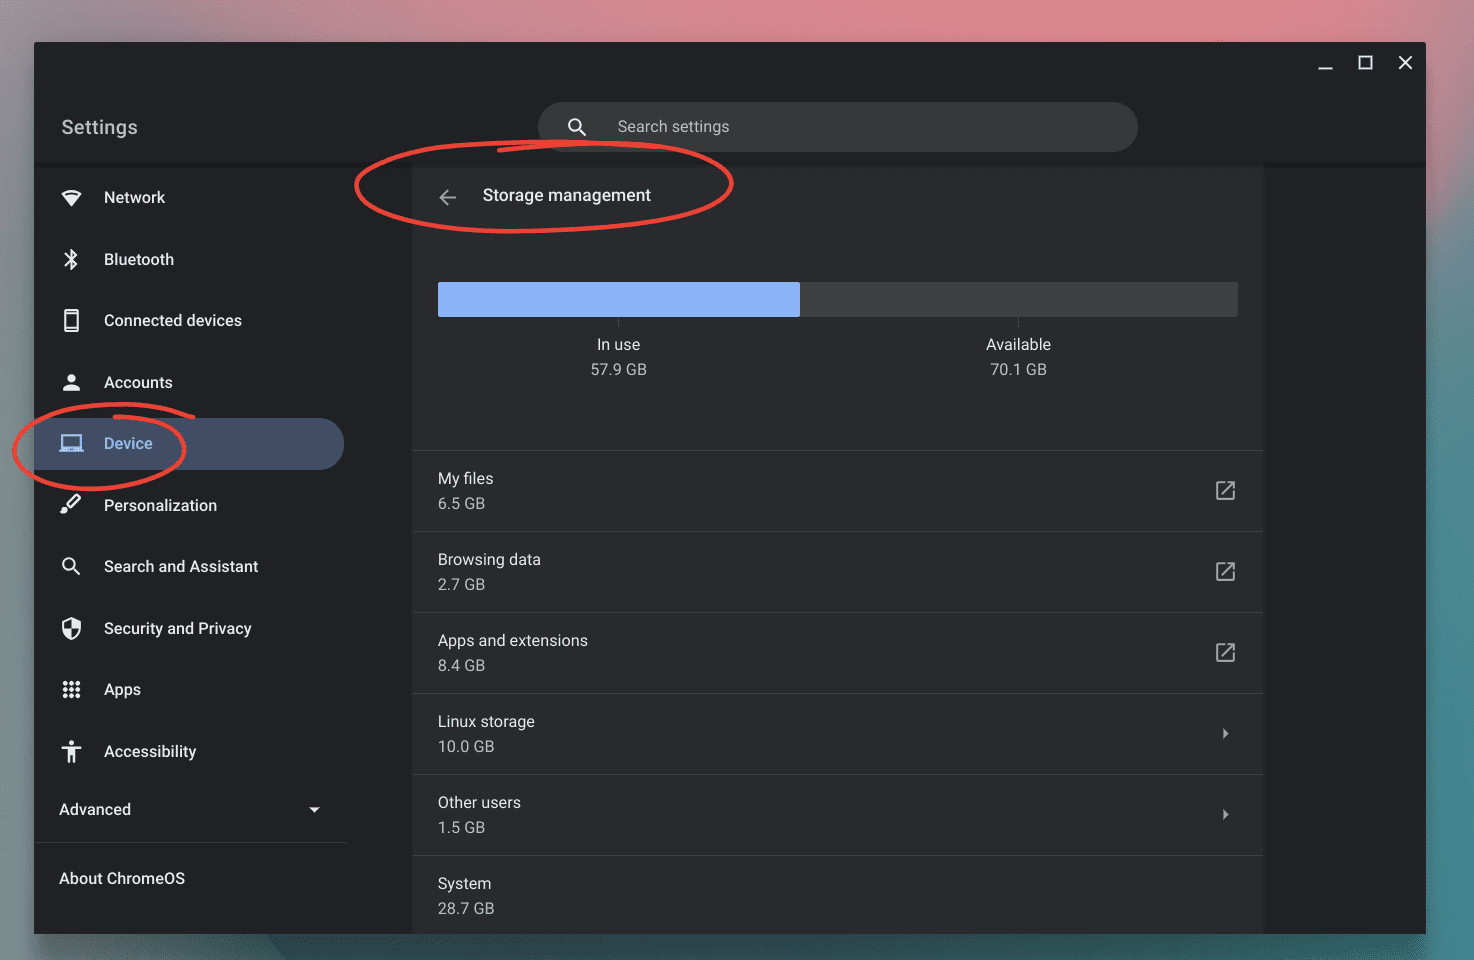
Storage management setting
6. Sync only essential Google Drive folders:
- By default, your Chromebook might sync all your Google Drive files for offline access. If you have a lot on Drive, this can consume significant space. Go to your Google Drive settings and select which folders you want to sync, keeping only the essentials.
7. External storage is your friend:
- Invest in a good SD card or USB drive. Whenever you have large files that you don’t frequently access, transfer them to external storage. This way, you keep your Chromebook’s internal storage lean and mean.
8. Utilize cloud alternatives:
- Before downloading large files, check if there’s a cloud version available. For instance, instead of downloading large video files, can you stream them? Or instead of heavy software, is there a web app version? Pcloud offers 10GB free space: How to install and configure pCloud on Chromebook
Conclusion
Reflecting on this, it’s fascinating how digital clutter can sometimes mirror our physical surroundings. Just as it’s refreshing to declutter our living spaces occasionally, our digital spaces need that breath of fresh air too.
Deleting files on a Chromebook might seem like a trivial task, but it’s essential for maintaining an optimal user experience. I often find this exercise therapeutic. There’s something liberating about letting go of the old and making space for the new. Here’s to more organized, efficient, and clutter-free Chromebook experiences!
