The Chrome browser is recognized across the globe as a reliable, speedy, and secure browser that Google readily supports with a deluge of updates day in and day out. However, those more concerned with their privacy and how the internet reacts to their online presence may want to look into the diverse benefits of hooking up Chrome with a proxy despite the browser’s in-built capacity to negate privacy threats.
In this guide, we’ll talk about how to set up a proxy in Google Chrome in a handful of easy-to-follow steps. You should know that the developers haven’t yet configured the Chrome browser to involve native proxy settings, so we will turn to your operating system to deal with the matter. In the meantime, though, check out our guide on how to use Chrome’s password manager easily—an equally effective feature to keep your privacy in check.
Therefore, let’s start using a proxy in Chrome without further delay.
What is a proxy, and why do you need it?
A proxy, otherwise fully known as a proxy server, is designed to mediate between a user and the internet. Think of it as a middleman that your computer would come into contact with first before the information is relayed to the wide interweb. But why is it necessary? That’s because proxy servers comprise an IP address of their own, guaranteeing anonymity for end users when they want to hop online.
For the uninitiated, each user on the web has an IP address that can, on the one hand, be mistreated by cybercriminals. Those who harm us can discover our precise location through our IP address. The latter is often called the internet’s phonebook, providing each user with a unique ID that helps other sites and computers recognize them and, therefore, engage in effective communication, which goes on to resolve queries.
Since an IP address is basically like a home address for users on the internet, you don’t want it falling into the wrong hands. That is why VPNs and proxy servers exist, allowing people from around the globe to hide their IP addresses and surf the web anonymously with a sense of security in mind. While VPNs do more than mask the identity of users, i.e., encrypt the data that they send and receive as well, proxies will get the job done by hiding the IP address.
The working mechanism of a proxy server is pretty simple to comprehend. A specific operation occurs on the back end whenever we try loading a web page. In a typical scenario, our PC requests access to the server and uses our IP address. When a proxy is employed, that process is subject to getting introduced to another entity in this two-person operation.
This proxy server, which comes in the middle of the regular data exchange process now, receives information from the PC before sending it out to the server on the other end. Once done, the info is forwarded, but with an IP address swapped out with the original. You now use the internet with a fake IP address and, therefore, consider yourself exempt from scams and other issues of cyber criminal nature.
Now that you know the gist of it, let’s set up a proxy server in Chrome.
Setting up Chrome with a proxy server
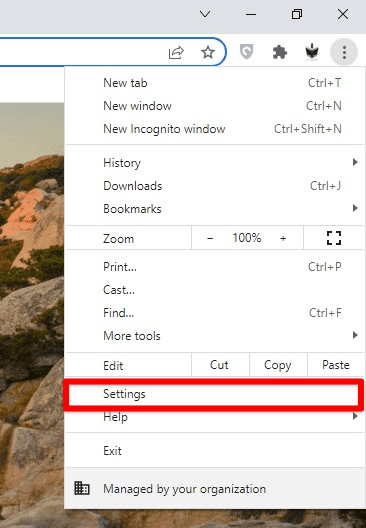
Google Chrome does not have a feature to configure its proxy settings. For now, it uses a default networking routine that transmits your IP address to other servers, but that can be switched up in a few minutes. To get started, open the Chrome browser and access its overlaying menu. Do that by clicking the “Customize and control Google Chrome” button in the top-right corner of the browser’s UI. Now, click the “Settings” button to complete the next step.
- Alternatively, you can also press “Alt” and “E” together, followed by pressing the “S” key, and that’ll open up the “Settings” section of the Chrome browser right away.

Opening Google Chrome’s “Settings”
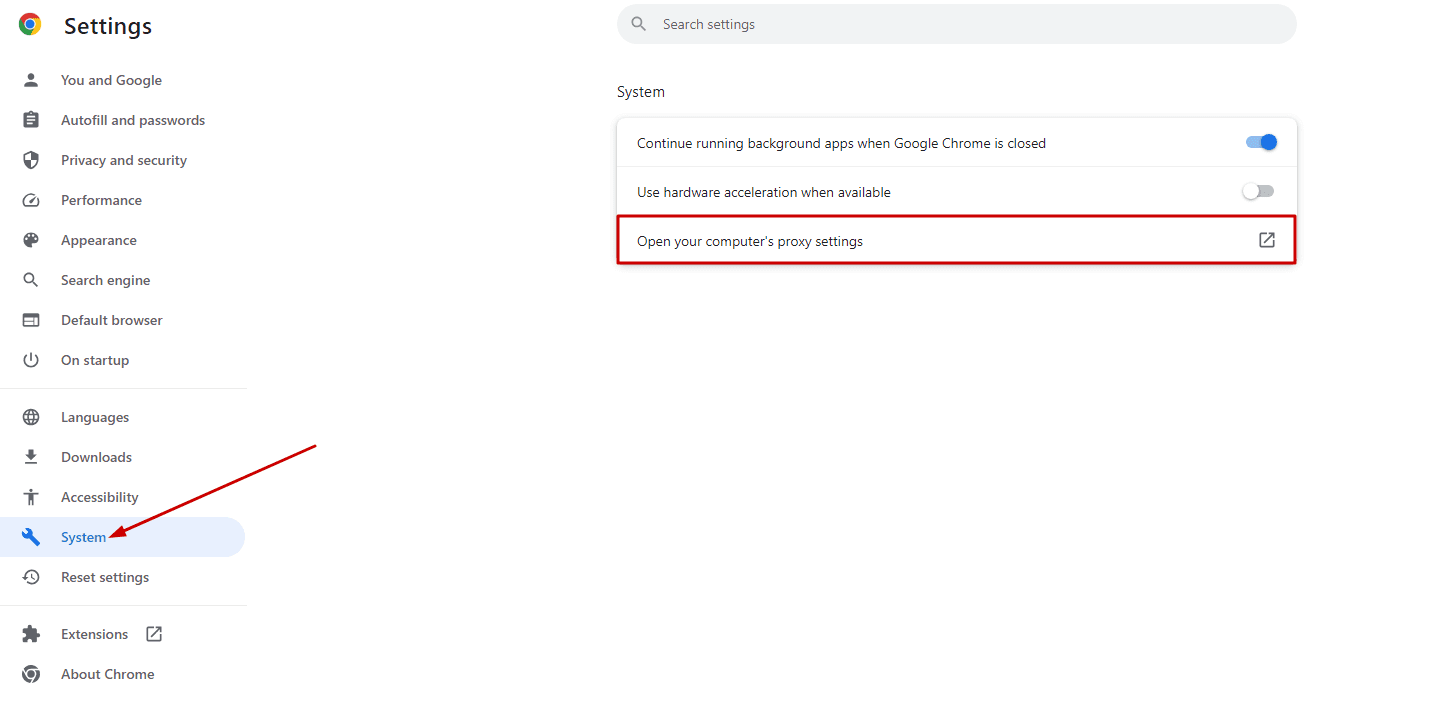
After the “Settings” section pops up, click the “System” tab on the side panel to the left of the screen. Doing that should take you to the relevant area of your Chrome browser’s settings. Proceed by choosing the “Open your computer’s proxy settings” button to open a specific portion of your PC’s Windows 10 or 11 “Settings” app. As mentioned, your operating system will help you set a proxy on Chrome, not the web surfer.

Opening the proxy settings
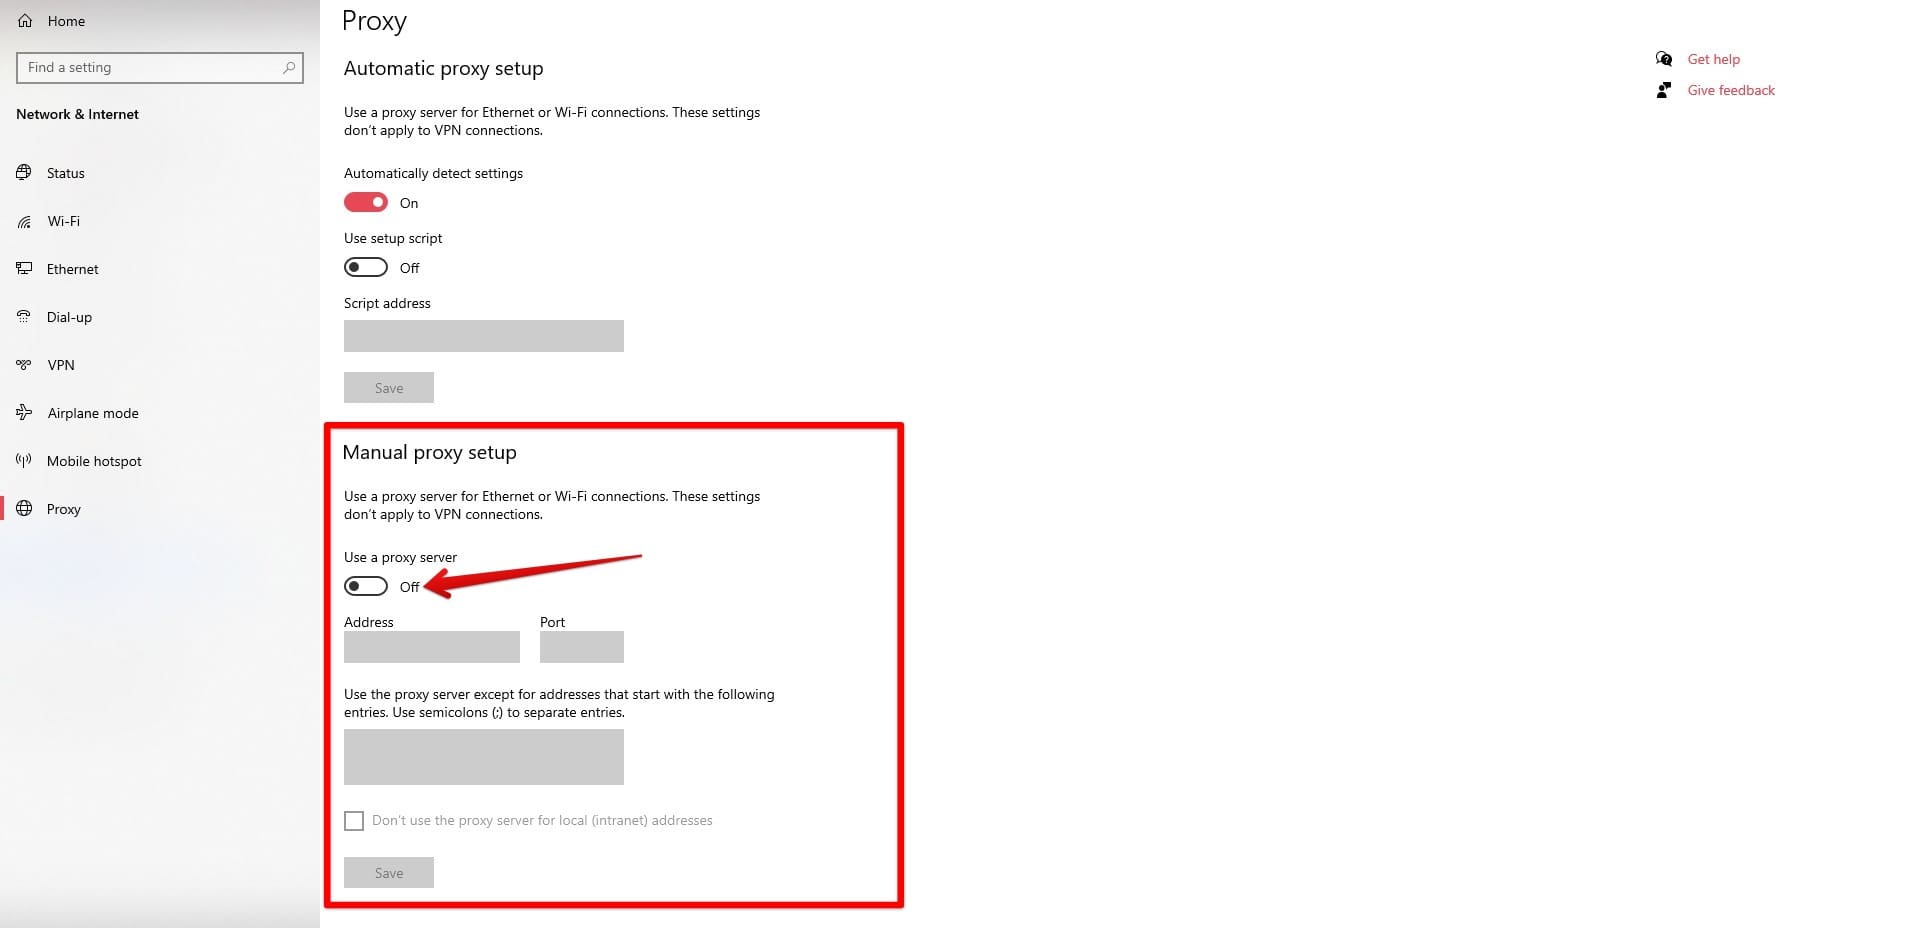
In this step, you’ll first enable the manual proxy setup feature on Windows 10. This will allow you to set up a proxy on Google Chrome by fetching the necessary details and entering them here. If you don’t toggle the functionality on, you won’t be able to proceed.

Toggling on the “Use a proxy server” feature
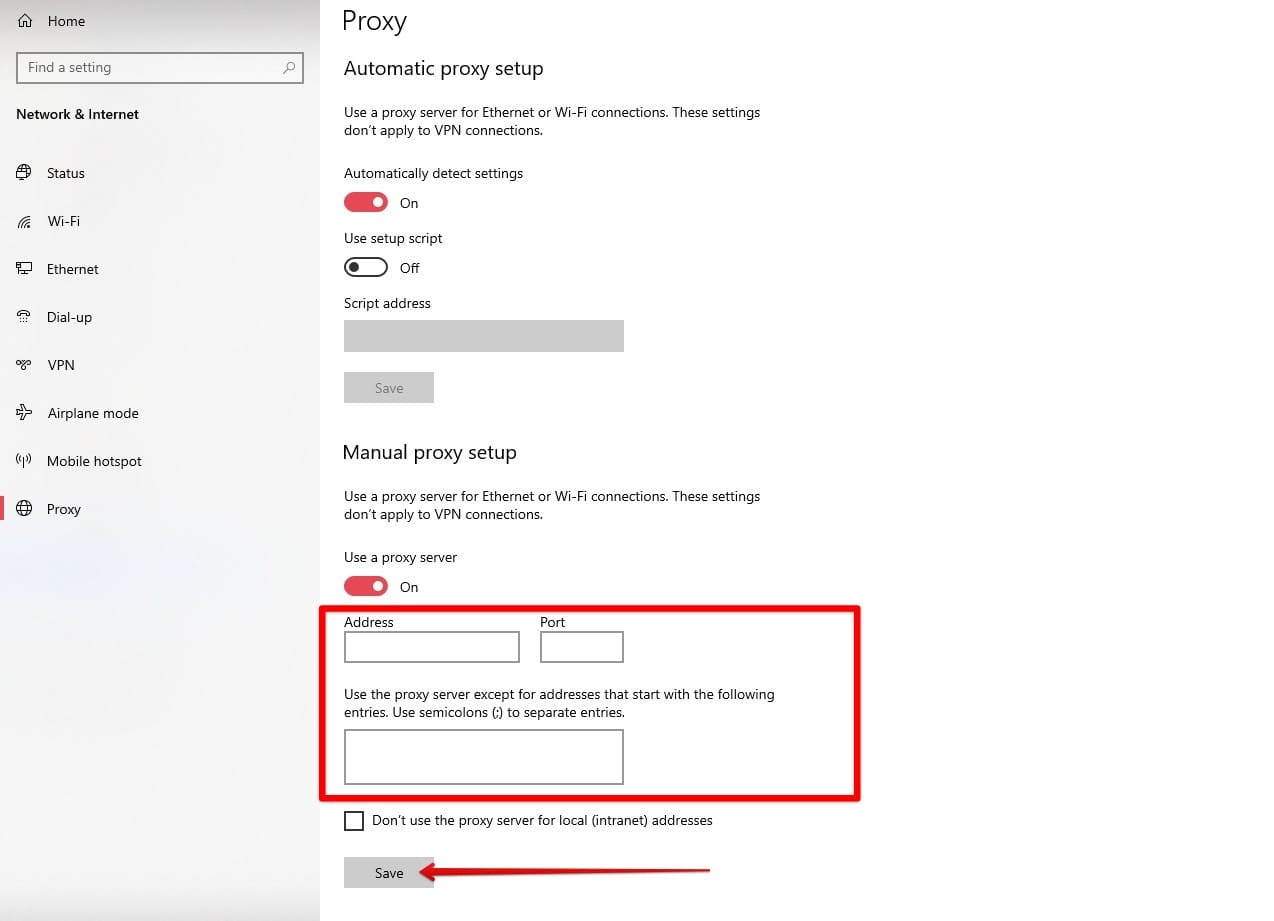
At this point, the goal is to enter the correct details for an actual proxy server developed and maintained by some authority. If you don’t have a proxy server to connect to, check out VPNOverview for some good entry-level options. The metrics that you’ll need to specify are “IP address” and “Port.” Check for other details as you finalize your choice of the free proxy server, such as level of anonymity, country, and speed. Click on “Save” when you’re done.

Manually inputting the details for the proxy server
That’s about it! After clicking the “Save” button and successfully entering valid information for a proxy server, feel free to fire up the Chrome browser and start surfing the web with more privacy than ever before. However, before letting you go, let’s review some other measures you can take to maximize your privacy when surfing the web.
Other privacy-oriented measures to take
Setting up a proxy server on Chrome is the way to go, but it shouldn’t be the only privacy-inducing measure that you should look into to make the browser more privatized. Your options are nowhere near exhausted, so we highly recommend checking out our guide to Chrome browser’s privacy and security settings for a clear depiction of what you can do in this regard.
Other essential tips and tricks include Site Isolation. This neat functionality separates the connection of your PC to a website, so in case the site turns out to be malicious, it won’t be able to steal the precious data that you’ve gathered from other websites, including the cookies that the Chrome browser has saved up on your end. Site Isolation is an experimental feature but can be enabled easily from the Chrome flags page.
Lastly, there’s the Do Not Track tool you can toggle on and do your part in terms of surfing the web more safely. Enabling this feature in Chrome adds a specific header to your web requests where websites are asked not to keep tabs on you. Of course, you have no control over how they respond in return, but it’s still worth an attempt, given the probable outcome.
Conclusion
Google Chrome is loaded to the brim with features, with the developers adding more and more with every stable release of the web crawler. From being able to sync your progress across Chrome on different devices to ensure seamless usability to using the reset functionality to restore default settings, the internet surfer is one to rely on; that’s what we’ve observed over the last decade of using Chrome.
In this guide, we’ve gauged how one can seamlessly set up a proxy server in Google Chrome to mask their IP address and breathe a little easier when browsing the wide interweb. Since there is no way to follow the procedure from Chrome’s built-in settings, you must tend to the operating system you’re currently using. Thankfully, Windows 10 makes it easier to set up a proxy manually to browse the internet.
Just ensure you’re using a valid server for the best results. If you found the guide valuable, comment below and share your feedback. Thanks for reading!
