Since its inception, Google Chrome has seen continual enhancement with time, where major browser iteration for the stable release brings something new to the table. Features such as Do Not Track, Sync, and Live Caption allow Chrome to offer a more cohesive experience. Still, the real facilitative functionality rests at the homestead of Google Lens—an AI-powered image tool that integrates profoundly with the Chrome browser.
In this guide, we’ll explain what Google Lens is and how you can benefit from it most. Lens is a feature-rich function of Chrome that can be used in various ways. Those new to the platform may find it difficult to unlock all of Lens’ features in one go, so the write-up will serve as a handy instructions manual for you to learn the ins and outs of the tool in question for the best results. With no further ado, let’s get right into it.
What is Google Lens?
As it turns out, Lens wasn’t always a native part of the Chrome browser’s user interface. The feature existed on the web as a separate site, accessible from Google’s search like any other domain. Over time, the company started to make changes on this front and, therefore, announced on September 29, 2021, that it’s working to integrate Google Lens with Chrome so that the functionality can work across the board in a built-in manner.
This significant change was implemented last year when Lens finally arrived at the forefront of Chrome, thereby making it easy for users around the globe to utilize the internet’s diverse offerings in a much more innovative fashion. It’s now as simple as ever to get into all that Lens has to offer, being a tool powered by AI and specializing in search capabilities. Along with the fundamentals of the Chrome browser, Lens also has received consistent upgrades as time went on.
Today, Google Lens makes it possible to search for images, so you can find their origin and discover lookalikes, impart text from photos, allowing you to copy and paste it, and finally, translate languages for you on the fly. It’ll work more intuitively than the Google Translate extension on that front. The fact that it pops up on one side of the screen within Chrome is just a massive productivity booster all on its own, thereby negating the need to launch an entire window.
That’s just the long and short of it, and we’ve yet to get into the full scale of Google Lens here. Follow along with the next section and learn how to utilize this feature to the best of its ability.
Using Google Lens in the Chrome browser
Lens naturally works within the Chrome browser, and users no longer have to access the desktop version of the functionality to utilize it. To get started, you have to hover your cursor over any image and right-click on it to bring up the overlay options. From there, choose “Search image with Google,” you should be able to launch Lens right after that. This will work for any image if you’re right-clicking on it.
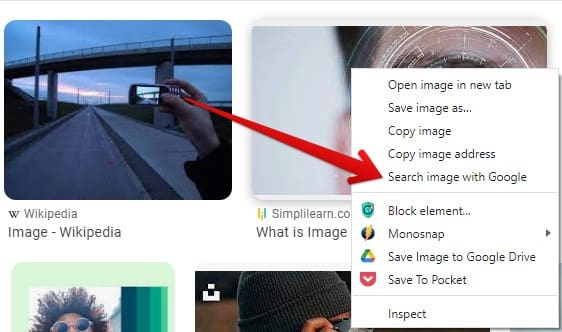
Initializing the Lens functionality in Chrome
After completing the previous step, you’ll observe that a side panel to the left side of the screen will appear, housing Google Lens inside. This is where you can enjoy a variety of features that the functionality offers daily. To simplify things, we’ve divided the major tools of Lens into different subsections, so you can find it easier to sift through them and absorb the forthcoming information without breaking a sweat.
Search
The very first portion of Google Lens’ functionality is “Search.” This feature is intended to find out a picture’s source or, in simpler terms, help the user discover where the photo is coming from. Situations such as being unable to put your finger on the name of a particular actor or actress or trying to find the name of a movie from a specific movie scene are examples of using Lens’ “Search” capability.
When you select the “Search image with Google” button after right-clicking on any image, the “Search” section will pop up first. It comprises a “Visual matches” area that presents you with results immediately, trying to match where precisely the photo is coming from. In our example, we’re trying to discover the actress’s name in the cinematic shot and the media she’s partaking in. Upon using Lens, we got our answers almost instantly.
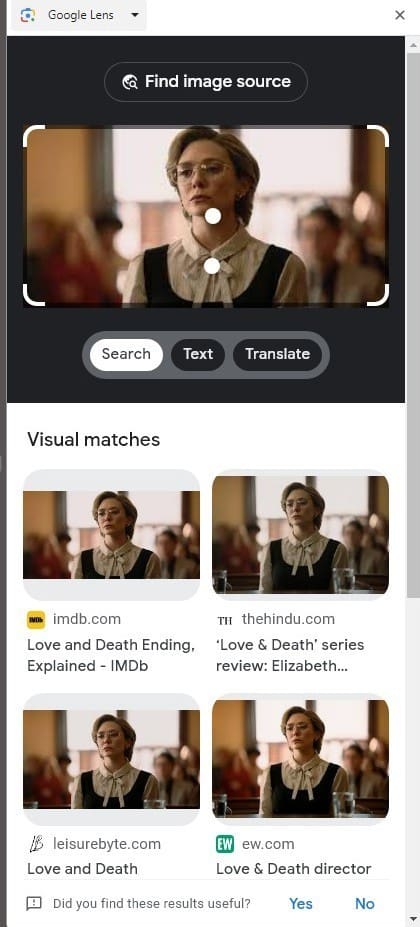
The “Search” feature of Google Lens
If the “Visual matches” section does not do the trick right away, feel free to click on the “Find image source” button to make Lens search for the picture on other platforms. This will allow you to dig up the source of the image, if it’s present on the internet, pretty quickly.
Text
Next up, we’ve got the “Text” feature to talk about, and this is nothing short of a boon for those whose work revolves around copying and pasting filler text off of images. If there’s a long-form statement you’ve found online embedded in a photo and it will take a lot of time to replicate manually, let Lens take control and make things uncomplicated for you. The starting procedure for doing that remains the same, but there is a different step to follow afterward.
Begin by right-clicking on the image comprising the text you wish to use and then selecting “Search image with Google.” Once done, the Lens side panel should pop up, with your next step being clicking the “Text” option. Choose that, and you should be good to go. Do observe that after switching to the “Text” section, the text will become highlightable, allowing you to move your cursor and select the text painlessly for copying.
Similarly, if you’d like to copy all of the text in one go, click on the “Select all text” option at the bottom section of the panel, and that should do it. From that point onward, feel free to copy your selection and use it anywhere. This is the primary purpose of Lens’ “Text” functionality.
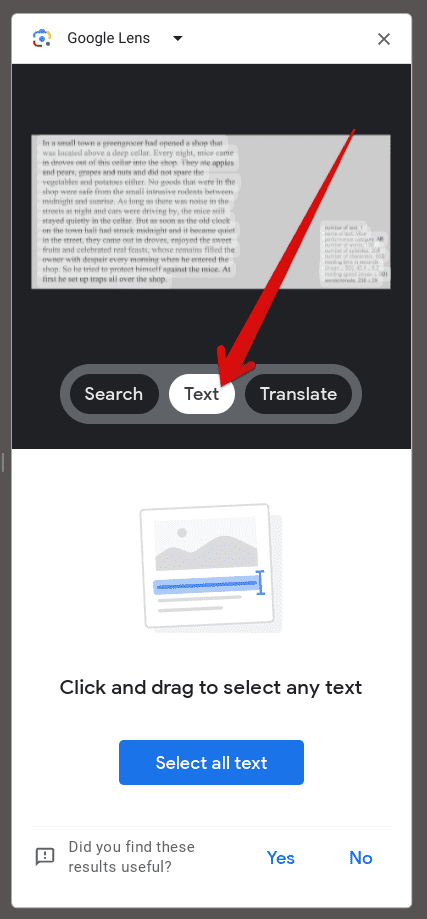
The “Text” feature in Google Lens
Translate
Last but not least, the final ace in the hole of Google Lens is “Translate,” an incredibly effective image tool that can help you receive translations on the fly without having to head over to the Google Translate functionality. The developers have integrated the Translate application into Lens for users’ convenience, and it’s also high time for you to learn its working mechanism.
The first step here is to find an image whose contents you wish to be translated into the language of your preference. Once done, right-click on it while staying within the Chrome browser and select “Search image with Google” again, similar to how you did it before. When the Lens panel pops from the side, choosing the “Translate” feature would be best to kick the translation into effect.
Again, Lens will provide additional tools to facilitate the user experience. After the text gets translated to the language of your preference, you can either choose to select all of it for copying and pasting or “Listen” for an added effect. The options bar at the top will also help you change the language you wish the text to be translated. Currently, Google Translate supports about 133 languages from around the world.
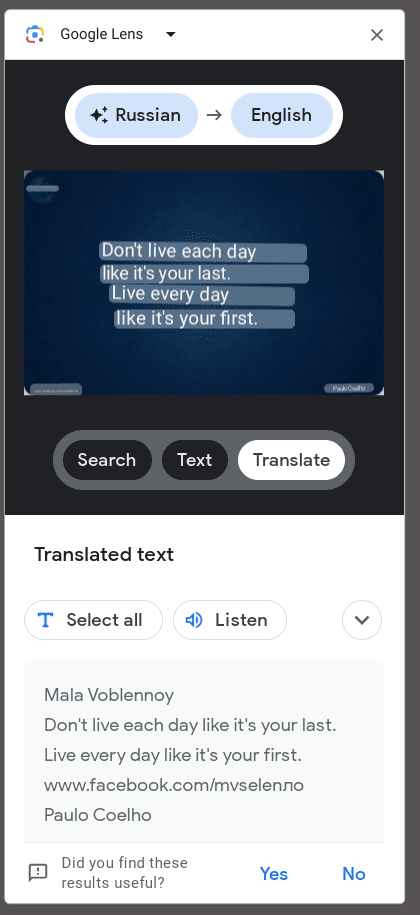
The “Translate” feature in Google Lens
That’s about it as far as the major functionalities of Google Lens are concerned, namely Search, Text, and Translate. It’s also possible to open the web-based version of Translate through the provided button should your operations get too lengthy to contain in the side panel. The button for that is beside the “x” icon, which shuts the Lens panel down before we top things off, though here’s how you can disable Google Lens on your PC, should you ever require to do so.
How to disable Google Lens in Chrome if needed
Since Lens has become a native part of Google Chrome, no in-built method is available to deactivate the functionality in the browser, although it’s likely for someone not even to approach the subject. Still, if you’d want greater flexibility on this front, there is a way to sort things out here. Embrace Chrome flags—experimental features in Chrome that haven’t made their way onto the stable release and are currently in a testing phase.
One Chrome flag called “#enable-lens-standalone” has been implemented to disable Google Lens in the Chrome browser. However, there are multiple other related flags that you need to get to to do away with the functionality in question. Start by typing “chrome://flags” into the address bar and pressing the “Enter” key. A new tab will load afterward, taking you straight to Chrome’s “Experiments” section.
Here, use the provided search bar and type in “Lens.” That way, all relevant flags that will assist you in disabling the feature will pop up. You have to click the toggle of each flag and click on “Disable.” Doing so should work like a charm, making it possible to use the Lens functionality no more in the Chrome browser.
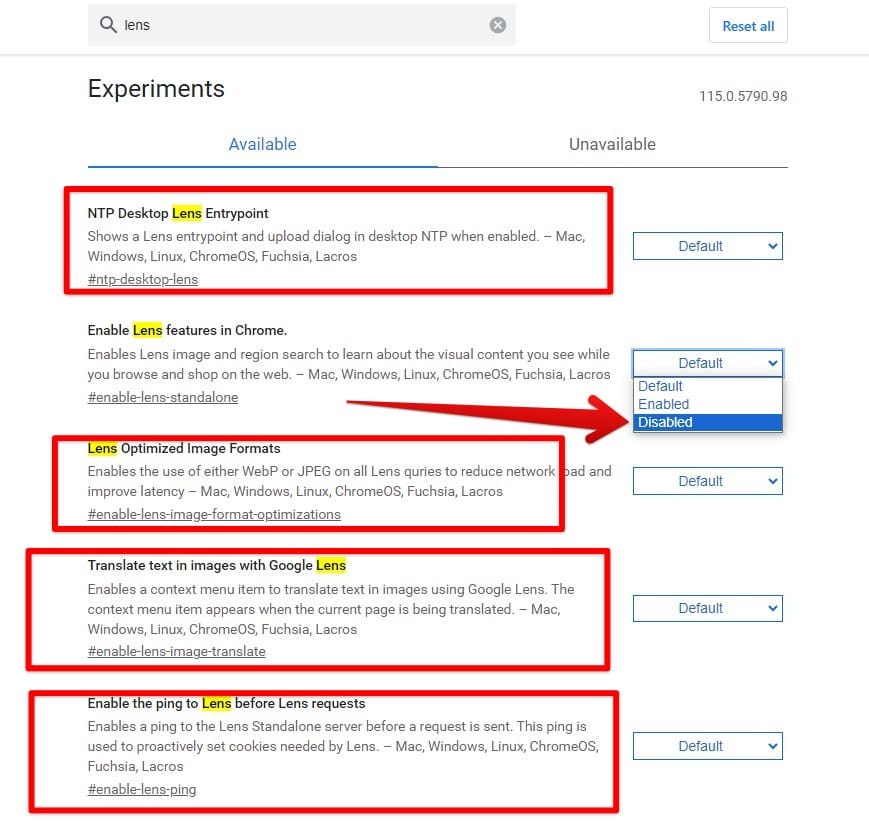
Disabling all Lens-relevant flags in Chrome
After you’ve made the required changes, the next step is to restart the Chrome browser to apply the relevant effects. A prompt at the bottom of the screen will help you get that done instantly. Click the “Relaunch” button, and the process should be complete.

Relaunching the Chrome browser
Conclusion
From comparing the Chrome browser to other web crawlers and coming out on top to utilizing the address bar of Chrome to unleash its full potential, there hasn’t been a better time to be a Google Chrome user day in and day out. The developers constantly try to keep the internet surfer hard and fast with easy-to-use features and tools, with Google Lens being one of them. This tool started on mobile operating systems and eventually found a home on desktops.
In this guide, we’ve explored Lens in-depth, talking about its significant features that millions of users utilize routinely. The Search, Text, and Translate functionalities all come together to provide a robust and reliable user experience that we can benefit from in times of need. Do let us know in the comments section below whether the write-up helped you. Thanks for reading!
