From utilizing Google services to the full to unlocking the power of the Chrome browser’s omnibox, the web crawler at hand is loaded to the brim with features, such as voice search, sync functionality, and an in-built screenshot tool that captures snapshots on the fly. Moreover, Chrome, throughout its lifetime, has emphasized customizability as well, allowing you to switch up the style of the font and modify its size in the browser as well.
Suppose you’ve been meaning to do that but can’t figure out how to, let this guide light the way for you ahead. We’ll go through the necessary measures that you can take to change your Chrome’s current font size and style in case you’re not super satisfied with it. By the end of the tutorial, we’ll also shed light on some other ways you can customize the Chrome browser significantly. With no further ado, let’s get started right away.
Customizing Chrome’s font size and style via native settings
Thankfully, changing how Google Chrome’s font appears is pretty straightforward. The gist is that you go to the “Settings” section of the browser, followed by entering the “Appearance” section. From there on out, you can painlessly alter the size of Chrome’s font and proceed toward changing the font style as well. Let’s break down each instance into different sections, so you can comprehend how to move forward accordingly.
Changing the size of the fonts in Google Chrome
Start by opening the Chrome browser and clicking on the “Customize and control Google Chrome” button, shaped like three vertical dots spaced together, and present in the top-right corner of the screen. Once clicked, a swath of options will appear on the screen, allowing you to click on “Settings.” Alternatively, if you’d prefer using a keyboard shortcut key combination, press “Alt” and “E” together, followed by pressing the “S” key.
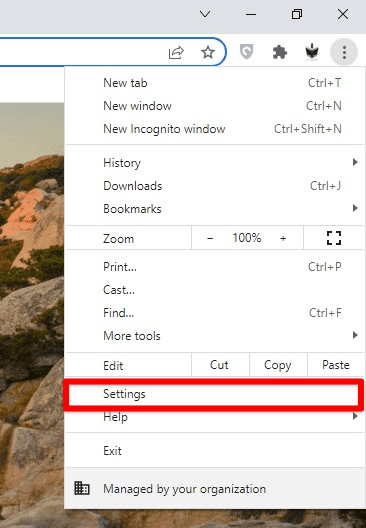
Opening Google Chrome’s “Settings”
You should now see a new tab loading on the screen, making you enter the “Settings” section. Look to the side column to the left and select “Appearance” to proceed. It’s right below “Security and Privacy.”
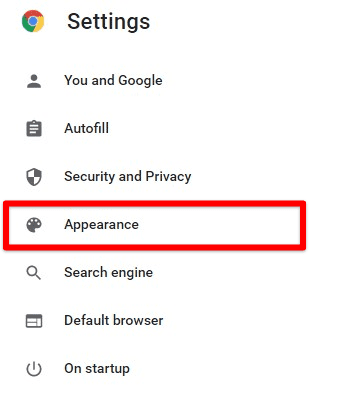
Choosing the “Appearance” tab
As you’re taken to the “Appearance” area on Chrome’s “Settings” page, look for the options at the bottom half of the zone in question. You’re going to observe “Font size,” “Customize fonts,” and “Page zoom.” Let’s start with the font size here. Click on the provided toggle, which probably should say “Medium,” given that’s the default setting. Once done, multiple options should surface on the screen, making it possible for you to choose between them effortlessly.
Check out each option since the change is made on the fly. You can choose between “Very small,” “Small,” “Medium,” “Large,” and “Very large.” Click on any option, and you’ll be done with the size facet of your Chrome browser’s font. The ideal choice here might differ, depending on your screen size and resolution.
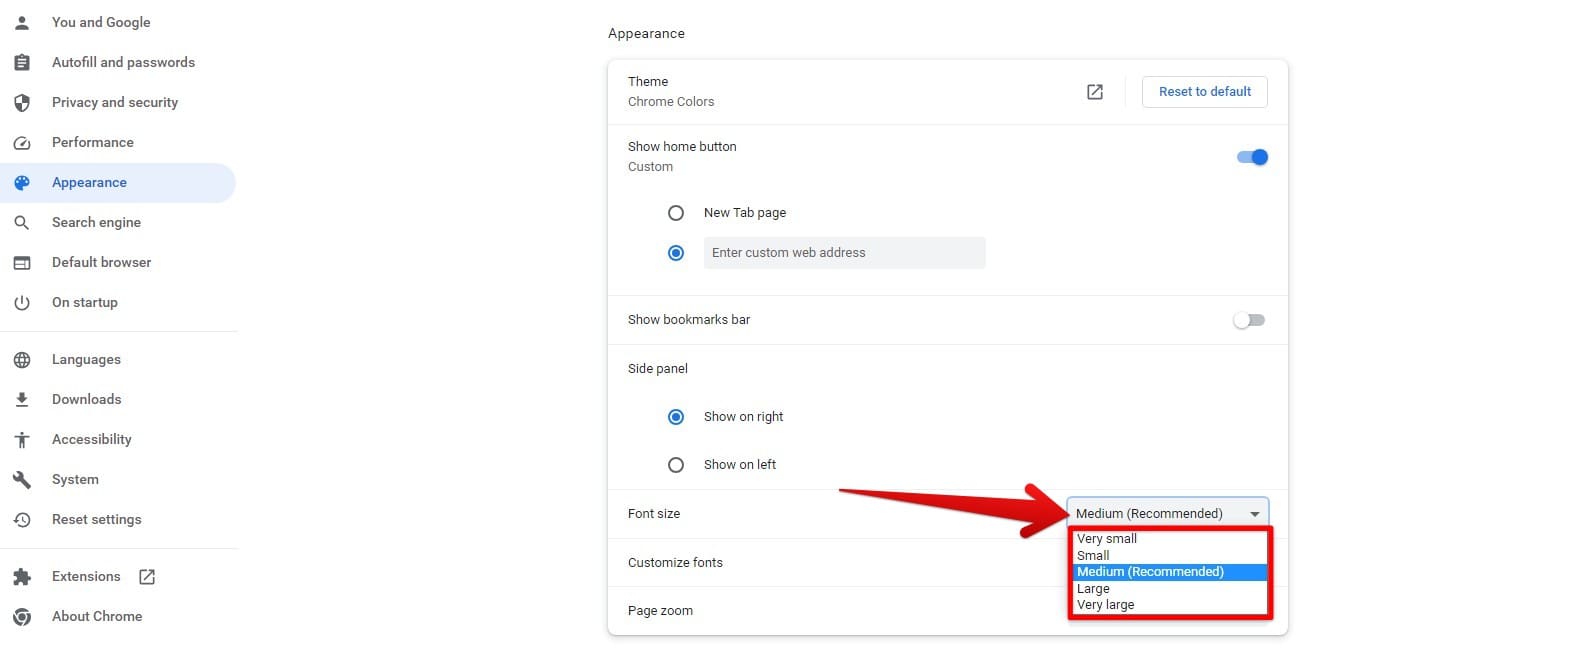
Changing the font size in Chrome
Changing the style of the fonts in Google Chrome
Next up, we’ve got the font style to discuss, and this is where things can get interesting. To get into the section where you can customize the font, choose the “Customize fonts” area under the “Appearance” section. You’ll be taken to the relevant site automatically.
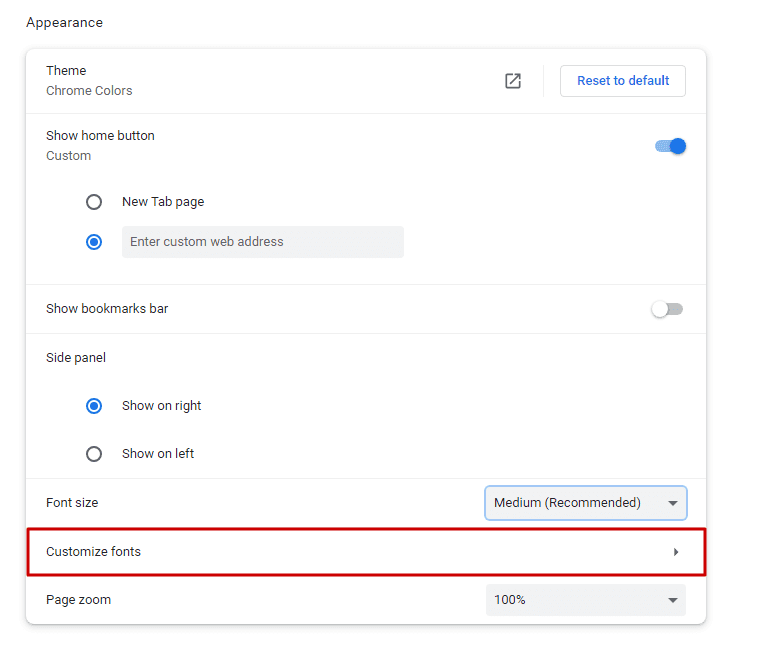
Clicking on the “Customize fonts” section
You can change how the font appears on this page on the Chrome browser. Begin by tweaking the font size and the minimum font size from the top of the area. Use the provided slider to make the relevant changes. We recommend keeping the “Minimum font size” to a low point for the best results. Moving on from there, you can start changing the different types of font you see on the screen when using the Chrome browser.
Begin with the “Standard font,” set to Times New Roman by default. Thankfully, there are loads of different choices to get into here, ranging from the likes of Cambria, Cambria Math, Arial, Sitka Text, Sitka Small, Symbol, Tahoma, Sylfaen, and Impact to Georgia, Gadugi, Segoe Print, Segoe Script, Segoe UI. Take your time with the options and choose the one that looks the best to you. There is an example sentence provided at the bottom of each font setting.
That will illustrate the differences between one font and the other. After having your way with the “Standard font,” move forward to “Serif font.” The alternatives that you will have to check out include “Sans-serif font,” “Fixed-width font,” and “Mathematical font,” as well. Feel free to exit the page and observe your changes as soon as you’re done.
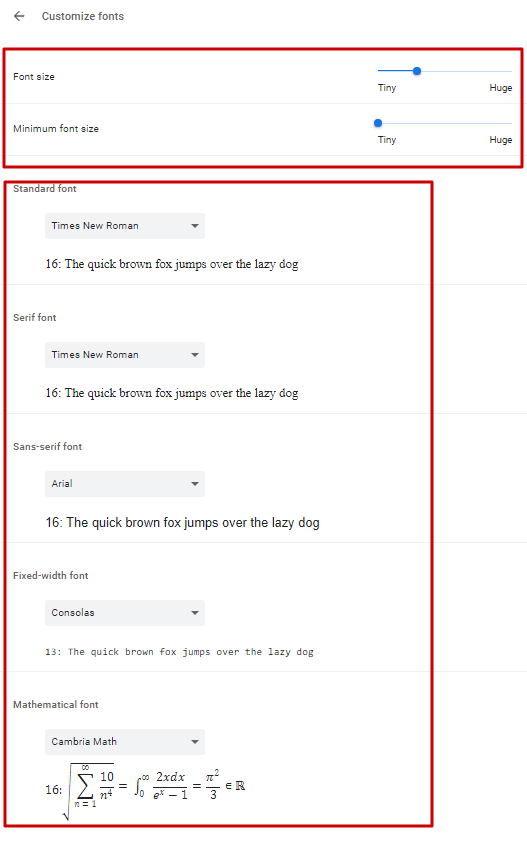
Customizing the style of the font
That’s all there is to tweaking the font style in Google Chrome. Before we top things off, you should also look into changing the on-page zoom, which is a significant part of how text appears in the Chrome browse.r
Changing on-page zoom in Chrome
By receding to Chrome’s “Appearance” section, you can seemingly acquaint yourself with another well-spirited Chrome function called “Page zoom.” This metric determines how much zoomed-in each page appears on your end. Again, there is a diversity of different options to go after here, starting from 25% and going all the way to 500%. Depending on your use case and overall preferences, the default setting of 100% may not work for you.
Experiment with the options available to see if any other zoom level will appeal more to your workflow.
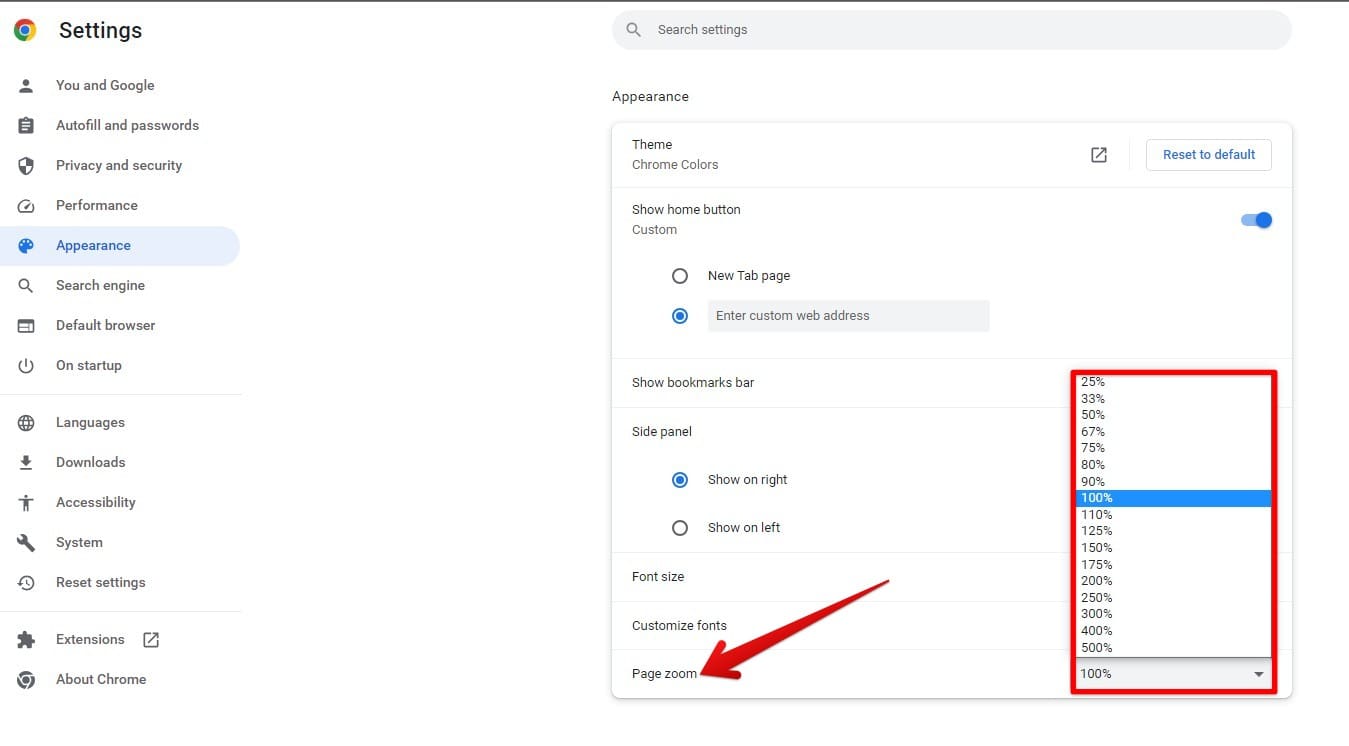
Optimizing the page zoom in Google Chrome
Changing Chrome’s font size and style with the help of dedicated extensions
While we’ve gone through the basics of the matter already, it’s worth talking about some of the advanced steps you can take to change how Chrome’s font appears and even alter the browser’s standing as a whole. As soon as you’re done with the fundamental settings options, try indulging in the world of Chrome Web Store extensions next. Lucky for you, we’ve gathered two high-quality options to try out on the Chrome browser.
Let’s go through both of these individually, so you can comprehend how to proceed from here on out. Although the names of the add-ons are similar, there is a distinction between them that sets them apart.
Extension 1. Font Changer
Font Changer is the first Chrome Web Store extension you can try. It’s simple, lightweight, and sports a user-friendly interface that ensures an all-inclusive working environment. Moreover, the application has been featured on the Chrome Web Store, with a star-studded rating and positive feedback from reviewers. To install it, go to its official extension page and click “Add to Chrome” when you get there.

Adding Font Changer to Chrome
A prompt should surface on the screen after you click the “Add to Chrome” button. It’ll verify whether you want to proceed with the installation or not. Select “Add extension,” and the download should begin momentarily. Once the extension has been installed, launch it from the extensions toolbar and pin it to the area while you’re at it to ensure easier access.
Given the extension’s user interface, you will require just a couple of clicks to be done with it. Begin by first selecting the font style, followed by altering the variation of that font. You can also toggle the “Enable on current domain only” if you wish to apply the changes to other sites.
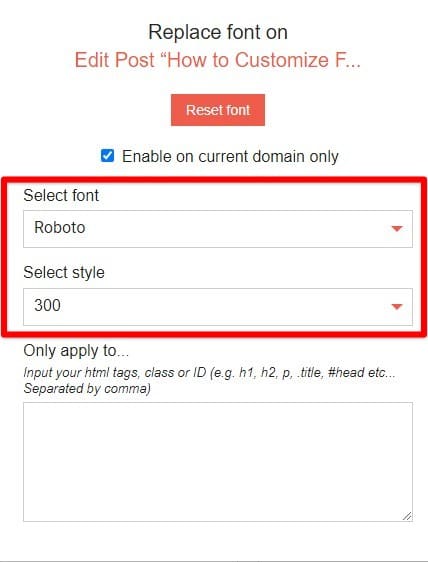
Selecting the font of preference with Font Changer
Extension 2. Fonts Changer
The other major extension that can help you with Chrome’s appearance is Fonts Changer (mind the “s”). This one is relatively more popular on the Chrome Web Store than its counterpart, boasting more reviews and a higher review count. The process for installing the add-on will stay similar to the previous one. Go to the add-ons page on the Chrome Web Store and click the “Add to Chrome” button to get started.

Installing the Fonts Changer extension
Like before, a prompt will make its way onto the screen, asking whether you’d like to continue. Affirm it by choosing “Add extension” and Fonts Changer should be installed at a moment’s notice. Once it does, fire up the application from the extensions toolbar to get right into font customization from the Chrome browser. Right off the bat, it’ll be easy to notice how the layout of Fonts Changer’s interface is bigger and more intuitively designed than the previous one.
With that said, if we’re to put things into perspective, the interface isn’t as simple as Font Changer’s, which is the previous extension we talked about. The major benefit of font-changing extensions, though, is that they can also change the font of websites. Choose from the many options available and see what you like. Go with those tweaks subsequently.
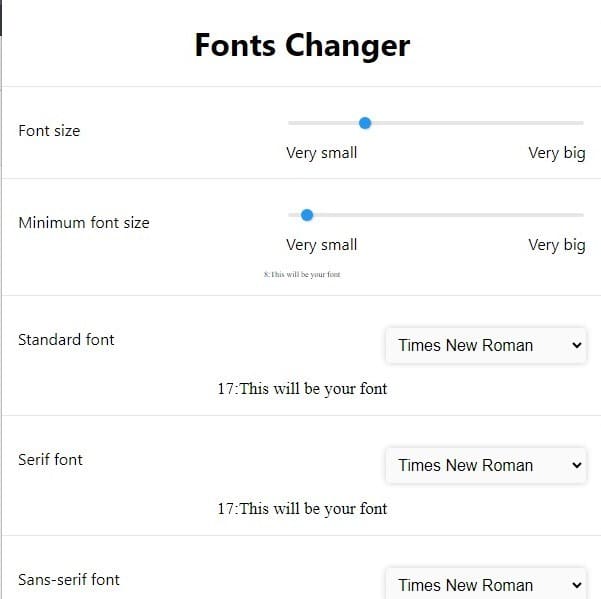
The Fonts Changer extension
Some of the other exciting ways to customize Chrome easily
While it has been easy enough to switch up the integral parts of your font in Chrome, that’s hardly all you can do to make the browser glow up like never before. Outside of system tweaks for integral performance, you can modify Google Chrome’s push notifications to make them appear per your preferences. In addition, the real deal here lies in the overall appearance-centric customizability of Chrome, which encompasses a myriad of parameters.
These include the wallpaper, the background colors, and what we’ve focused on in this guide—the fonts. Additionally, you can also change Chrome’s toolbar, which consists of the URL bar, otherwise called the omnibox, and the extensions toolbar as well. Our favorite adjustment relates to customizing the New Tab background on Google Chrome since it possesses the potential to set you in the mood and freshen you up with its liveliness.
Conclusion
The Chrome browser is reliable, speedy, and universally compatible with various applications and features. On the customization front, we’ve shown you in the write-up that the web crawler can be modified in multiple ways. Starting with the size of the font, the article has continued until the font’s style, showcasing the numerous options available at your disposal in terms of changing how the text appears on Chrome.
Alongside that, there are other approaches to make the browser a stand-out application on your end. This will involve some effort, but thankfully, changing the wallpaper and theme on the internet surfer is a walk in the park. While you’re at that, check in with your extensions to determine which ones can be regulated and what options have to see the exit door.
Do comment down below and tell us whether the guide helped you out. Thanks for reading!
