The Chrome browser is a multi-platform tool many people use on different devices. When that happens, the famous internet crawler automatically stores the preferences, data, and other browser settings that you’re using, so when you launch Chrome on another device, the experience remains the same for you—fast, smooth, and utterly familiar. Now, Chrome has been made capable of doing this with the help of the “sync” feature, which is tied to your Google account.
In this guide, we’ll explain what sync means in the context of Google Chrome and how you can toggle it on for cross-platform data carry-over without breaking a sweat. While maximizing what you can do with Chrome by using related services is recommended, having the sync function up and running is second to none for ensuring an unhindered user experience. With no further ado, let’s get right into it.
How does syncing help in Google Chrome?
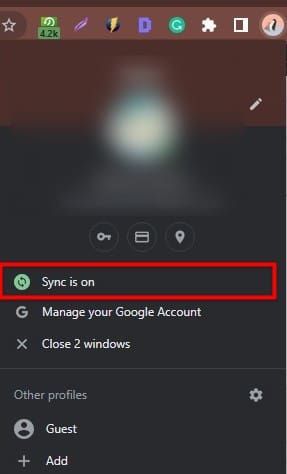
The “sync” feature in Google Chrome
The word “sync” is shorthand for synchronization. It’s a terminology that refers to the process of two or more instances happening simultaneously in different locations or devices in the context of computing. When we talk about enabling sync in Google Chrome, we highlight how your saved preferences can move over to another device should you choose to use the browser on two different devices simultaneously on some occasions.
That said, this does not mean that your Chrome profile on the first device will be removed. It will always stay there unless you sign out and sign in with a different Google account. That is to say, your saved data, browsing history, cookies, browser settings, bookmarks, installed extensions, theme, and wallpaper all are affiliated with your Google account and, therefore, stored in the cloud.
Moreover, using a singular Google account with Chrome means that you get to automatically sign into different Google services, such as YouTube, Google Workspace software such as Docs, Sheets, and Slides, along with Gmail as well. In addition, if you’ve opted into the “Web and App Activity” program, syncing your Chrome data will allow you to receive more tailored suggestions based on your usage of other Google services, which include Maps, Translate, and even Lens.
One of the most significant benefits of the functionality at hand arises in cases where you lose your phone or laptop. As long as you remember your sign-in data or credentials of your Google account, your Chrome data is going nowhere. Signing into any other device afterward means you get the same experience driven back to you, with all your stored preferences re-appearing like they were never gone.
That’s the whole point of enabling sync in Google Chrome. In the next section, we’ll learn the exact steps of how this can be achieved easily.
Enabling sync on the Chrome browser
Toggling the sync functionality in the Chrome browser is as easy as ABC. All you have to do is enter the “Settings” section, followed by entering the “Sync and Google services” area in the “You and Google” tab. From there on out, it’s painless to enable sync in Google Chrome and manage the different aspects of your browser that get synced to the Google account. There’s also an additional option to encrypt your synced data here.
This was just the gist of the process. The steps outlined will dive deep into what you need to do to enable sync in Google Chrome. Make sure to follow until the end diligently.
1. The first step after opening the Chrome browser is to click the “Customize and control Google Chrome” button in the top-right corner of the screen, followed by clicking the “Settings” button. If you’d like to use shortcut keys, press “Alt” and “E” to bring up the menu, and use the “S” key afterward to get to the next step.
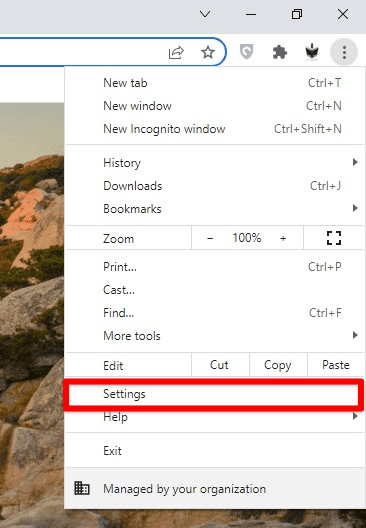
Opening Google Chrome’s “Settings”
2. As soon as you’ve tapped into the “Settings” section, the area that you’ll automatically be taken to within the latter is “You and Google.” Click the “Sync and Google services” button to move forward here.

Accessing the “Sync and Google services” section of the Chrome browser
3. Now that you’re in the “Sync and Google services” area, you’ll observe different sync-related features to get into. Let’s take this one step at a time so it’s easier for you to absorb everything that’s about to come. The first thing you must check is whether the sync feature has been enabled in the first place. If it is, you will notice the green-colored sync icon in one corner of your profile photo at the top of the page.
If not, you’ll see an option to turn on sync and several details where Google explains the benefits of enabling this functionality. Moreover, feel free to look into the “Other Google services” area now that you’re in the section to enjoy some of the other features of Chrome simultaneously. Please note that you must sign into your account after attempting to toggle the sync functionality.
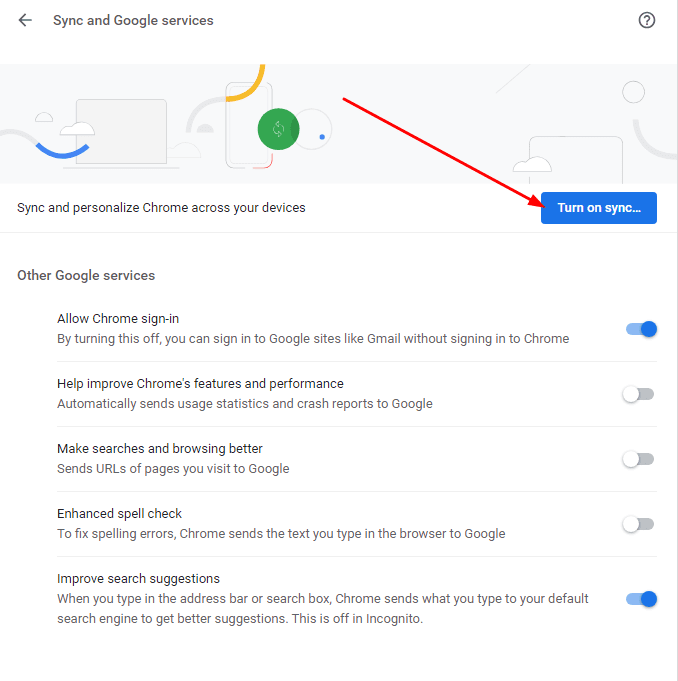
Enabling the “sync” feature in Google Chrome
4. To continue systematically after enabling sync in the Chrome browser, click the “Manage what you sync” subsection.
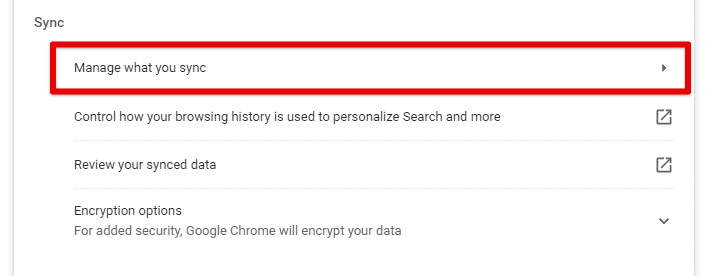
Clicking on “Manage what you sync”
5. A list of different items should surface on your end now, allowing you to go through the different parameters that can be synced to the cloud thanks to the footprint of your Google profile. By default, there are two settings that Chrome puts forth here—”Sync everything” and “Customize sync.” The former does exactly what its name suggests, while the latter lets you control the type of data stored securely, so when you log into another device, that parameter is not lost.
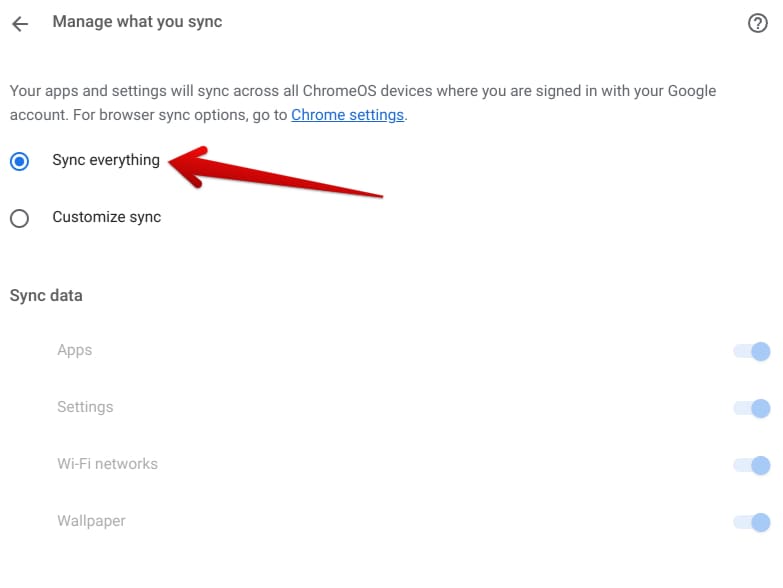
Adjusting sync options for data backup
6. If you’re syncing data for the first time, allow some time for the browser to back up your data. In the meantime, go back to the previous page and look into the encryption options available for your safekeeping. You can encrypt the passwords you’ve saved with your Google account or opt for a sync passphrase by clicking on the relevant option. This is a robust method to safeguard your data and ensure anything sensitive does not fall into the wrong hands.
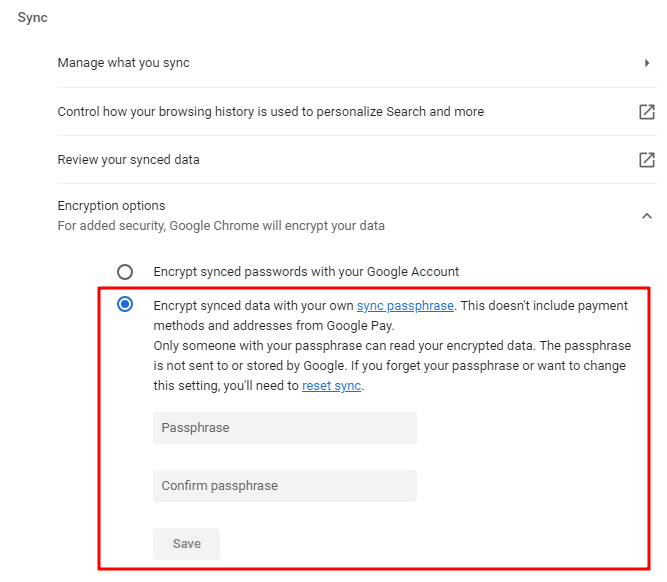
Setting a sync passphrase in Google Chrome
7. By this step, your data should be synced by now, so it’s logical for you to review exactly what has been synced. Back on the “Sync and Google services” page, click the “Review your synced data” option, and you can open a new tab in the Chrome browser.

Reviewing the synced data in Chrome
8. You should now be able to visualize a list of items about your profile synced to the cloud across all your devices. At this point, you can log in on any PC or phone and find that the same data has carried over from your previous device to the new one. Google keeps the browser’s usability pretty seamless thanks to the sync feature.
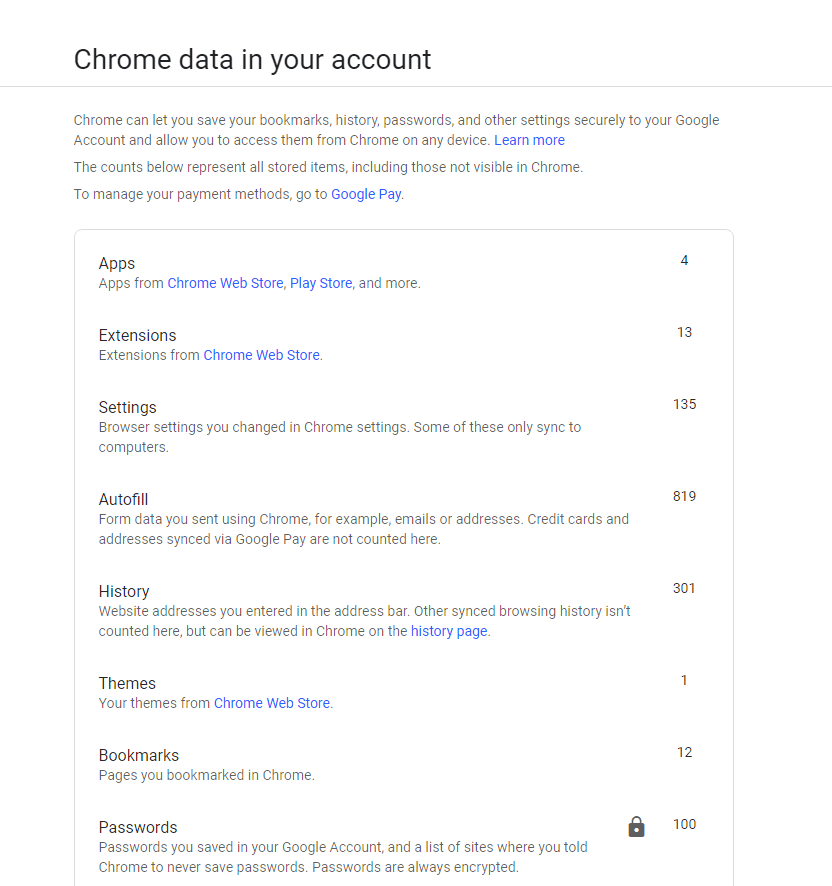
Some of the data that has been synced to the Chrome browser
A word on security
You need to note that while the sync feature is thoroughly convenient for users and thoughtful from the developers’ side, it can sometimes function as a double-edged sword, but only if you’re not careful. Google recommends not to use the tool on devices you do not own. For instance, if you’re using a public computer, try not to sign in with your Google account unless it’s urgent and an absolute necessity.
What you can do in place of signing in is use the Chrome browser’s “Guest mode” feature. This specialized way of using the Chrome browser is meant to guarantee the anonymity of the user by leaving no trace of history, bookmarked pages, or even cookies., kind of like the Incognito Mode. Those who prefer keeping their browsing private by taking measures such as the Do Not Track functionality may also utilize the Guest mode to benefit from Chrome’s various services.

The Guest mode in Google Chrome
How to turn off the sync feature and clear your data in Google Chrome
At a time when you feel you need to get rid of the constantly operating sync feature of Google Chrome, you should know the preliminary steps of the procedure. After all, managing the data so it doesn’t fall off your radar and into the grip of someone else unaccounted for is a responsibility you have to take. Thankfully, there are fail-safe operations to consider looking into if and when things go wrong, such as disabling sync and clearing your synced data.
To start with the latter, head to the “Sync and Google services” and select the “Review your synced data” option again. As the new tab opens on your end, scroll down until you see the “Clear Data” option. Select it to get to the next step.

Clearing all synced data in Chrome
A prompt appearing on the screen will ask for confirmation whether you’d like to continue with this decision. Carefully assess the situation and click on “OK.” There’s going to be no turning back from here on out.
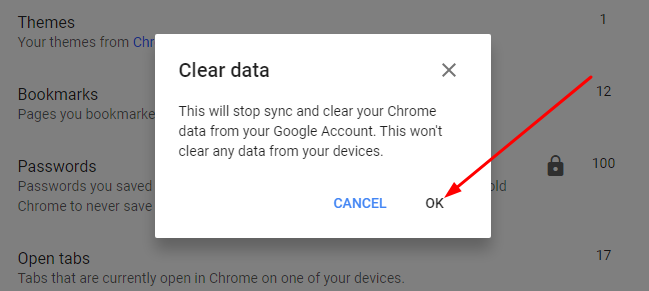
Clicking on “OK”
Disabling sync signs you out of your Google account, so remember your credentials as you proceed. To begin, access the “Sync and Google services” section in Chrome’s settings and click the “Turn off” button to get to the next step. We advise proceeding with the procedure after you’ve cleared your synced data for the best results.
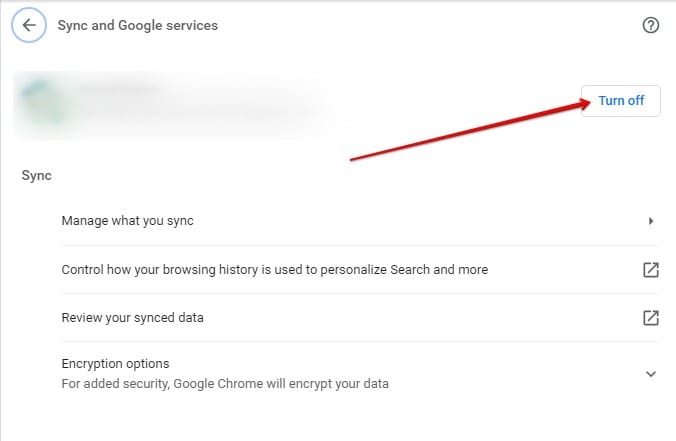
Disabling sync in Google Chrome
Once done, a prompt will surface on your screen, allowing you to read through the consequences of turning sync off on Chrome. If you look at a facilitative option at the bottom section of the prompt, there’s a checkmark that will help you get rid of your browsing history, bookmarks, and other pertinent data on the spot, leading to a crisp and clean Google Chrome.
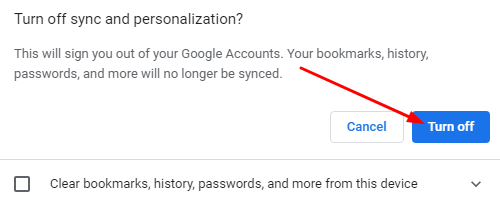
Confirming the prompt
Having your synced data cleared and the sync functionality turned off will give you heightened security. Remember, whenever you feel comfortable again on a device you have, enabling the sync feature again is plain and straightforward.
Conclusion
From backing up and syncing your memories on Google Photos to syncing multiple calendars for better organization in Google Calendar, most cloud-oriented Google apps benefit greatly from the functionality. The Chrome browser relies too heavily on this technology to ensure a smooth experience for users worldwide, streamlining their usability no matter their device.
In this guide, we’ve gone in-depth on the process of enabling sync in Google Chrome, along with other sections discussing important information about the functionality. Since privacy and security should be your top priority, enable sync on devices you trust. Do comment down below and tell us whether the write-up helped you out. We would love to read your feedback!
